My time
Sinopse
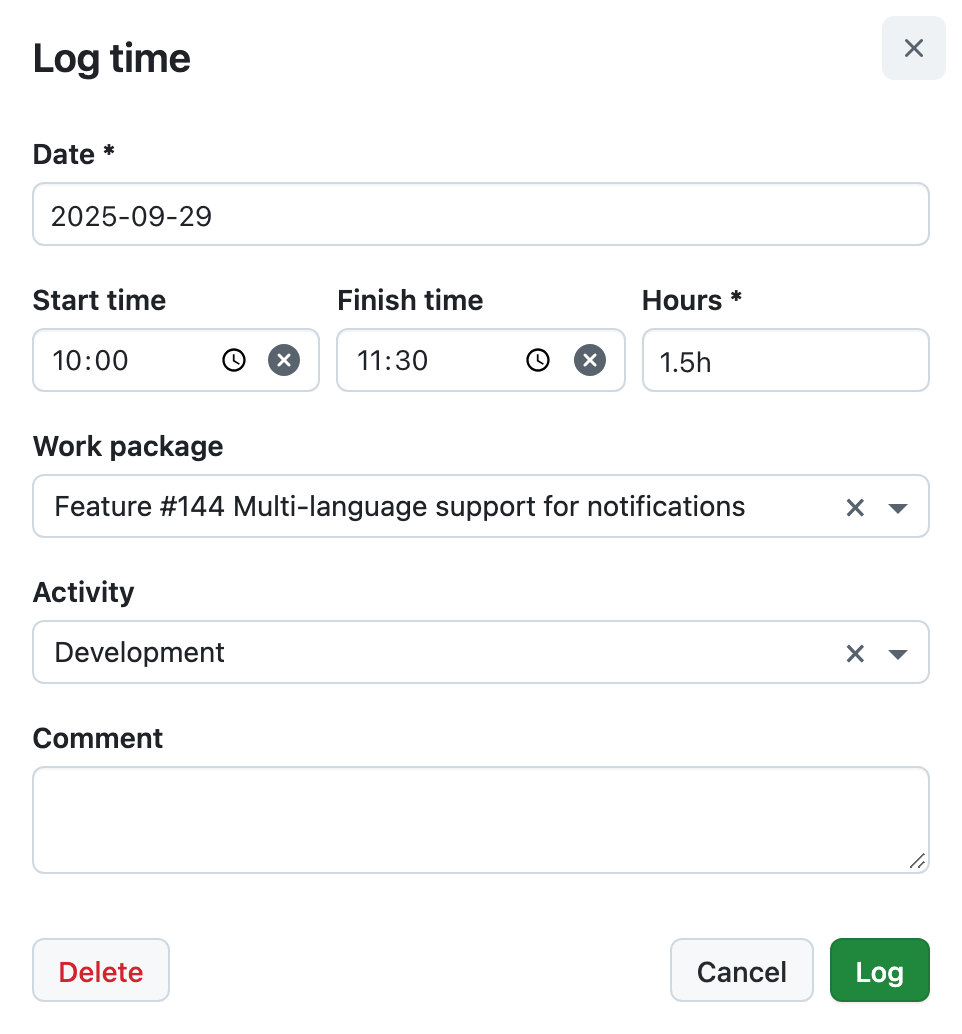
The My time module offers a clear overview of your personal time entries and the work that is allocated to you. Pode registar rapidamente as horas diretamente a partir desta página. To access it, select My time from the left-hand menu.
Alternatively, click the grid icon in the top left corner and select My time from the overlay menu that will open.
My time page filters
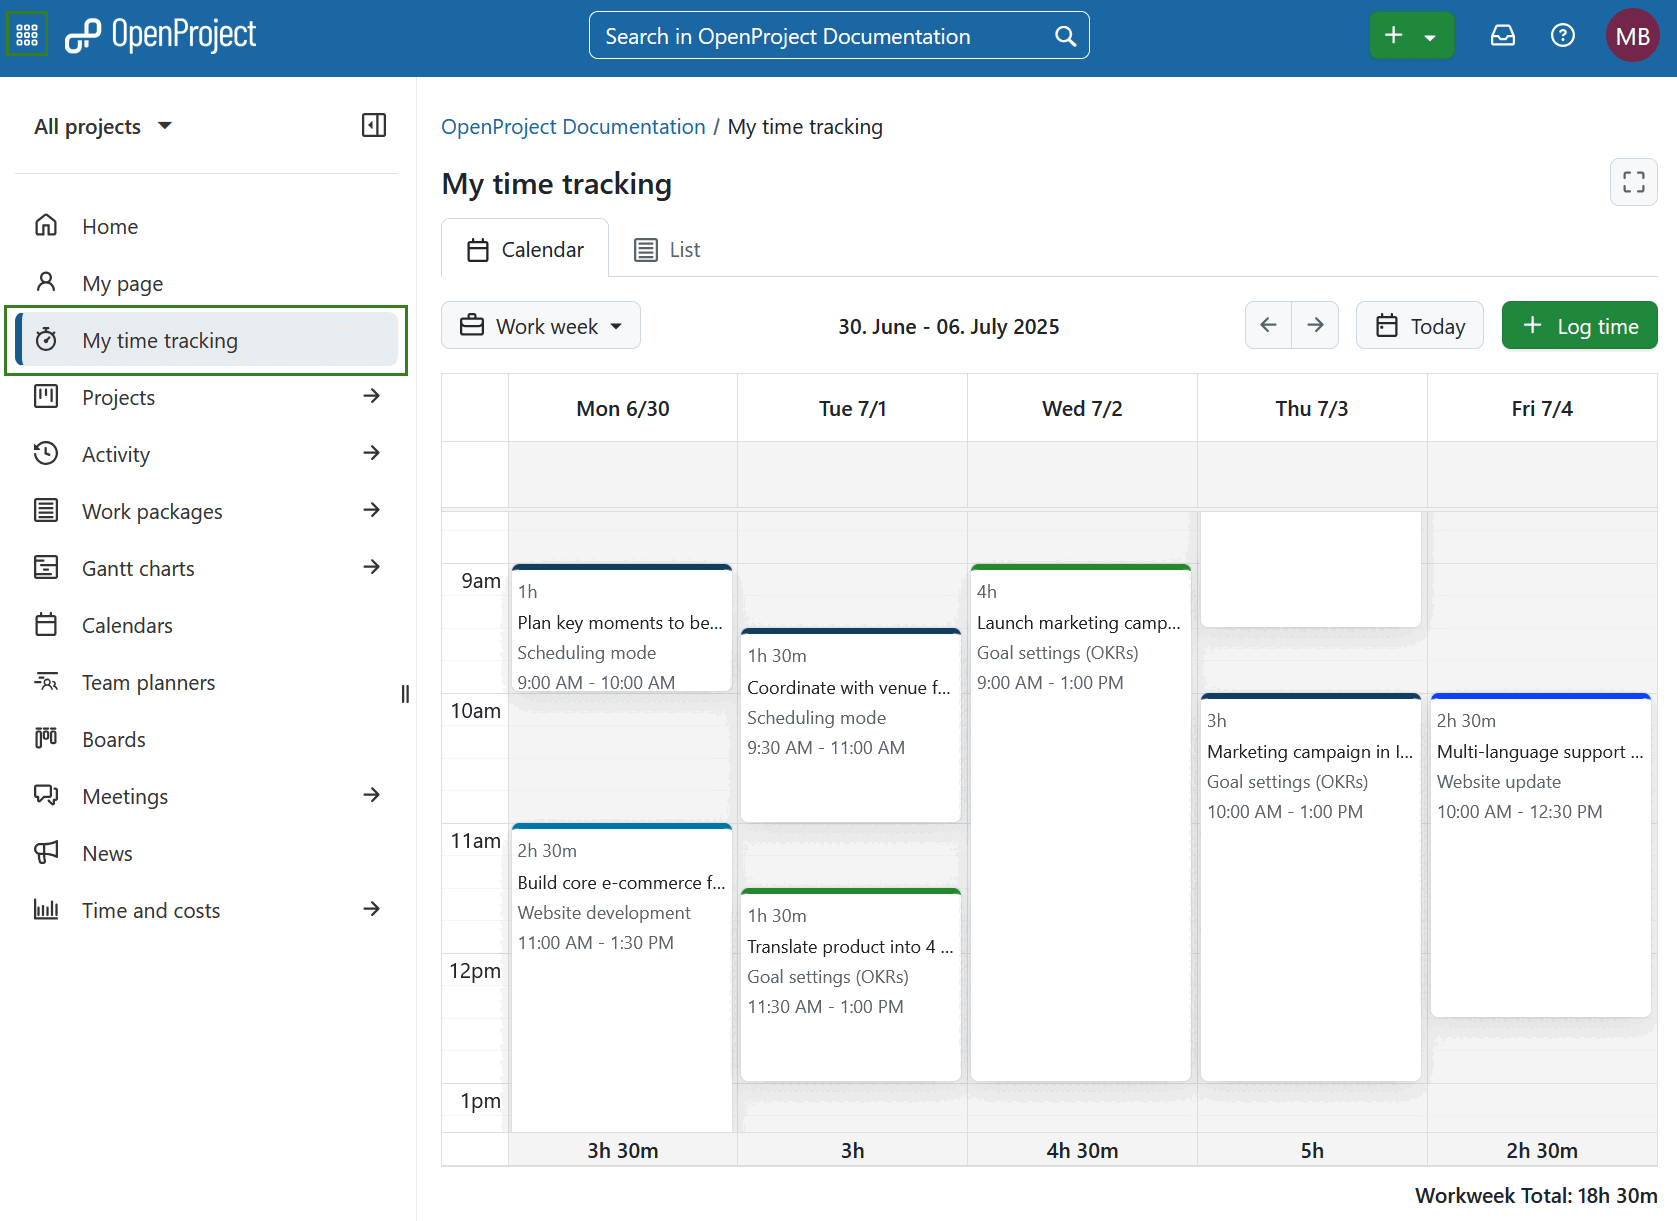
- On the My time page, you’ll find the following interface elements:
- Botão Modo Zen - alterna para uma vista sem distrações.
- Tab selector — switch between Calendar, List and Stack views.
- Menu pendente Nível de zoom - selecionar a escala de tempo para a vista. Estão disponíveis as seguintes opções:
- Dia
- Semana de trabalho
- Semana
- Mês
- Intervalo de datas apresentado - mostra o período visível.
- Setas de navegação - deslocam-se para o período de tempo anterior ou seguinte.
- Botão Hoje - salta diretamente para o dia atual.
- Botão + Registar tempo - adicionar um novo registo de tempo.
If Resource management is available, an additional dropdown menu next to the zoom level lets you choose which entries are displayed:
- All entries
- Logged time only
- Allocations only
OpenProject remembers the view and zoom level you used last and it will be used when coming back to the My time section.
Vista de calendário
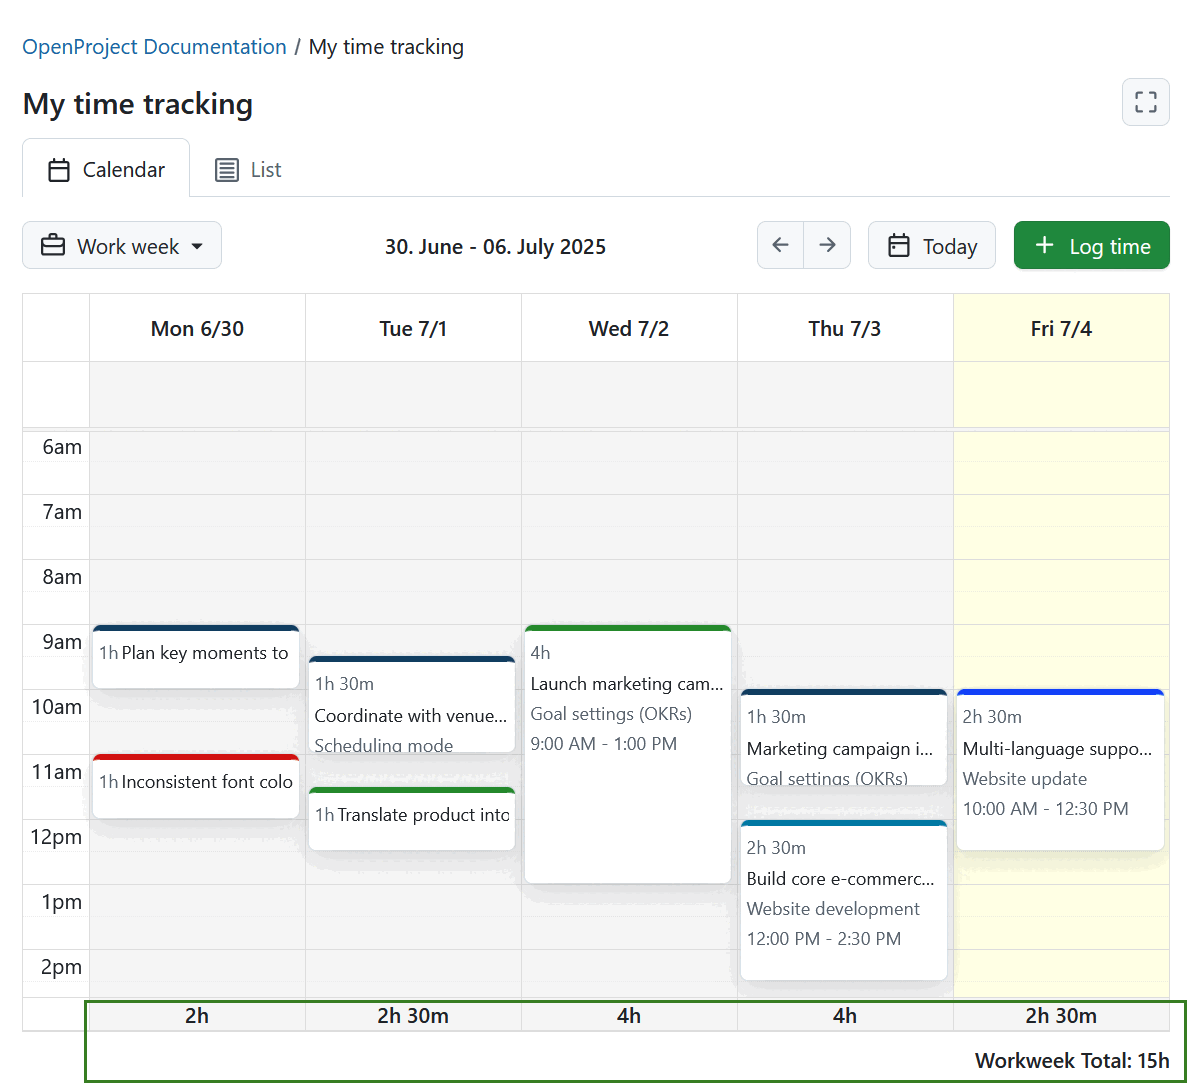
A vista Calendário abre-se por defeito se as horas de início e de fim dos registos de horas tiverem sido ativadas em Administração do sistema. Pode ajustar o nível de zoom com o menu pendente, com opções para Dia, Semana de trabalho, Semana ou Mês. O dia atual é destacado.
Os registos de horas aparecem nos dias correspondentes em que foram registados. As cores de entrada refletem o tipo de pacote de trabalho associado ao tempo registado.
Na secção superior de cada dia do calendário, existe uma área dedicada que permite registar o tempo sem especificar uma hora de início ou de fim. É útil para entradas rápidas ou para registar o esforço que não está ligado a um intervalo de tempo específico.
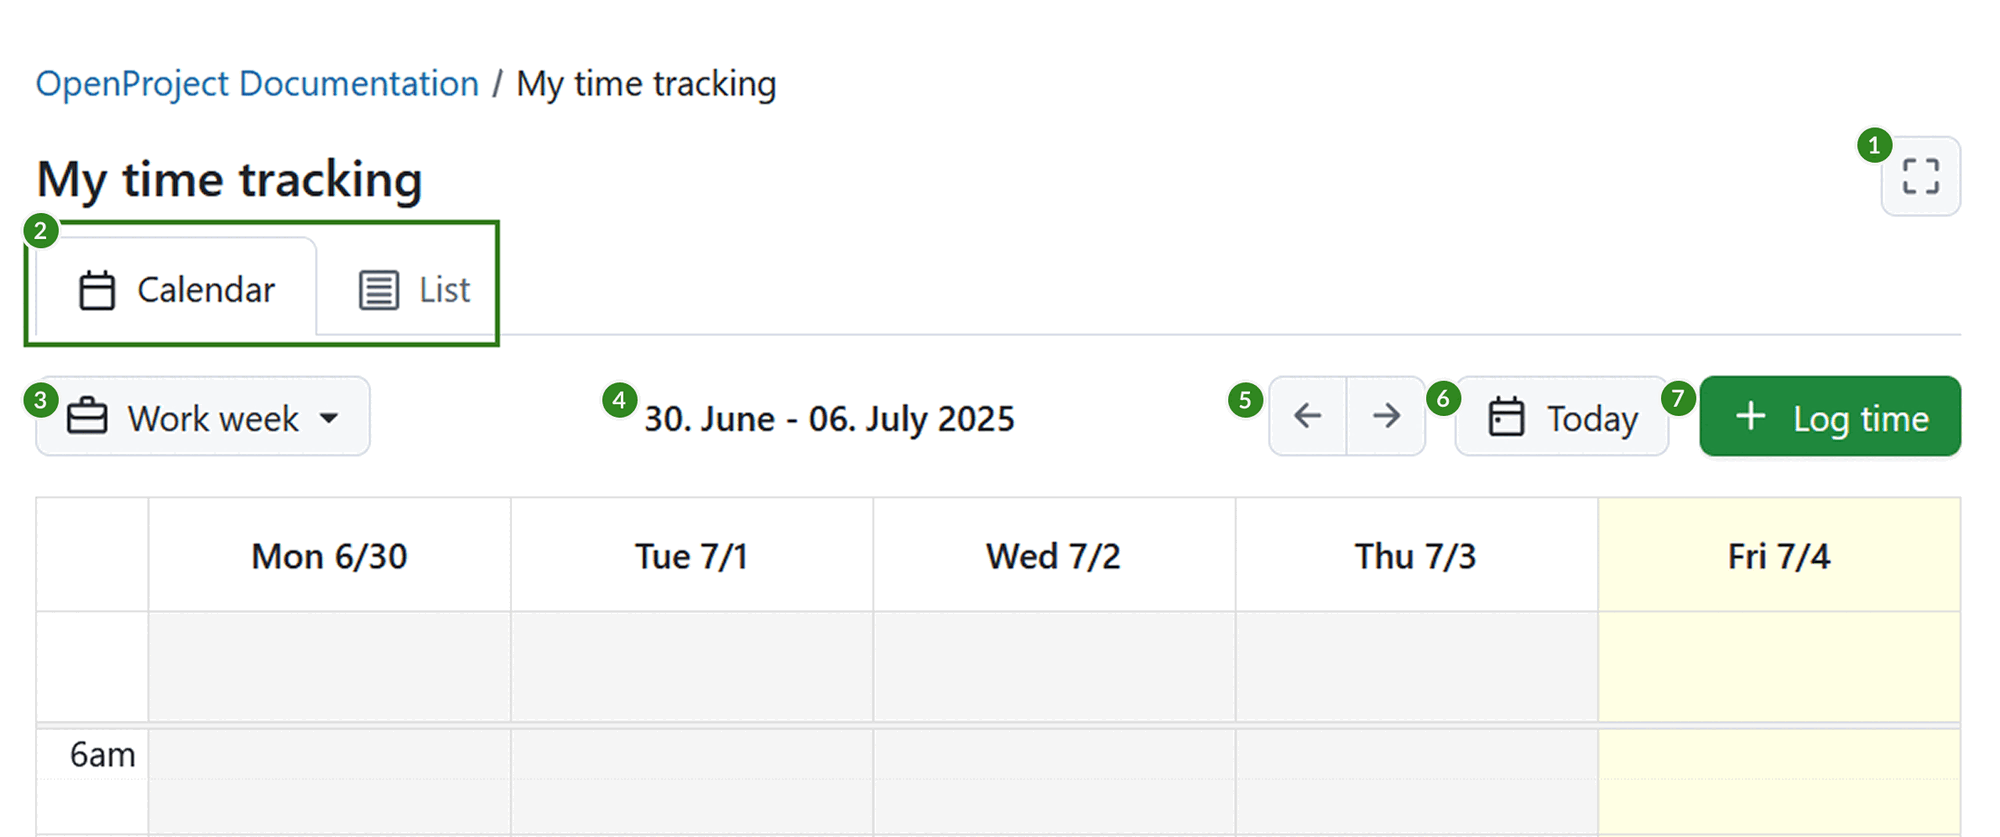
Pode registar o tempo selecionando um intervalo de tempo em qualquer parte do calendário ou com o botão + Registar tempo.
Pode arrastar e largar registos de tempo para os reposicionar dentro do mesmo dia ou movê-los para um dia diferente. Para ajustar a duração de um registo, arraste a margem superior ou inferior do registo de horas para cima ou para baixo.
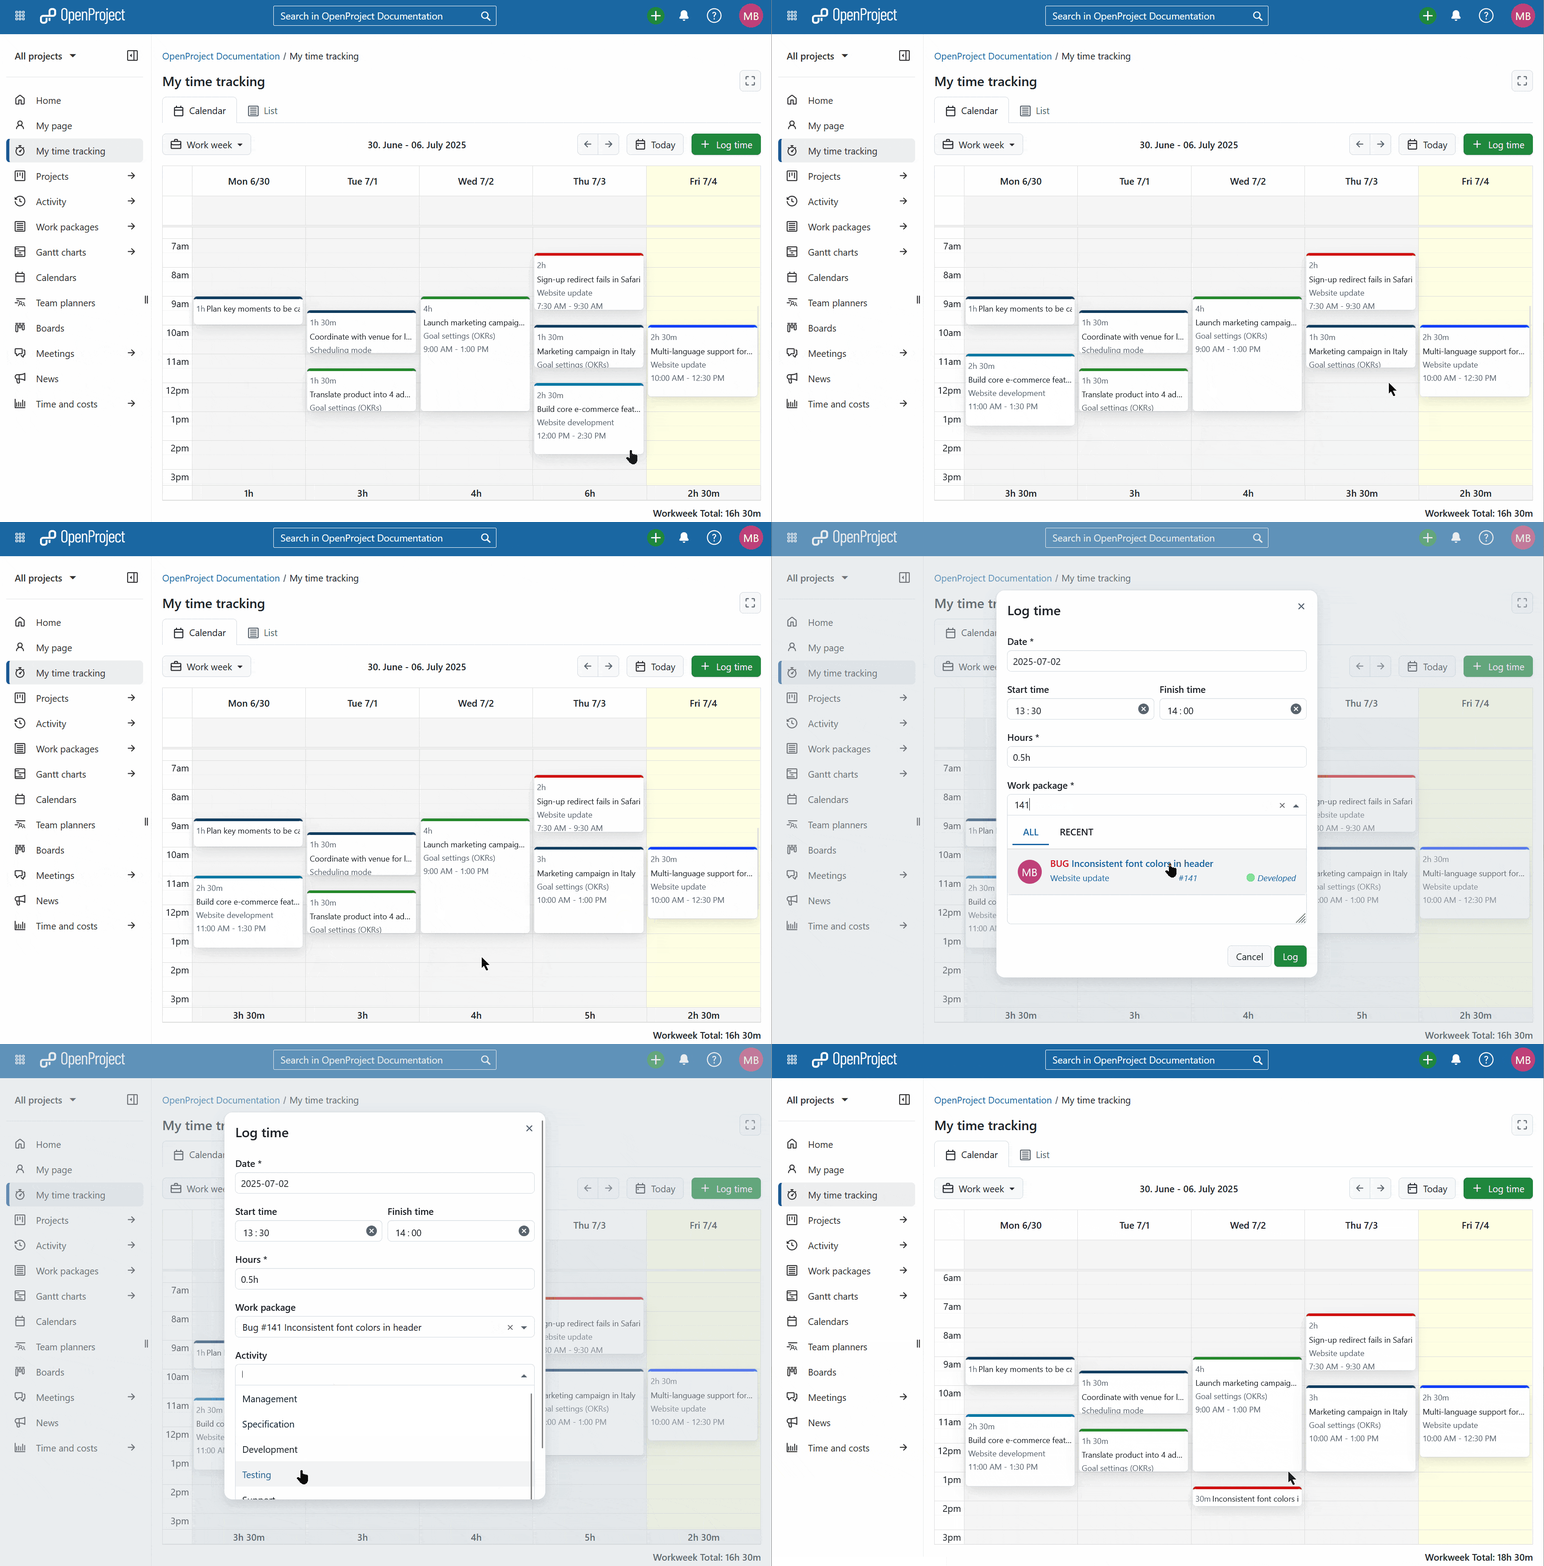
Para editar um registo de horas, clique no mesmo no calendário, faça as alterações e guarde. Também pode eliminar a partir do mesmo menu.
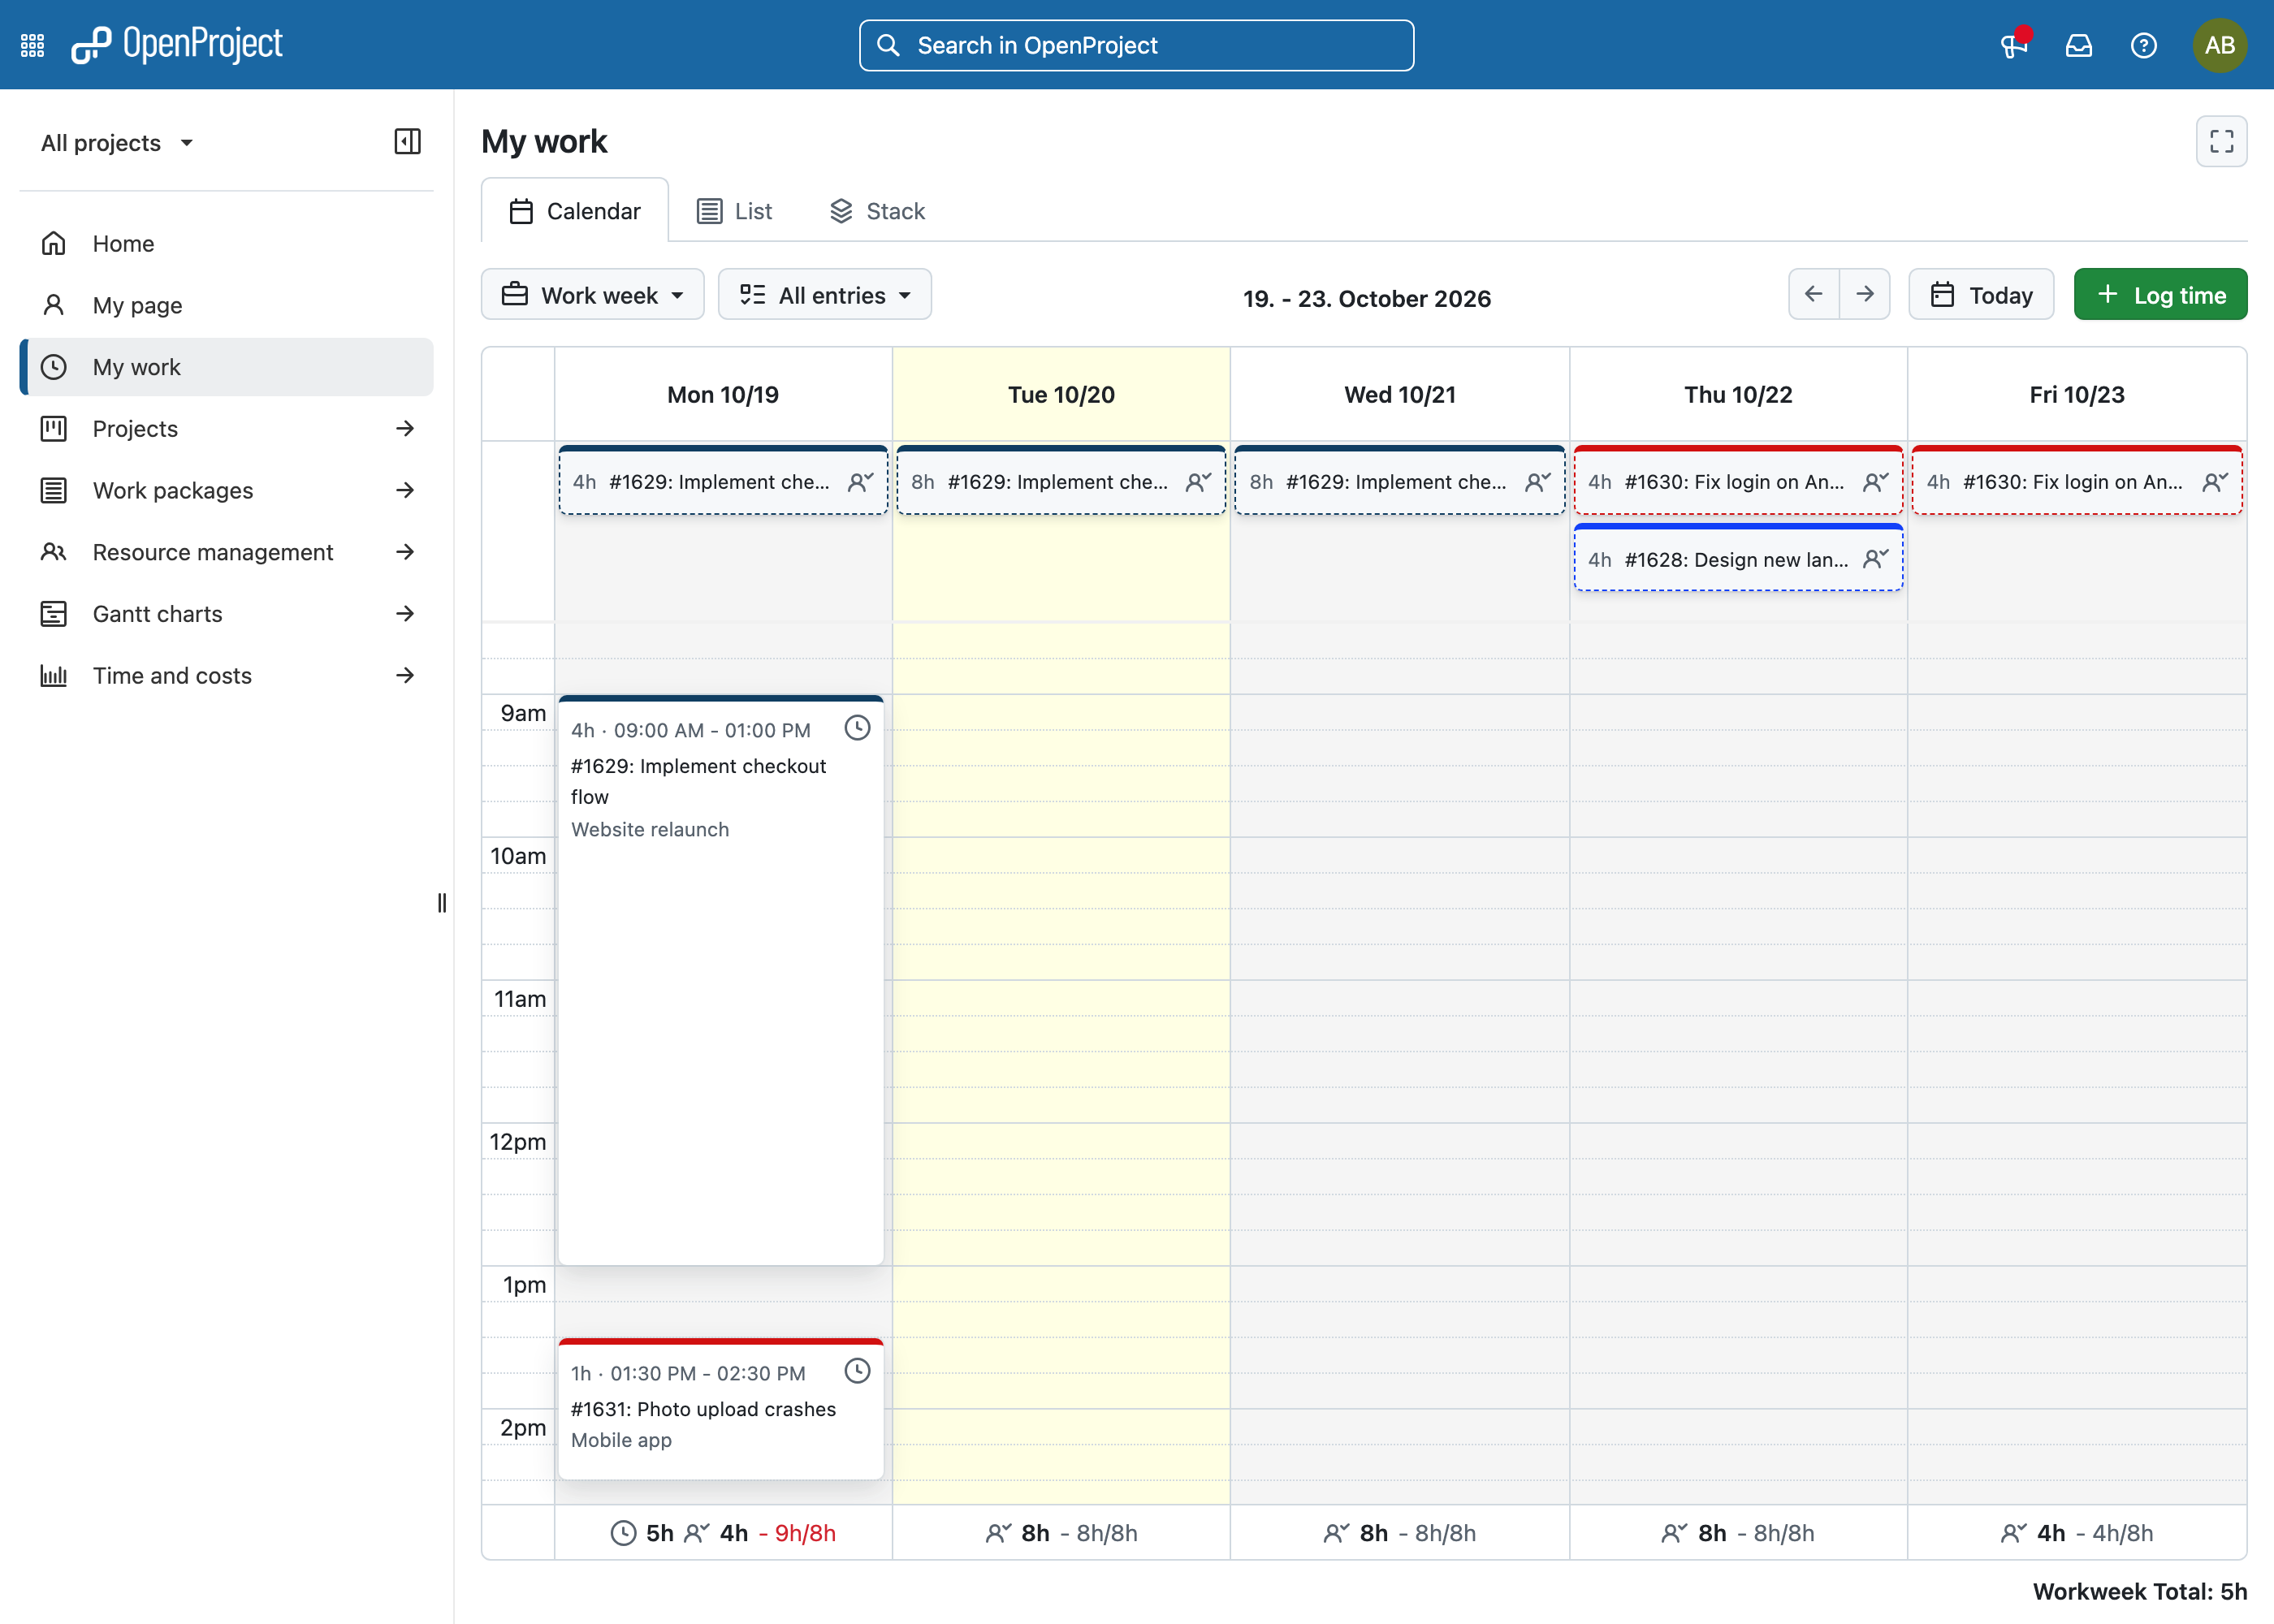
If work is allocated to you in Resource management, your resource allocations are displayed in the area at the top of each day, next to time entries without start and finish time. Allocations have a dashed border and show the hours you are expected on that work package on that day. They cannot be moved or resized. Click an allocation to open the work package or to log time from it.
Na parte inferior de cada dia, é apresentada uma soma de horas por dia. If work is allocated to you, it also shows the allocated hours and compares the sum of logged and allocated hours with your working hours of that day, for example 9h/8h. This value is shown in red if you are planned for more than your working hours. If week or month is selected, a total of the logged hours is also shown in the bottom right corner.
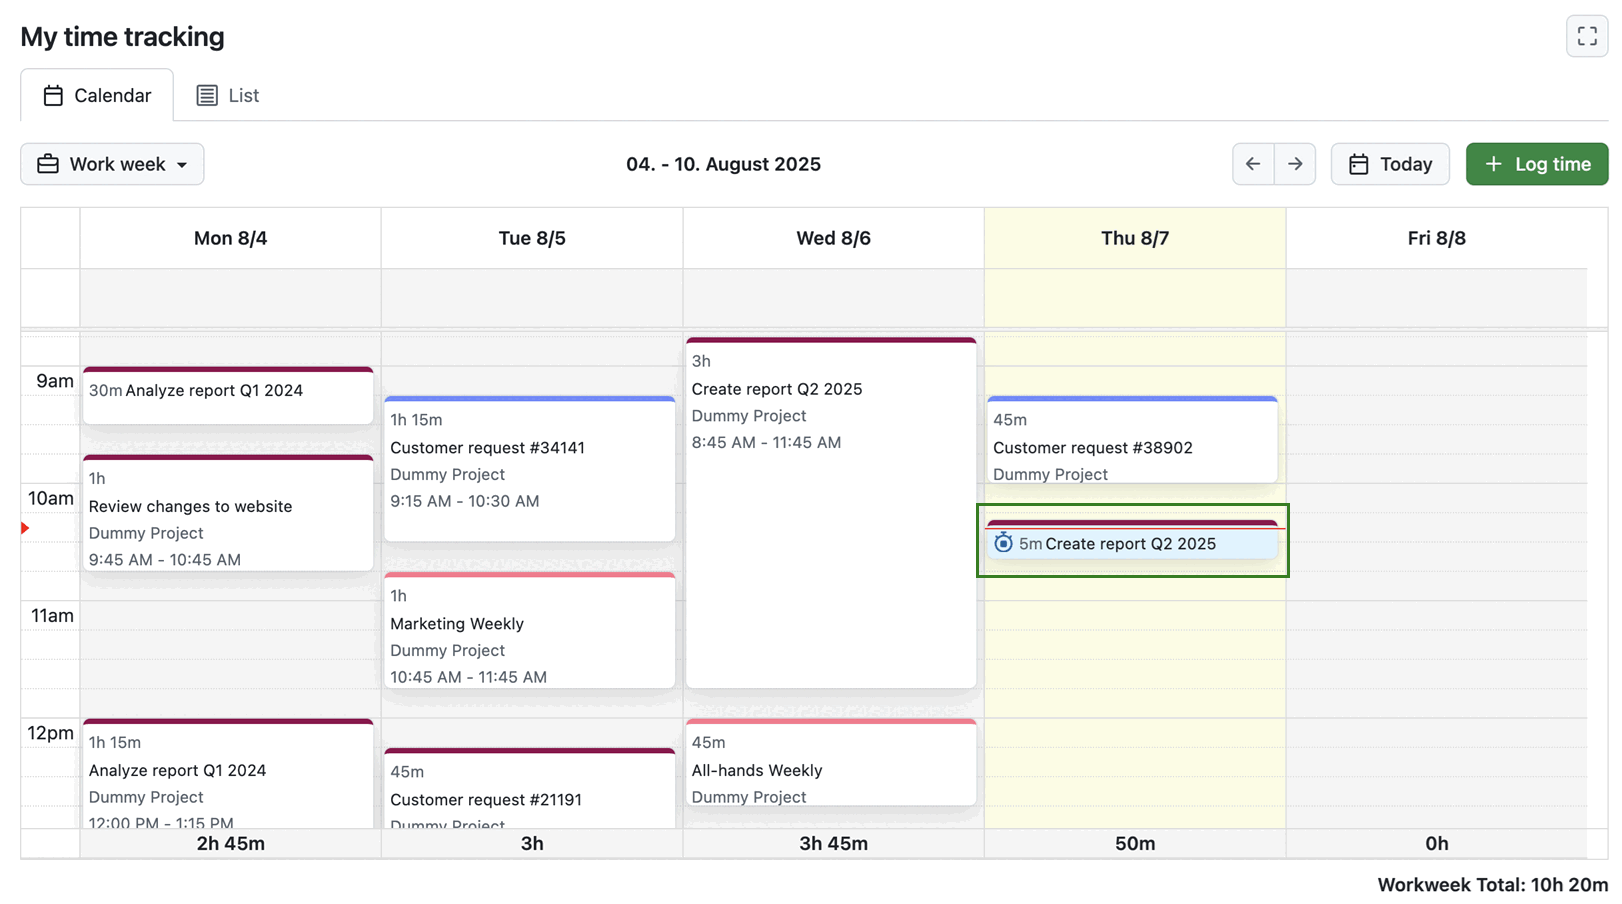
Se controlar o tempo com um temporizador num pacote de trabalho específico, verá também o temporizador de controlo de tempo em curso no respetivo pacote de trabalho. O pacote de trabalho em questão também tem uma cor de fundo diferente para facilitar a diferenciação.
Ver lista
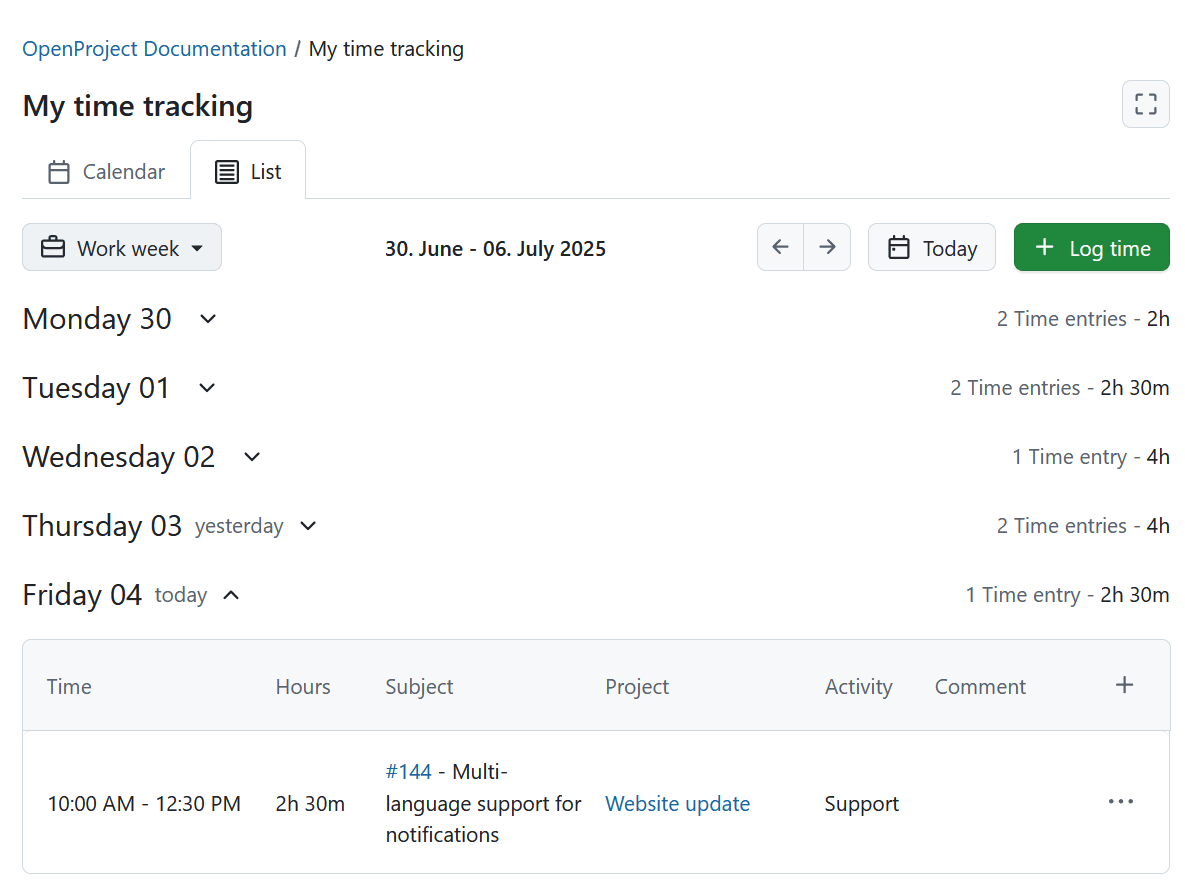
A vista Lista abre-se por defeito se as horas de início e de fim dos registos de horas estiverem desativadas em Administração do sistema. Tal como na vista Calendário, pode selecionar o nível de zoom com o menu pendente - as opções incluem Dia, Semana de trabalho, Semana ou Mês.
Nesta vista, os registos de tempos são agrupados por dia. Cada dia apresenta o número total de entradas e a sua duração combinada no lado direito da linha de cabeçalho.
-
Quando o zoom Dia é selecionado, a vista é expandida por defeito.
-
Quando o zoom Semana ou Semana de trabalho está selecionado, os dias passados e futuros são recolhidos por predefinição. No entanto, o dia atual é alargado.
-
Quando o zoom Mês está selecionado, os dias ou semanas anteriores são recolhidos por predefinição. No entanto, a semana atual é expandida, juntamente com todas as semanas futuras desse mês.
Dica
If monthly level is chosen in the list view mode, time entries are aggregated by week and not by day. Isto é especialmente útil para obter uma síntese das suas horas registadas em cada semana.
Os dias expandidos apresentam registos de tempo num formato de tabela com as seguintes colunas:
- Tempo
- Horas
- Assunto (com uma ligação clicável para o pacote de trabalho)
- Projeto
- Atividade
- Comentário
- + (última coluna, utilizada para registar o tempo desse dia específico)
Para registar o tempo na vista Lista, pode:
- Clique no botão + Registar hora para adicionar um registo de hora para qualquer data fora do intervalo atualmente apresentado.
- Utilize o ícone + na tabela para registar o tempo diretamente para um dia específico.
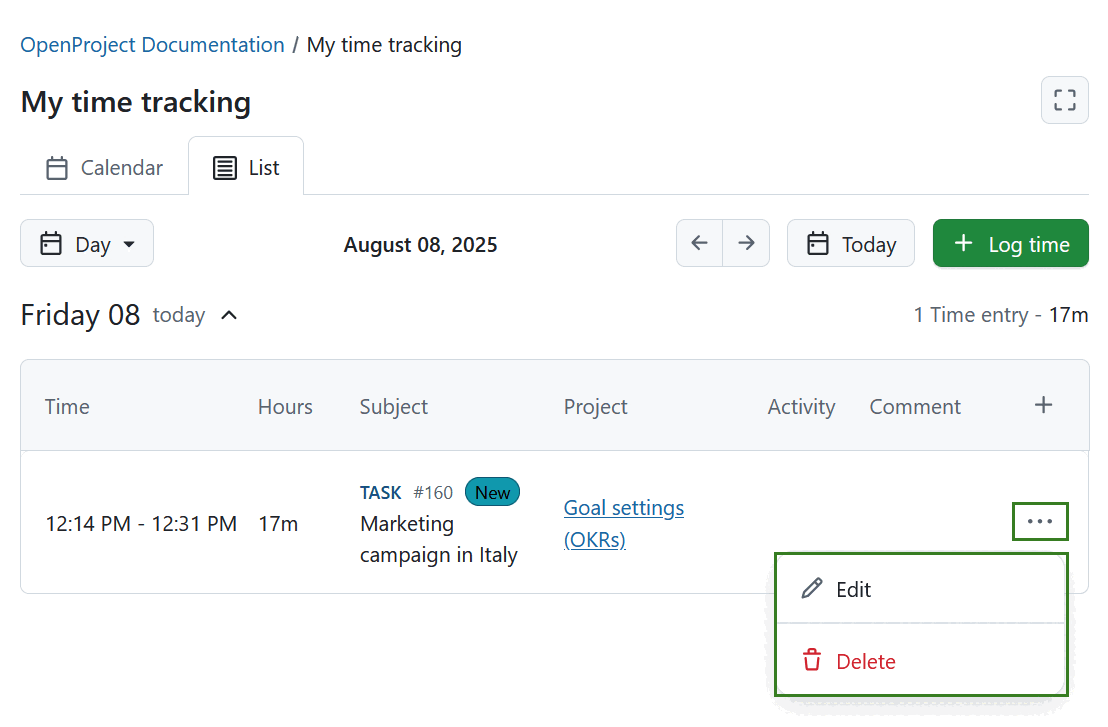
Para editar ou apagar um registo de tempos na vista Lista, clique no ícone Mais (três pontos) no final da linha do registo na tabela, e depois selecione o ícone Editar (lápis) ou Eliminar, respetivamente.
Stack view
The Stack view shows how many hours you have logged and how many are still planned for each day. Entries are stacked on top of each other, so the height of a column shows the total hours of that day. The scale on the left shows hours, not the time of day. Non-working days are shaded.
You can select the zoom level Day, Work week or Week. The Month zoom level is not available in this view.
Time entries are displayed at the bottom of each day, followed by a running timer if there is one. Resource allocations are stacked on top.
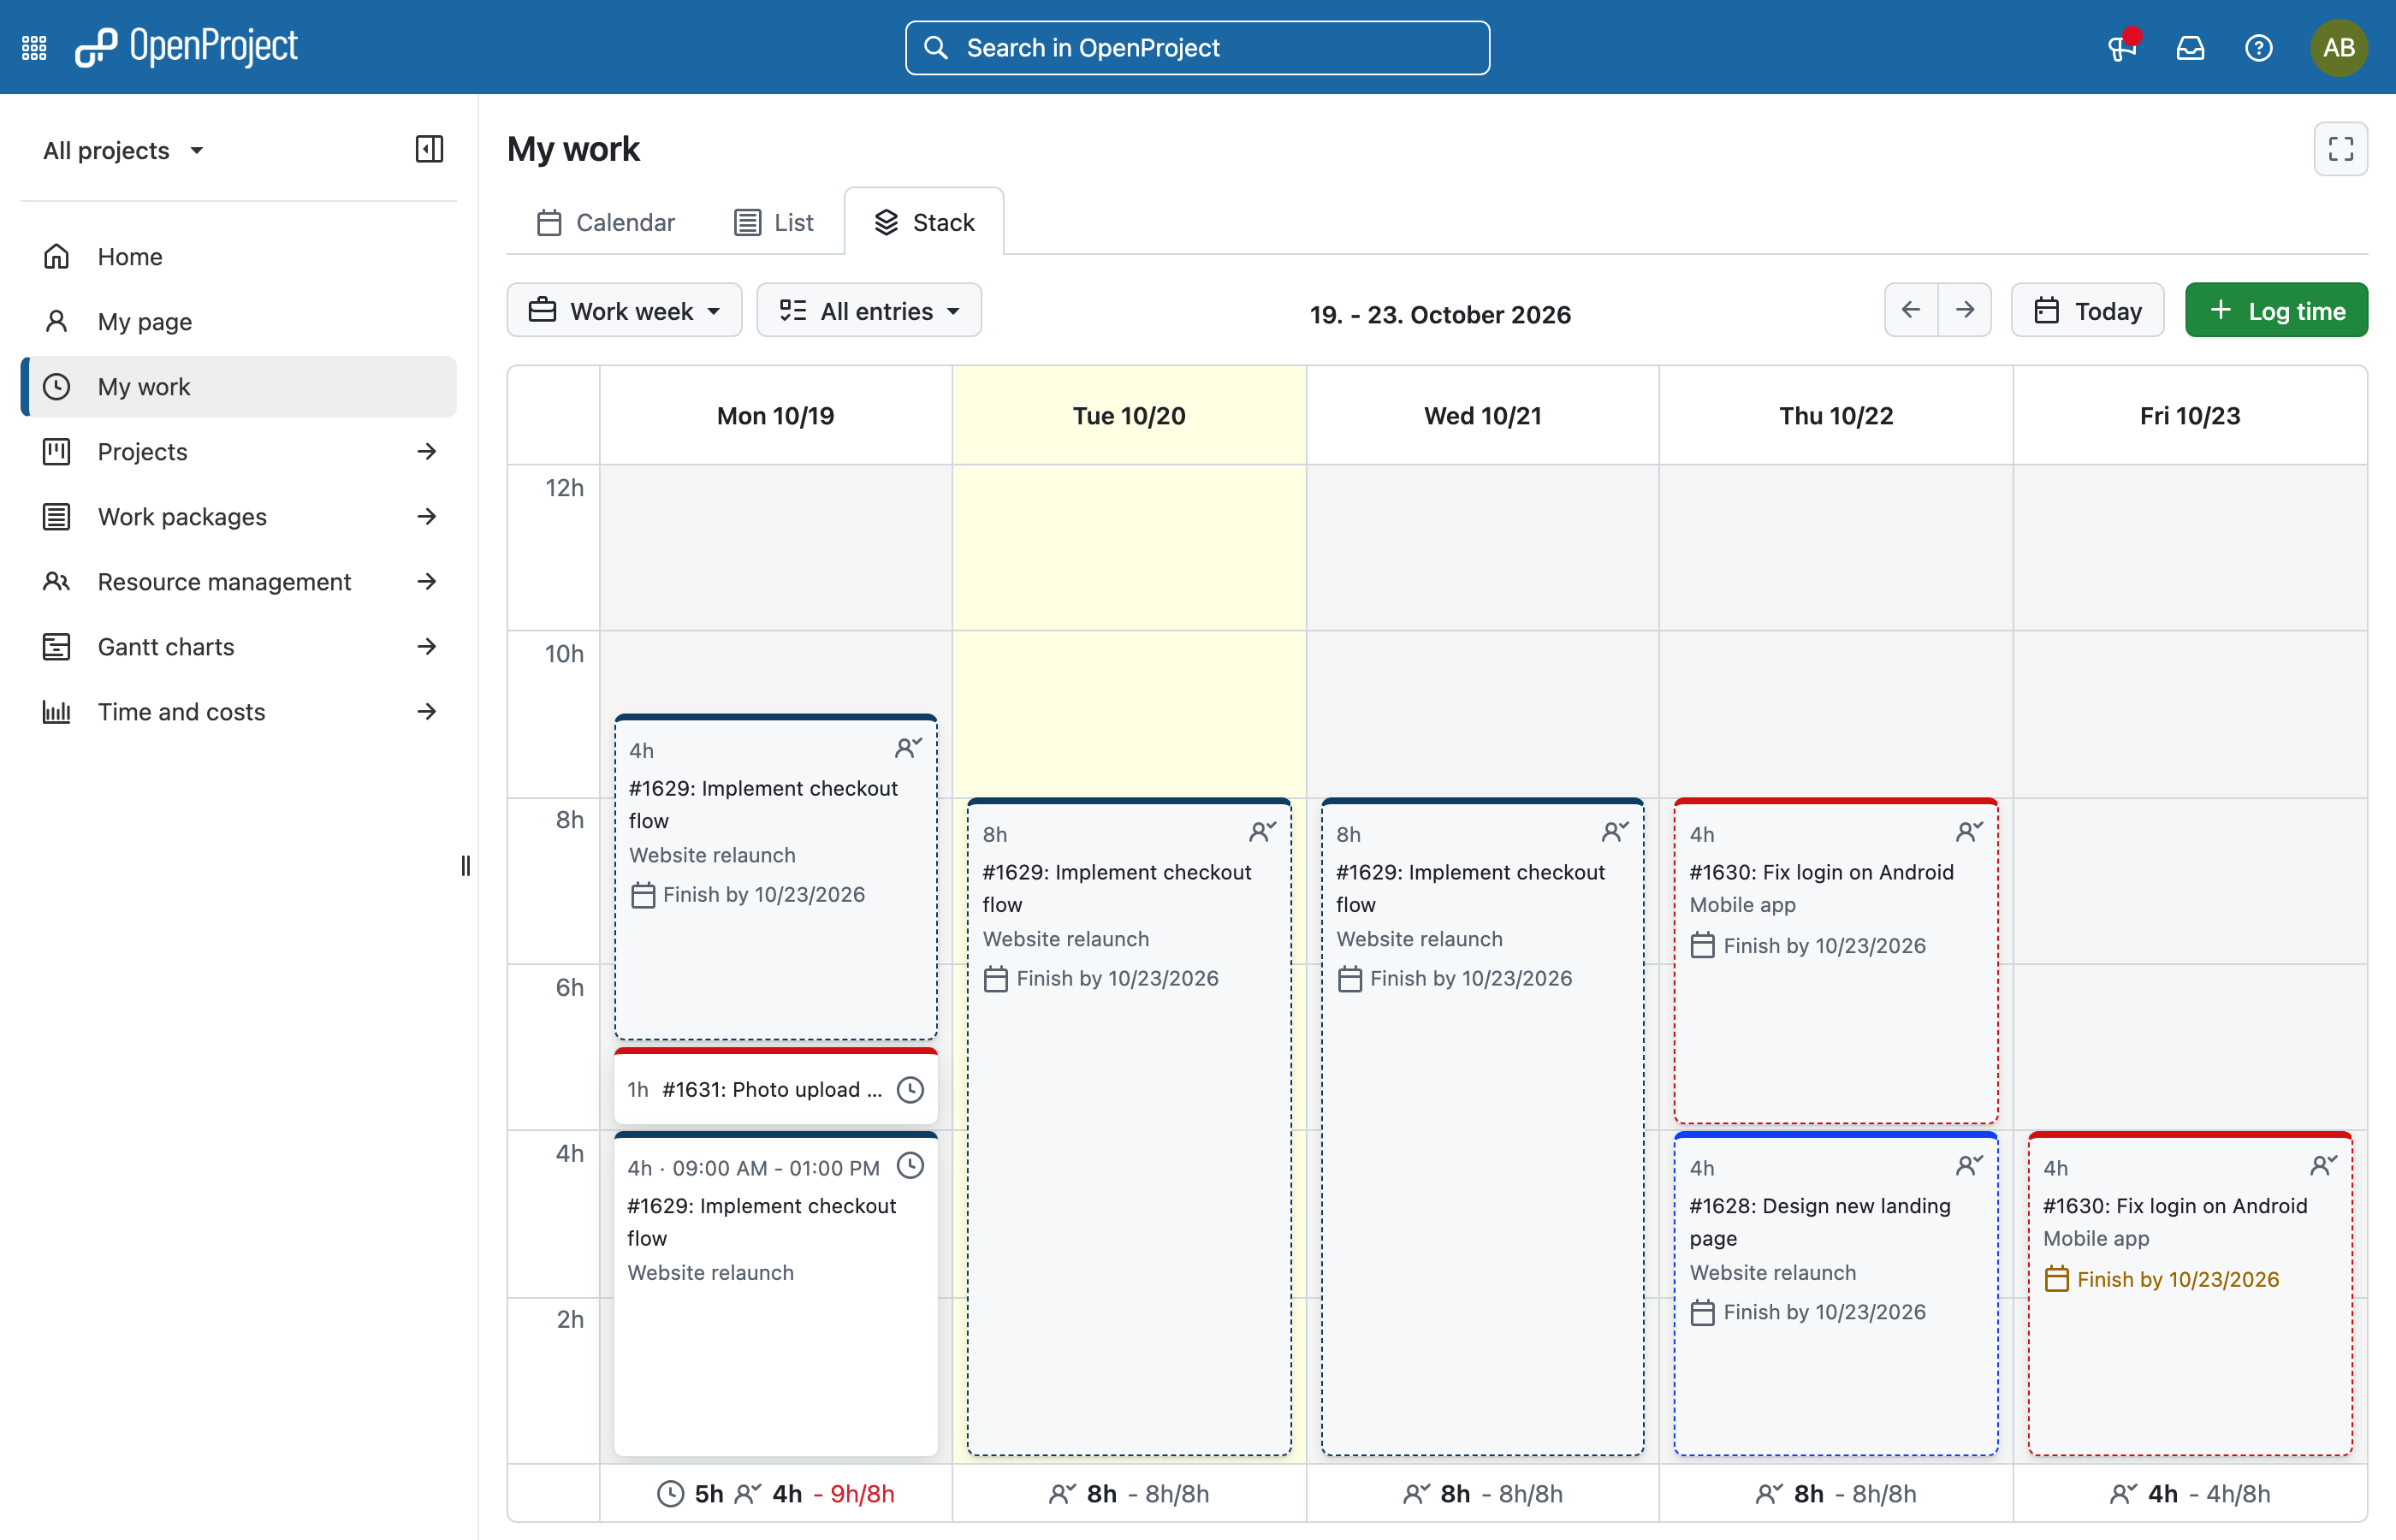
To log time, select a range in a day. The Hours field is pre-filled with the length of the selected range. You can also use the + Log time button.
Click a time entry to edit or delete it.
At the bottom of each day you see:
- the hours you have logged
- the allocated hours you are expected to work
- the sum of both compared to your working hours of that day, for example 9h/8h
The sum is shown in red if logged and allocated hours together exceed your working hours.
Resource allocations in My time
If work is allocated to you in Resource management, your allocations are displayed in all views of the My time page.
OpenProject distributes the hours of an allocation over your working days within the allocated dates. Time you have already logged on the same work package on that day is subtracted, so you only see the hours that are still left.
Allocations have a dashed border. Each allocation shows:
- the remaining expected hours for that day
- the work package and its project
- the finish date of the allocation, for example Finish by 10/23/2026. On the last day of the allocation this is highlighted.
In the Calendar view, allocations are displayed in the area at the top of each day.
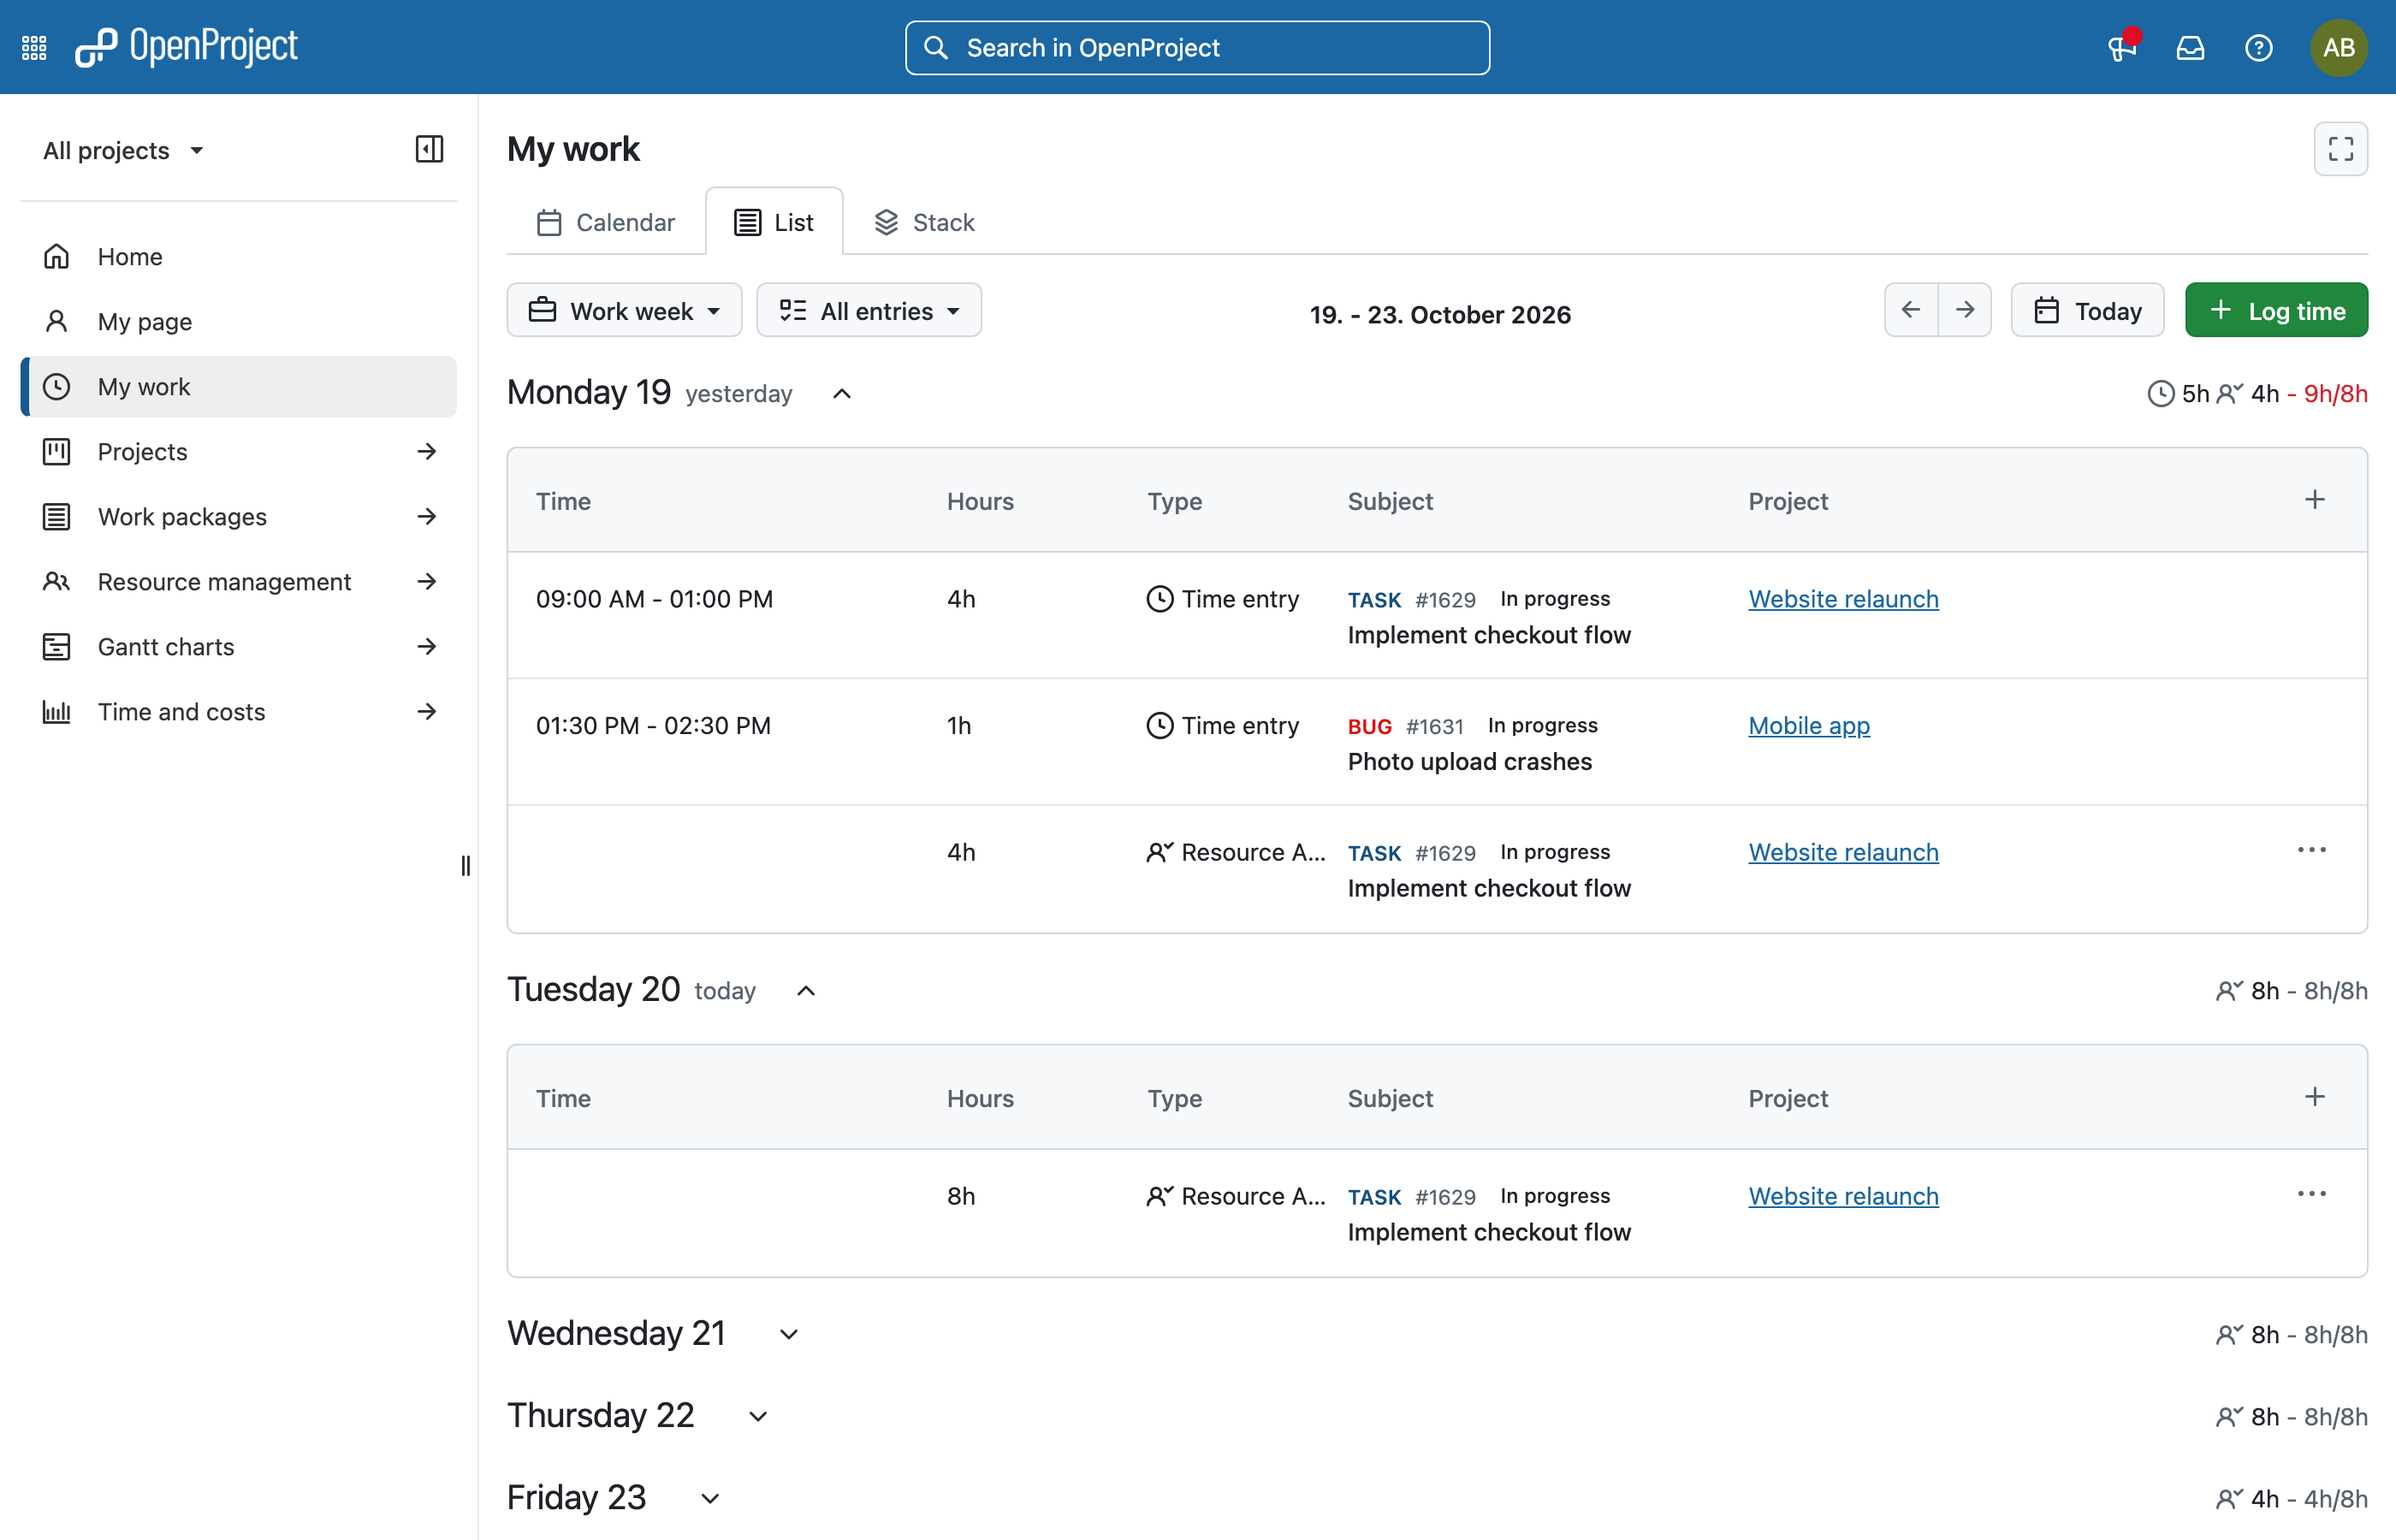
In the List view, allocations are listed together with your time entries. The Type column shows Resource Allocation for them.
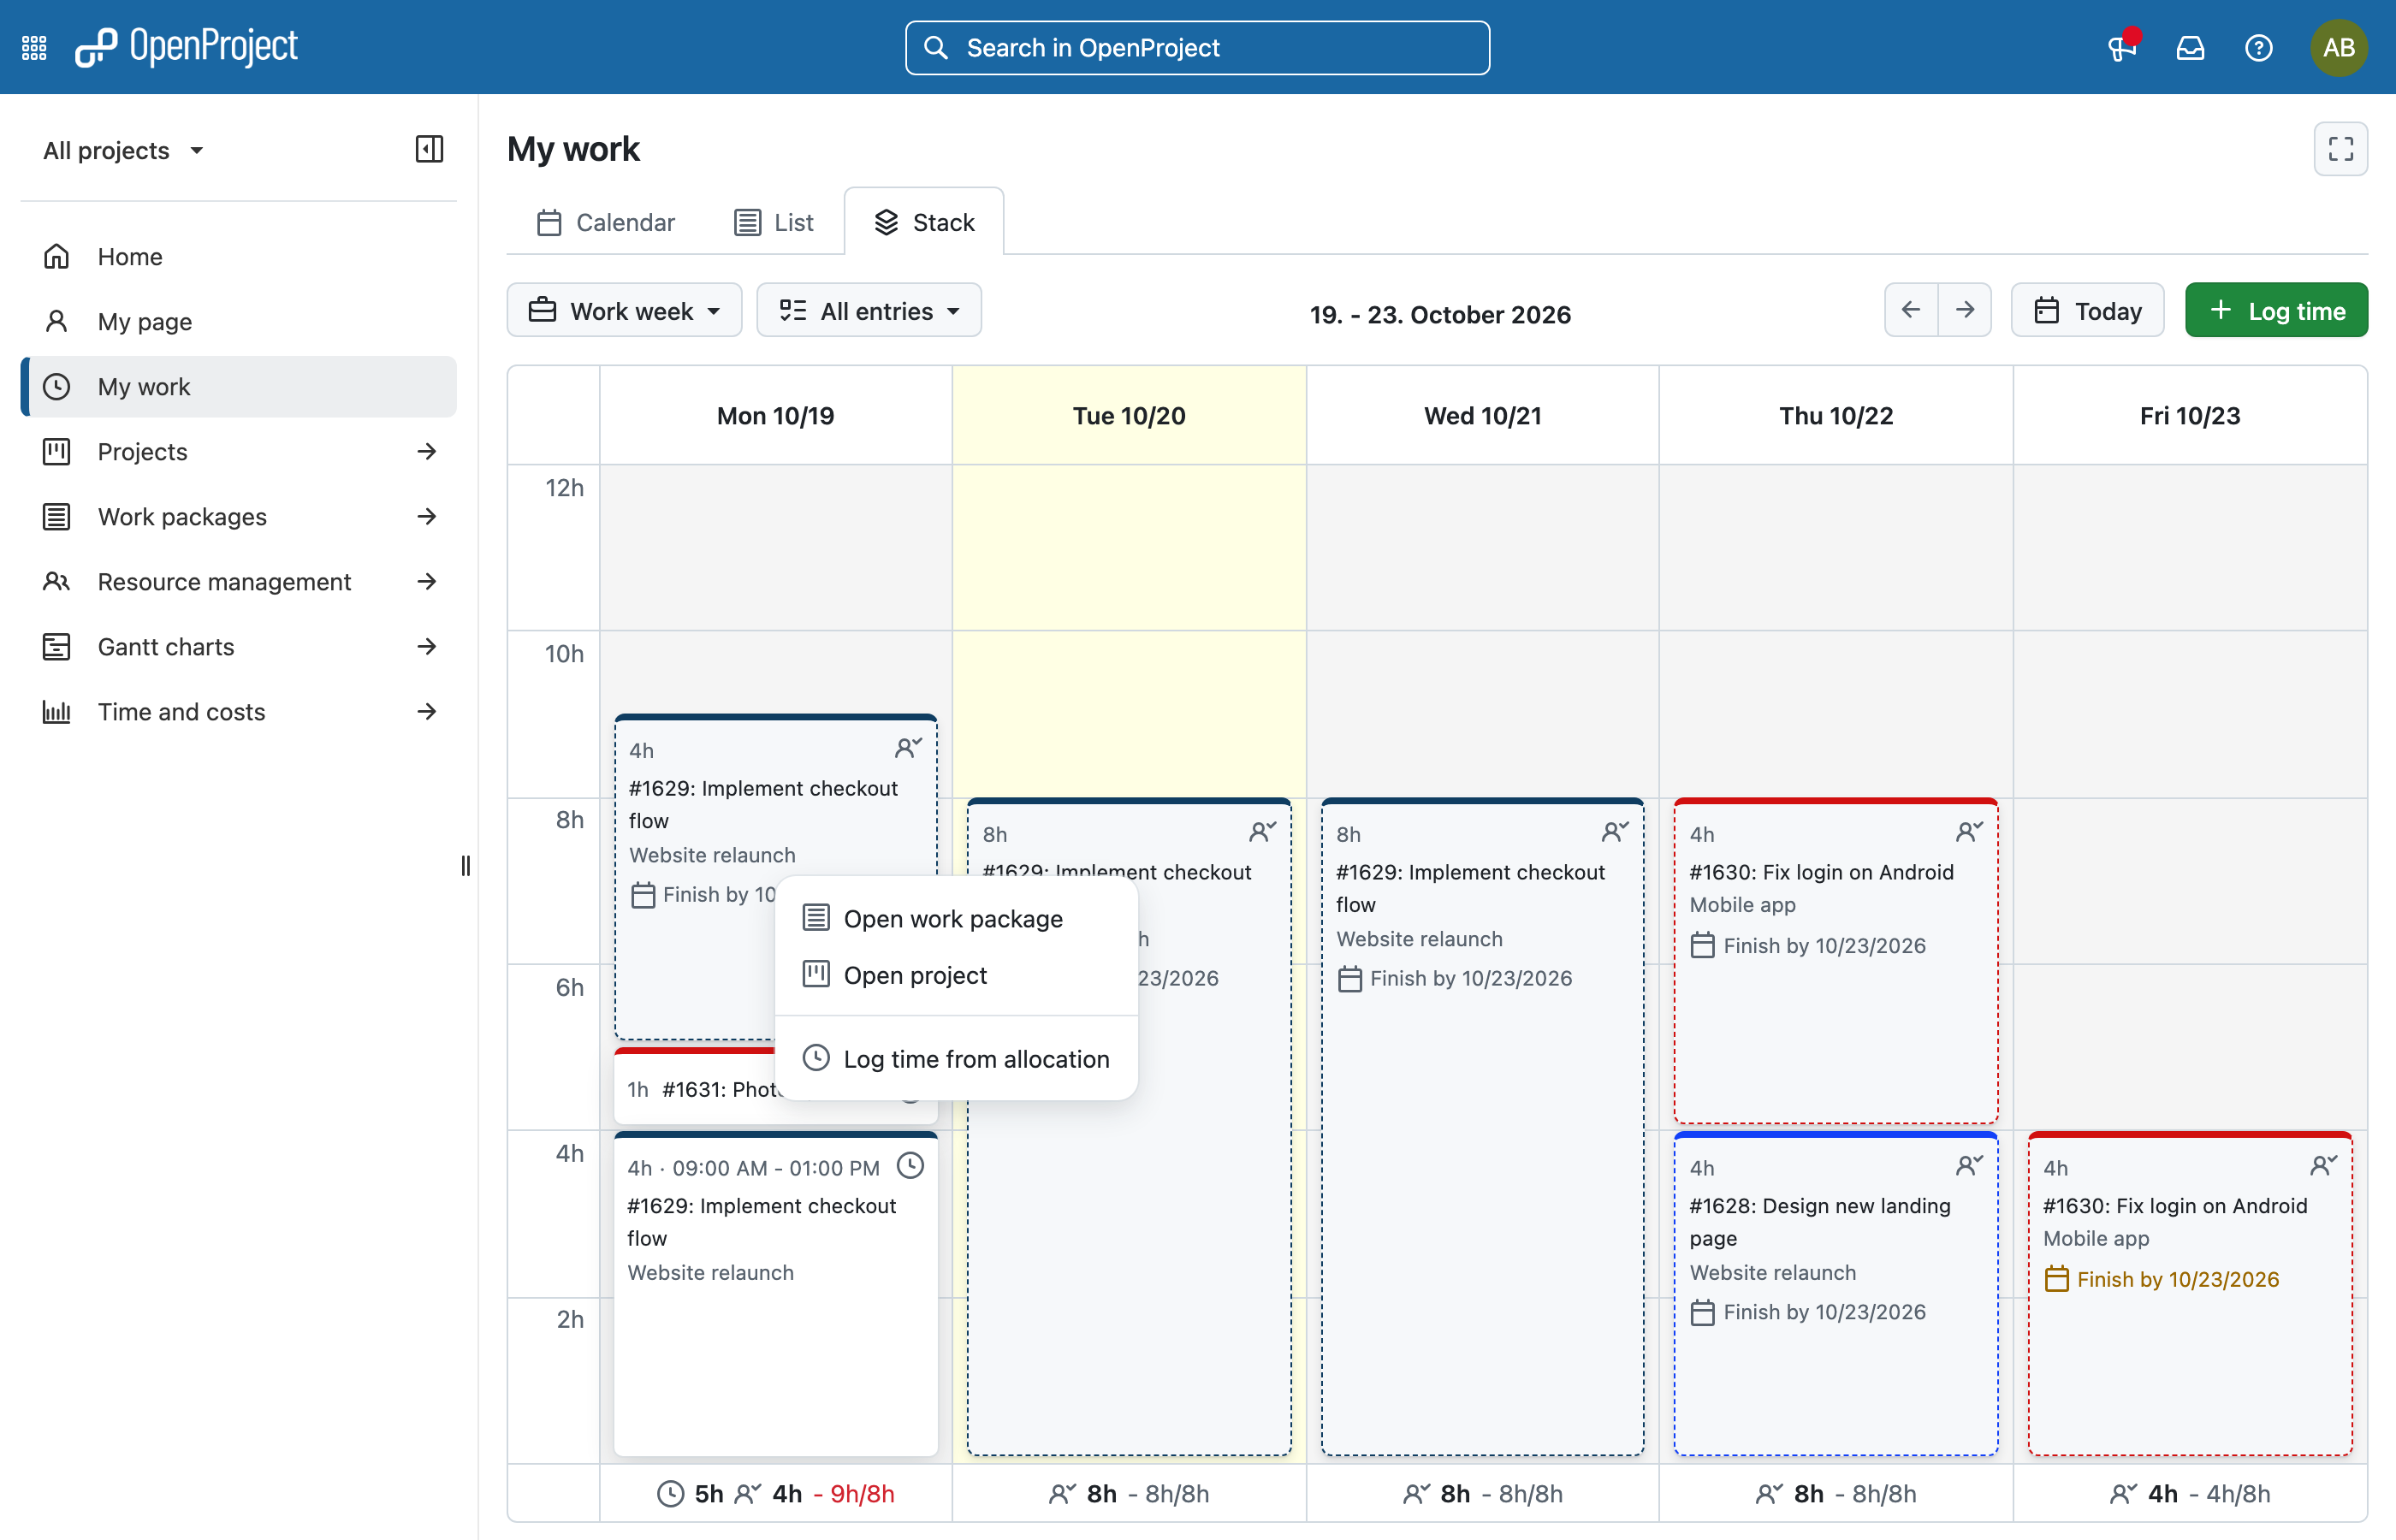
Click an allocation to see the available actions:
- Open work package
- Open project
- Assign work package to me – only shown if you are not the assignee of the work package.
- Log time from allocation – opens the log time dialog with the work package, date and remaining hours already filled in.
Nota
The My spent time widget on My page also uses the stack view, but only shows your logged time.
Log time in My time module
To log time on the My time page, click the + Log time button. Aparecerá uma janela modal com os seguintes campos:
-
Data - Selecione o dia para o registo de hora.
-
Hora de início e Hora de fim - Quando ambas são introduzidas, o campo Horas é calculado automaticamente.
Dica
Estes campos só são visíveis se a opção Permitir controlo de horas exatas for ativada por um administrador. Se a opção Exigir horas exatas também estiver ativada, estes campos tornam-se obrigatórios para guardar o registo de horas.
- Horas - Introduza o número de horas que pretende registar num pacote de trabalho específico.
Dica
A duração pode ser introduzida tanto em horas como em minutos. Por exemplo, para registar 1,5 horas, pode introduzir:
- 1.5h
- 90m
- 90min
- 1:30
-
Pacote de trabalho - Digite para procurar um pacote de trabalho ou selecione a partir da lista de pacotes utilizados recentemente. You can find the correct work package by using a work package name, ID, type and status.
-
Atividade - Escolha uma atividade que esteja ativa para o projeto a que pertence o pacote de trabalho selecionado.
-
Comentário - Adicione notas ou detalhes relevantes para o registo de horas.
Não se esqueça de clicar no botão Registar para guardar o seu registo de tempo.