Backlog und Sprints
Hinweis
Das Modul Backlogs wird aktuell fortlaufend verbessert. Diese Dokumentation wird regelmäßig aktualisiert, um die neuesten Änderungen zu berücksichtigen.
Die Arbeit in agilen Projektteams gewinnt zunehmend an Bedeutung, und mit OpenProject ist dies einfacher denn je. OpenProject unterstützt Ihre Arbeit mit der Agile- und Scrum-Methodik durch eine Vielzahl verbesserter Funktionen. Sie können jetzt Sprints erstellen und verwalten, Arbeitspakete in Sprints und im Backlog erfassen und priorisieren, automatisierte Sprint Boards oder Burndown-Charts verwenden und vieles mehr. Weitere Informationen finden Sie auf der OpenProject Feature-Seite Agile and Scrum.
Ein Backlog ist als Modul definiert, mit dem die Backlogs-Funktion in OpenProject genutzt werden kann. Um Backlogs in einem Projekt zu verwenden, muss das Backlog-Modul in den Projekteinstellungen aktiviert werden.
Bitte beachten Sie, dass dieses Nutzungshandbuch keine Einführung in die Scrum-Methodik darstellt, sondern lediglich die Scrum-bezogenen Funktionen und Anleitungen in OpenProject erläutert.
Backlog verwalten
Das Backlog-Modul ist in zwei Bereiche unterteilt: Auf der linken Seite finden Sie das Backlog, bestehend aus dem Eingangs-Backlog unten und den darüber liegenden Backlog buckets (sofern vorhanden). Rechts werden Sprints angezeigt. Falls keine Backlog buckets erstellt wurden, wird auf der linken Seite lediglich der Eingangs-Backlog angezeigt.
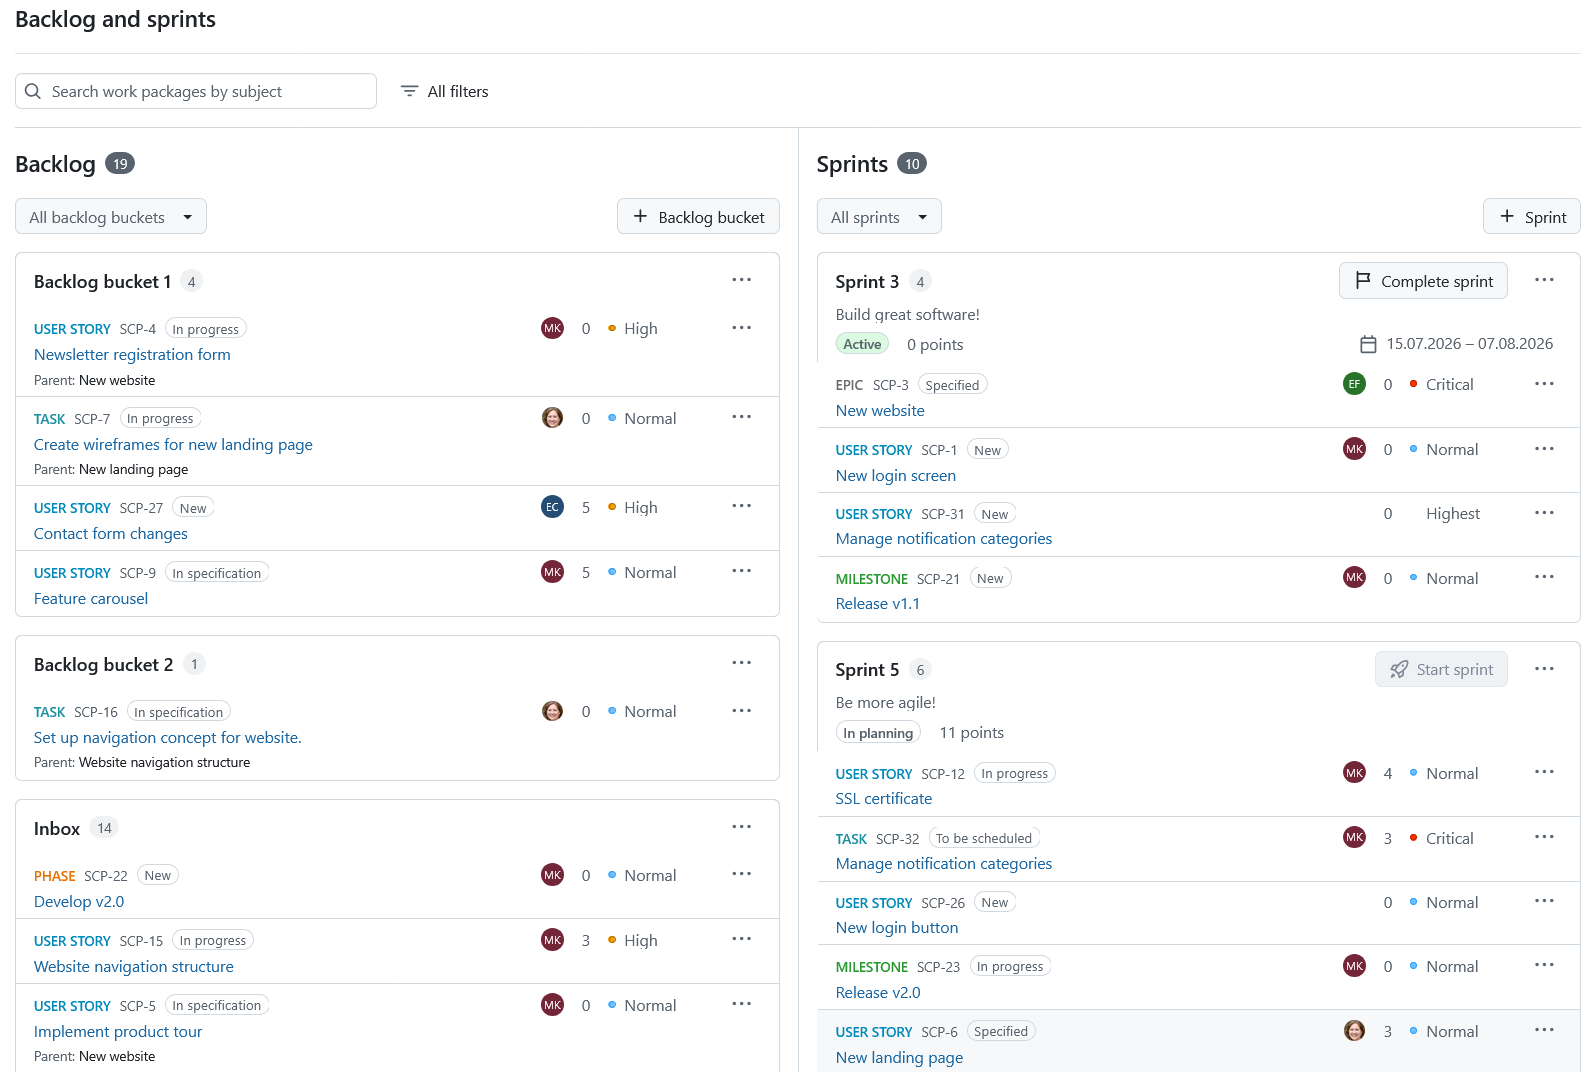
Backlog und Sprint-Filter
Oben auf der Seite „Backlog und Sprints“ können Sie Arbeitspakete suchen und filtern, um sich bei der Bearbeitung des Backlogs oder der Sprintplanung auf bestimmte Elemente zu konzentrieren.
Geben Sie Text in das Feld Arbeitspakete nach Betreff suchen ein, um nur Arbeitspakete mit passendem Betreff anzuzeigen. Die Ergebnisse werden während der Eingabe über Sprints, Backlog-Gruppen und den Backlog im Posteingang hinweg aktualisiert.

Klicken Sie auf die Schaltfläche Alle Filter, um die angezeigten Arbeitspakete weiter einzugrenzen.
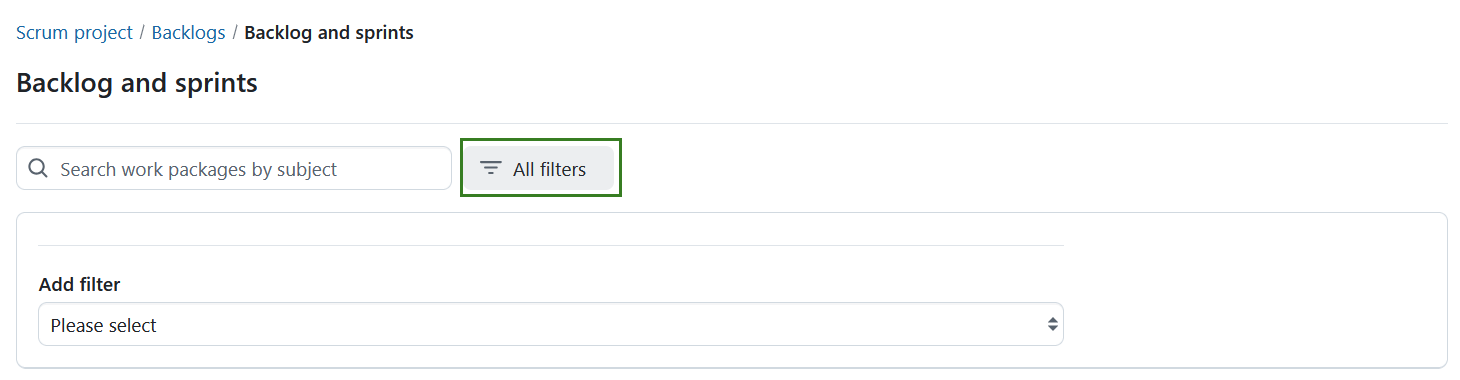
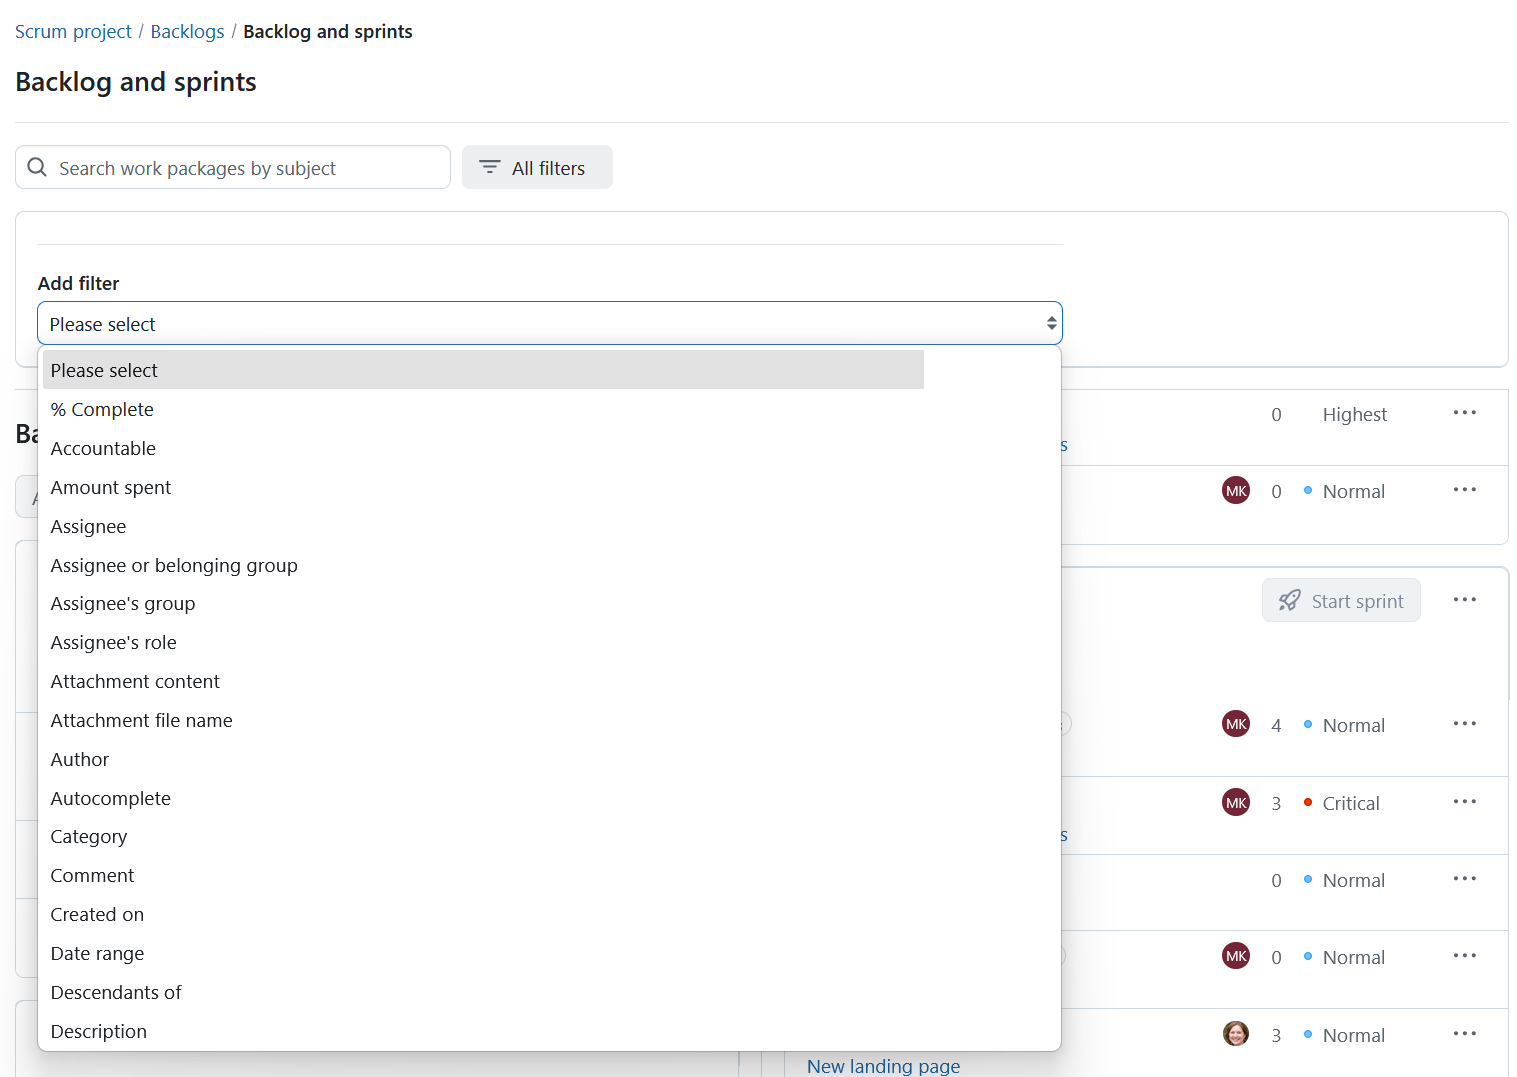
Im Filterbereich können Sie Filter für Typ, Betreff, Zugewiesen an, Status, weitere verfügbare Arbeitspaketattribute sowie benutzerdefinierte Felder hinzufügen. Das Filtern von Arbeitspaketen funktioniert genauso wie in der gesamten Anwendung. Die Ansicht „Backlog und Sprints“ wird automatisch aktualisiert, sobald Filter angewendet werden.
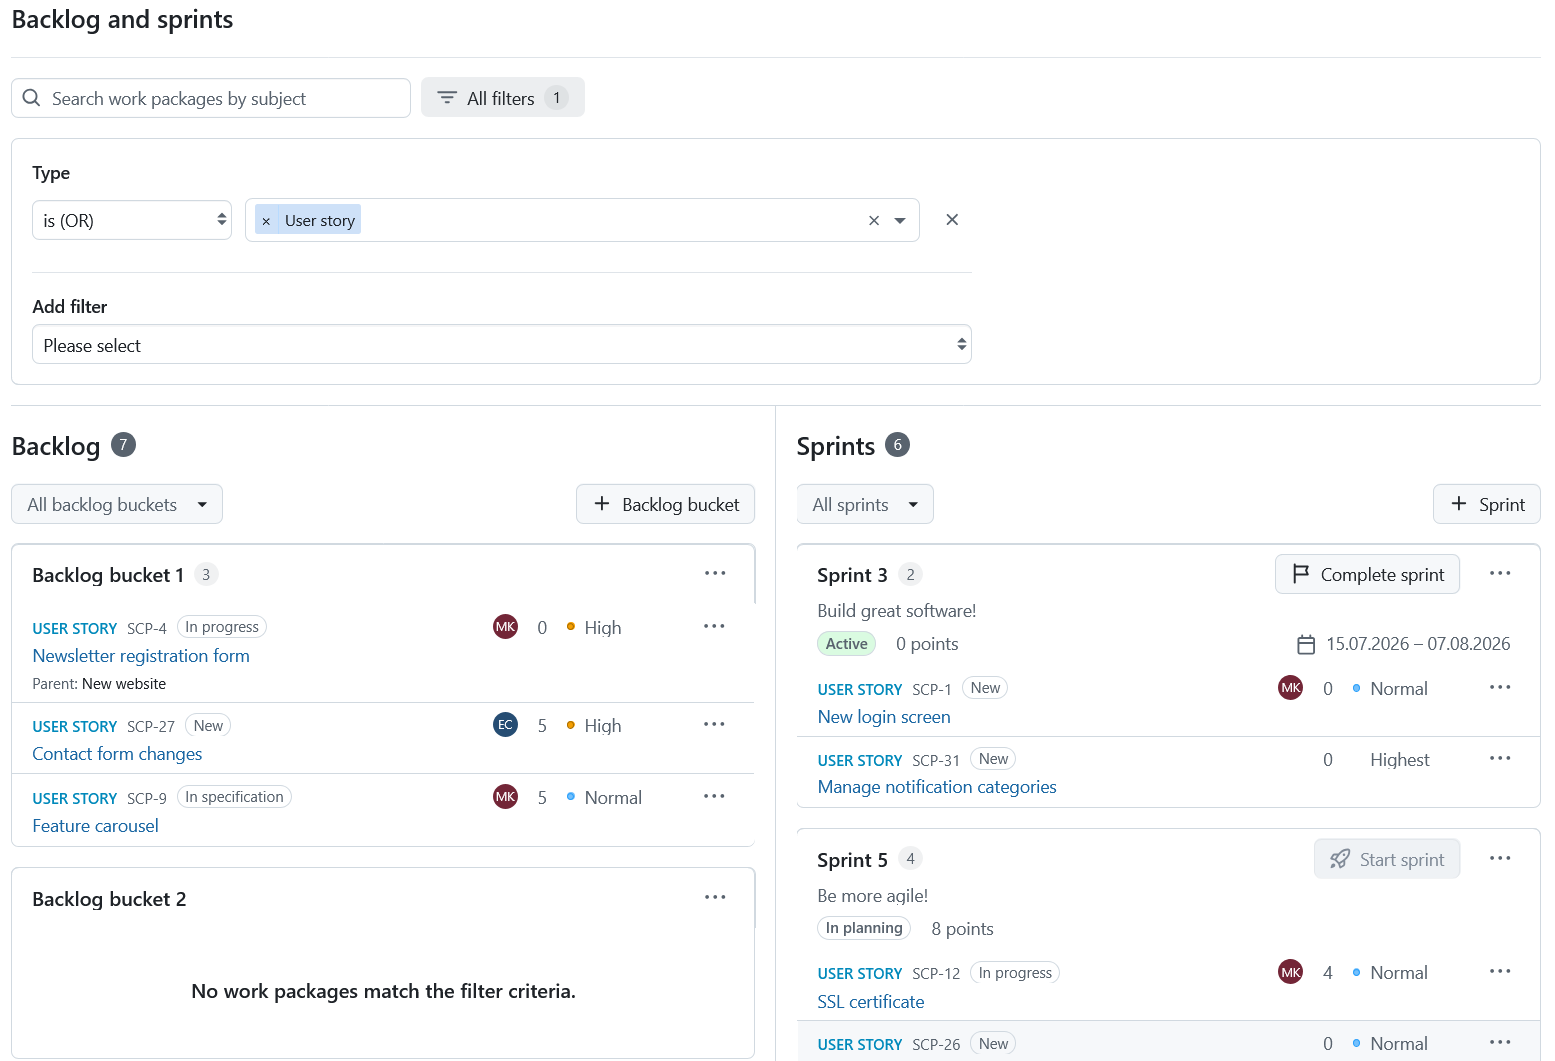
Die Such- und Filterfunktionen gelten für Arbeitspakete in allen Containern: Sprints, Backlog-Gruppen und dem Backlog „Posteingang“. Arbeitspakete, die nicht den aktuellen Kriterien entsprechen, werden vorübergehend ausgeblendet.
Die Anzahl der Arbeitspakete und die Story-Punkte, die für jeden Container angezeigt werden, werden angepasst, um die derzeit sichtbaren Arbeitspakete widerzuspiegeln. Wenn keine Arbeitspakete in einem Container den aktuellen Kriterien entsprechen, bleibt der Container sichtbar, zeigt jedoch an, dass keine passenden Arbeitspakete vorhanden sind.
Hinweis
Durch Suchen und Filtern wird lediglich beeinflusst, welche Arbeitspakete angezeigt werden. Dies hat keinen Einfluss auf die Zuordnung zu einem Sprint, einem Backlog-Bucket oder dem „Posteingang“-Backlog.
Klicken Sie erneut auf die Schaltfläche Alle Filter, um das Filterfenster zu schließen.
Hinweis
Die Ansicht „Gefilterte Backlogs“ wurde in OpenProject 17.9 eingeführt und kann derzeit noch nicht gespeichert werden. In der Zwischenzeit können Sie die URL einer gefilterten Ansicht als Lesezeichen speichern, um später darauf zuzugreifen, oder sie an andere weitergeben.
Sprint Container
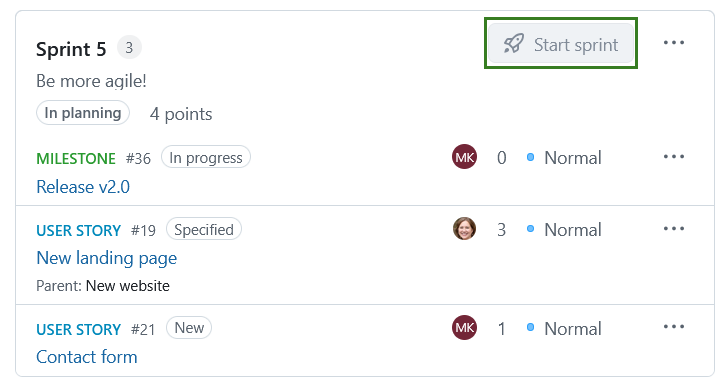
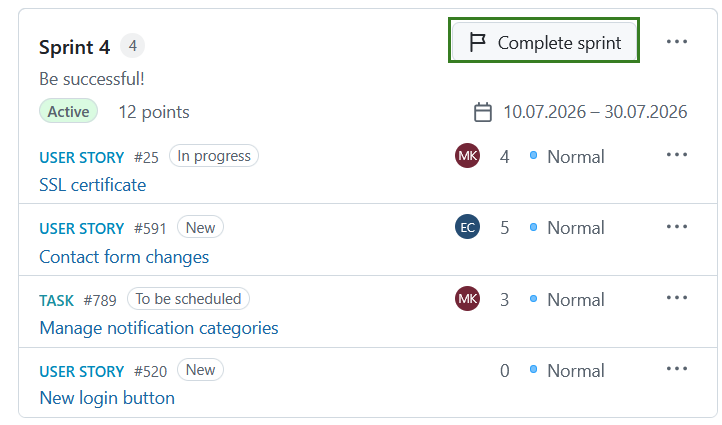
Jeder Sprint wird in einem speziellen Container angezeigt, der die wichtigsten Planungsinformationen enthält, darunter den Namen des Sprints, den Status, das Start- und Enddatum, die Anzahl der Arbeitspakete und die Gesamtzahl der Story Points.
Sofern definiert, wird das Sprint-Ziel in der Sprint-Kopfzeile unterhalb des Sprint-Namens angezeigt.
Je nach Sprintstatus wird entweder die Schaltfläche Sprint starten (für Sprints in Planung) oder Sprint abschließen (für aktive Sprints) angezeigt.
Hinweis
Die Schaltfläche Sprint starten ist standardmäßig deaktiviert, wenn bereits ein anderer Sprint aktiv ist oder wenn keine Sprintdaten definiert wurden. Möglicherweise ist diese Funktion auch nicht verfügbar, wenn Sie nicht über die Berechtigung Sprints starten/abschließen verfügen. Standardmäßig kann jeweils nur ein Sprint aktiv sein. Wenn Ihr Projekt so konfiguriert ist, dass mehrere aktive Sprints in den Einstellungen für den Projekt Backlog zulässig sind, bleibt die Schaltfläche Sprint starten für weitere Sprints verfügbar.
Backlog Buckets
Backlog buckets helfen Ihnen dabei, Arbeitspakete innerhalb des Backlogs zu organisieren und zu priorisieren. Ein Backlog bucket ist eine mit Namen versehene Liste von Arbeitspaketen, die unabhängig vom Eingangs-Backlog angepasst werden kann. Die Ansicht „Backlog und Sprints“ zeigt alle Backlog buckets innerhalb des aktuellen Projekts an, einschließlich des Namens und der Anzahl der darin enthaltenen Arbeitspakete.
Hinweis
Backlog buckets sind projektspezifisch und werden nicht projektübergreifend geteilt.
Arbeitspakete in Backlogs
Die Arbeitspakete, die in der Backlog- und Sprint-Ansicht angezeigt werden, enthalten die folgenden Informationen:
- Typ
- ID
- Status
- Zugewiesen an
- Story-Punkte
- Priorität
- Thema
- Übergeordnetes Arbeitspaket
Auf kleineren Bildschirmen können die Namen von Empfängern und Prioritäten ausgeblendet werden, um Platz zu sparen, sind aber weiterhin über Tooltips verfügbar.
Hinweis
Wenn ein übergeordnetes Arbeitspaket für Nutzende aufgrund von Berechtigungen nicht sichtbar ist, wird stattdessen Unsichtbar angezeigt.
Ein Arbeitspaket:
- kann jeweils nur zu einem Backlog bucket gehören.
- kann nicht gleichzeitig zu einem Sprint und einem Backlog bucket gehören.
- kann nicht gleichzeitig zu einem Backlog bucket und dem Eingangs-Backlog gehören.
Sie können Arbeitspakete in allen Containern (Backlog-Bucket, Posteingang und Sprints) per Drag & Drop oder mit der Option Verschieben aus dem Arbeitspaketmenü sortieren. Über das Menü „Mehr“ (drei Punkte) können Sie außerdem neue und bestehende Arbeitspakete in allen Containern (Backlog Buckets, Eingangs-Backlog und Sprints) hinzufügen.
Einen Backlog bucket erstellen
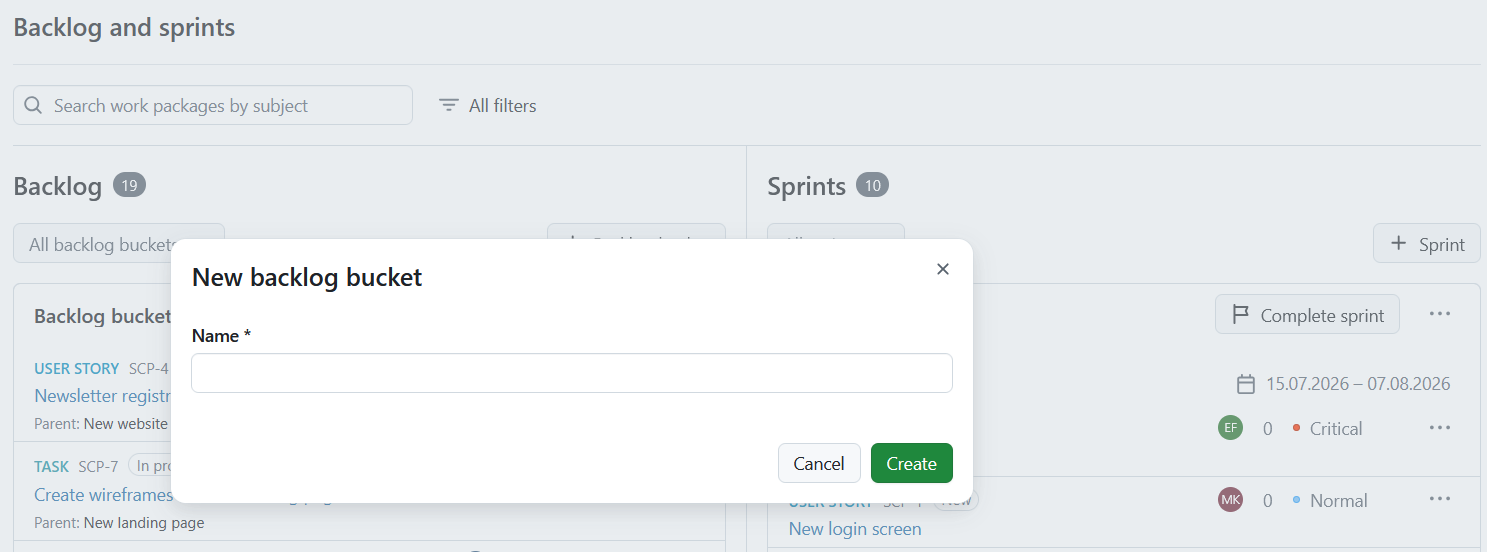
Um einen Backlog bucket zu erstellen, klicken Sie in der Ansicht „Backlog und Sprints“ auf die Schaltfläche + Backlog bucket. Daraufhin öffnet sich ein Dialogfeld, in dem Sie den Namen des Buckets eingeben können. Klicken Sie auf Anlegen, um fortzufahren.
Zum Erstellen und Löschen von Backlog buckets sind entsprechende Projektberechtigungen erforderlich.
Einen Backlog Bucket bearbeiten oder löschen
Öffnen Sie das Menü Mehr (drei Punkte) eines Backlog buckets, um:
- Backlog Bucket bearbeiten
- Den Backlog bucket zu löschen
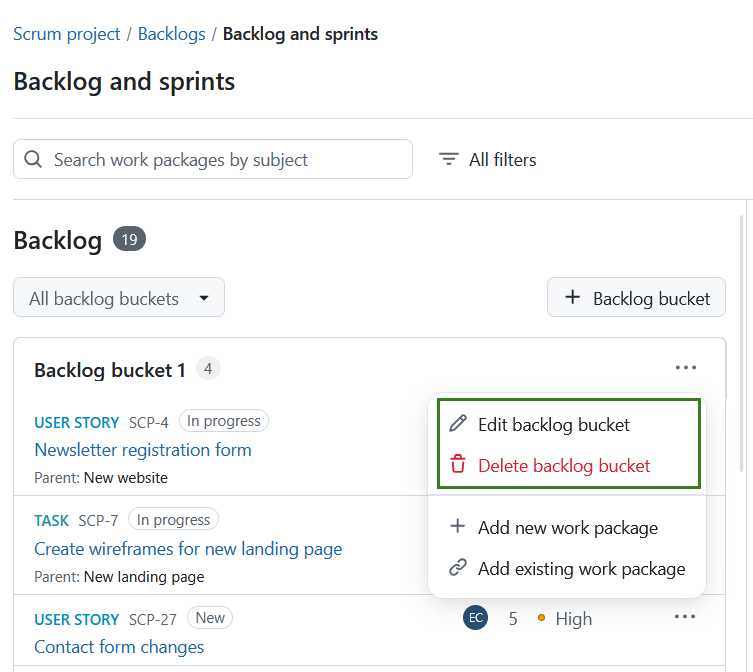
Beim Löschen eines Backlog buckets werden alle darin enthaltenen Arbeitspakete automatisch an das Ende des Eingangs-Backlogs verschoben.
Arbeitspakete können auch direkt über das Menü „Mehr“ der Arbeitspakete in einen Backlog-Bereich verschoben werden. Falls mehrere Backlog-Buckets vorhanden sind, können Sie in OpenProject den Ziel-Bucket auswählen. Das Arbeitspaket wird am unteren Rand des ausgewählten Buckets abgelegt.
Änderungen am Backlog Bucket eines Arbeitspakets werden auf der Registerkarte Aktivität des Arbeitspakets erfasst. Auf diese Weise können Sie nachvollziehen, wann ein Arbeitspaket in einen Backlog Bucket verschoben, aus diesem entfernt oder zwischen verschiedenen Backlog Buckets verschoben wurde.
Hinweis
Änderungen an Backlog Buckets sind auf der Registerkarte „Aktivität“ nur sichtbar, wenn Sie über die erforderlichen Berechtigungen zum Anzeigen von Sprint- und Backlog-Informationen verfügen.
Alle Backlog Buckets
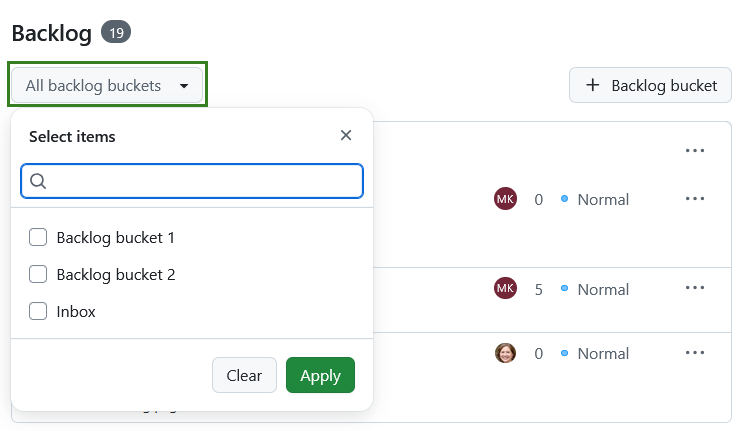
Die Schaltfläche „Alle Backlog Buckets“ ist ein Dropdown-Menü mit Mehrfachauswahl, mit dem Sie nach Buckets in Ihrem Backlog filtern können. Klicken Sie auf Alle Backlog Buckets. Wählen Sie die gewünschten Backlog Buckets aus, die angezeigt werden sollen, oder geben Sie einen Suchbegriff in das Suchfeld ein, um die Liste zu filtern. Klicken Sie auf Anwenden, um Ihre Änderungen zu speichern.
Posteingang
Der Posteingang wird automatisch mit allen Arbeitspaketen in einem Projekt gefüllt, die keinem Sprint oder Backlog-Bereich zugewiesen sind und die nicht durch die Backlog-Einstellungen des Projekts ausgeschlossen wurden. Wenn ein Arbeitspaket einem Sprint oder einem Bucket hinzugefügt oder geschlossen wird, wird es aus dem Posteingang entfernt.
Hinweis
Geschlossene Arbeitspakete werden aus dem Eingangs-Backlog und den Backlog buckets entfernt, sind aber weiterhin in den Sprints sichtbar.
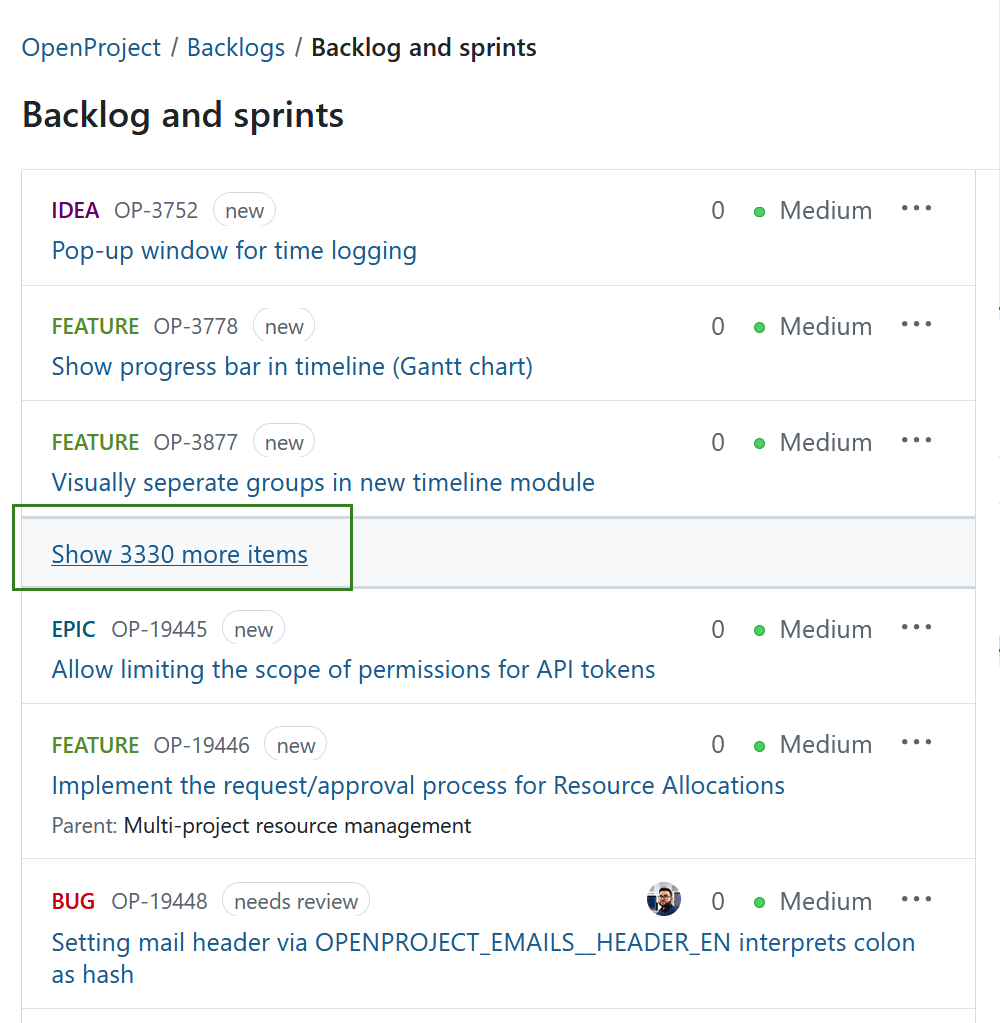
Wenn sich zu viele Elemente im Backlog befinden, erscheint in der Mitte des Eingangs-Backlogs ein Link Zeige weitere Elemente. Dadurch wird der mittlere Bereich ausgeblendet, sodass Sie immer den oberen und unteren Teil des Eingangs-Backlogs sehen.
Sind die Suchfunktion oder Filter aktiviert, wird die Anzahl der ausgeblendeten Arbeitspakete entsprechend angepasst. Wenn Sie auf „Weitere Elemente anzeigen“ klicken, werden nur Arbeitspakete angezeigt, die den aktuellen Kriterien entsprechen.
Arbeitspakete sortieren und verschieben
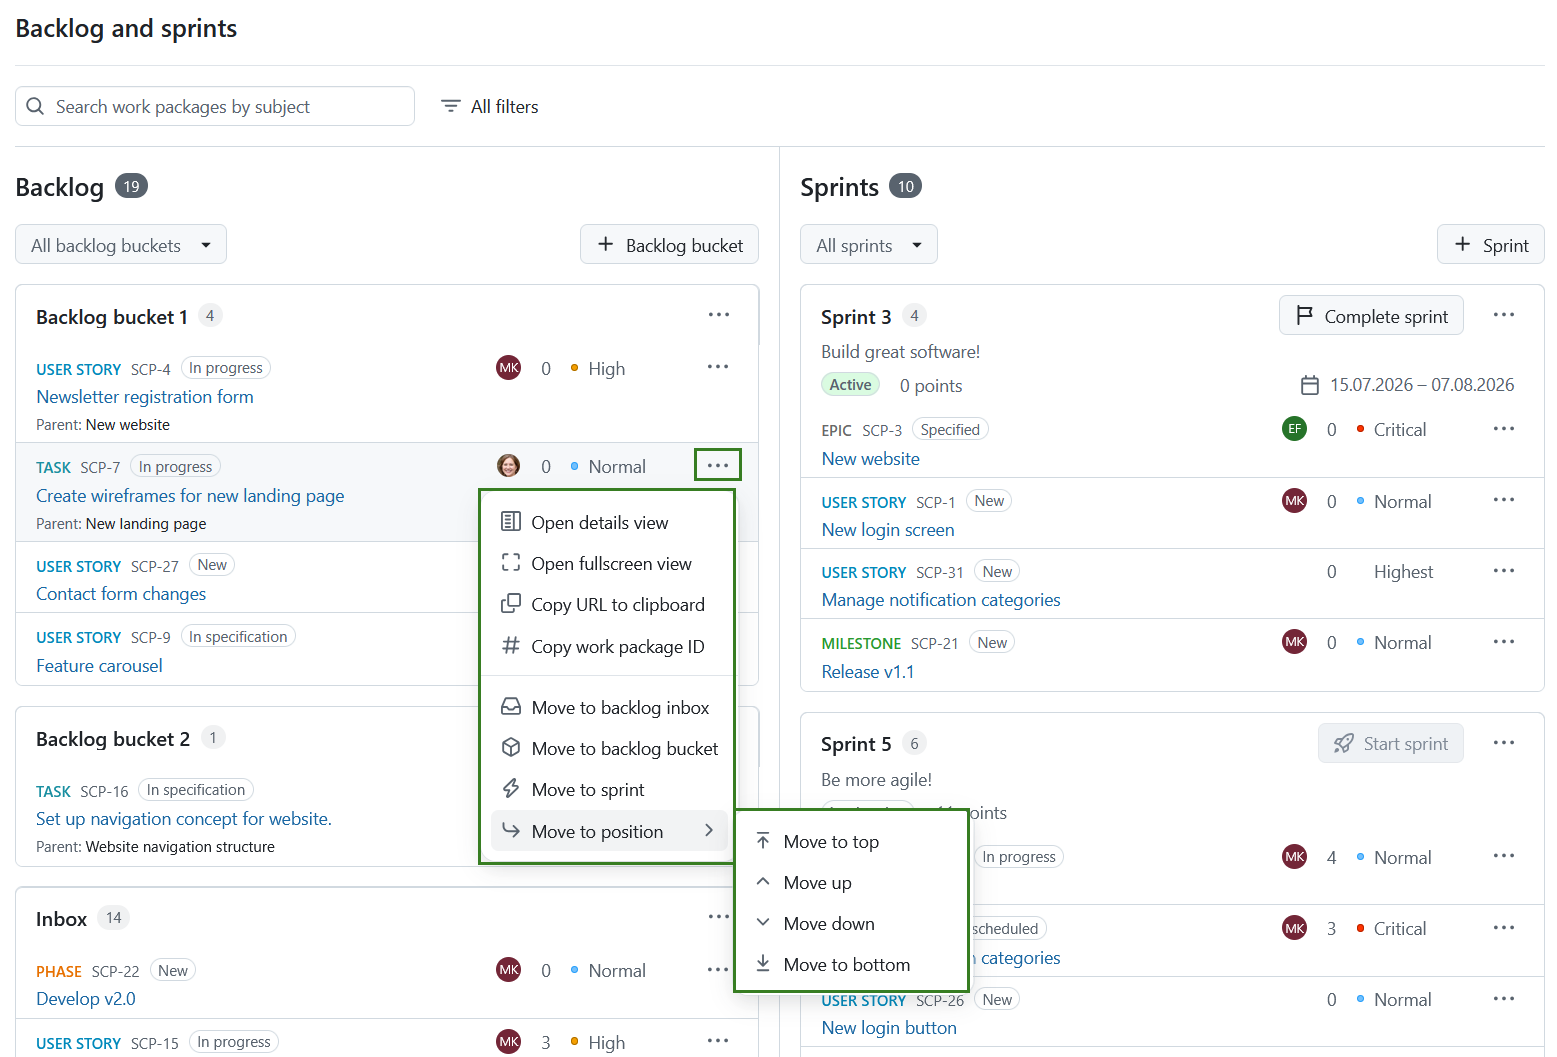
Neben jedem im Backlog, Eingangs-Backlog, Backlog bucket oder Sprint aufgeführten Arbeitspaket können Sie auf das Menü Mehr (drei Punkte) zugreifen, das folgende Optionen enthält:
- Öffnen Sie die Detailansicht oder die Vollbildansicht eines Arbeitspakets. Mit diesen Optionen können Sie festlegen, wie viele Informationen (über den Backlog Element) Sie anzeigen lassen möchten.
- Kopieren Sie die URL oder ID des Arbeitspakets in die Zwischenablage.
- In Backlog Posteingang verschieben
- In Backlog Bucket verschieben
- Zum Sprint verschieben
- Zu Position verschieben Mit dieser Option können Sie die Reihenfolge eines Arbeitspakets innerhalb seines aktuellen Containers ändern.
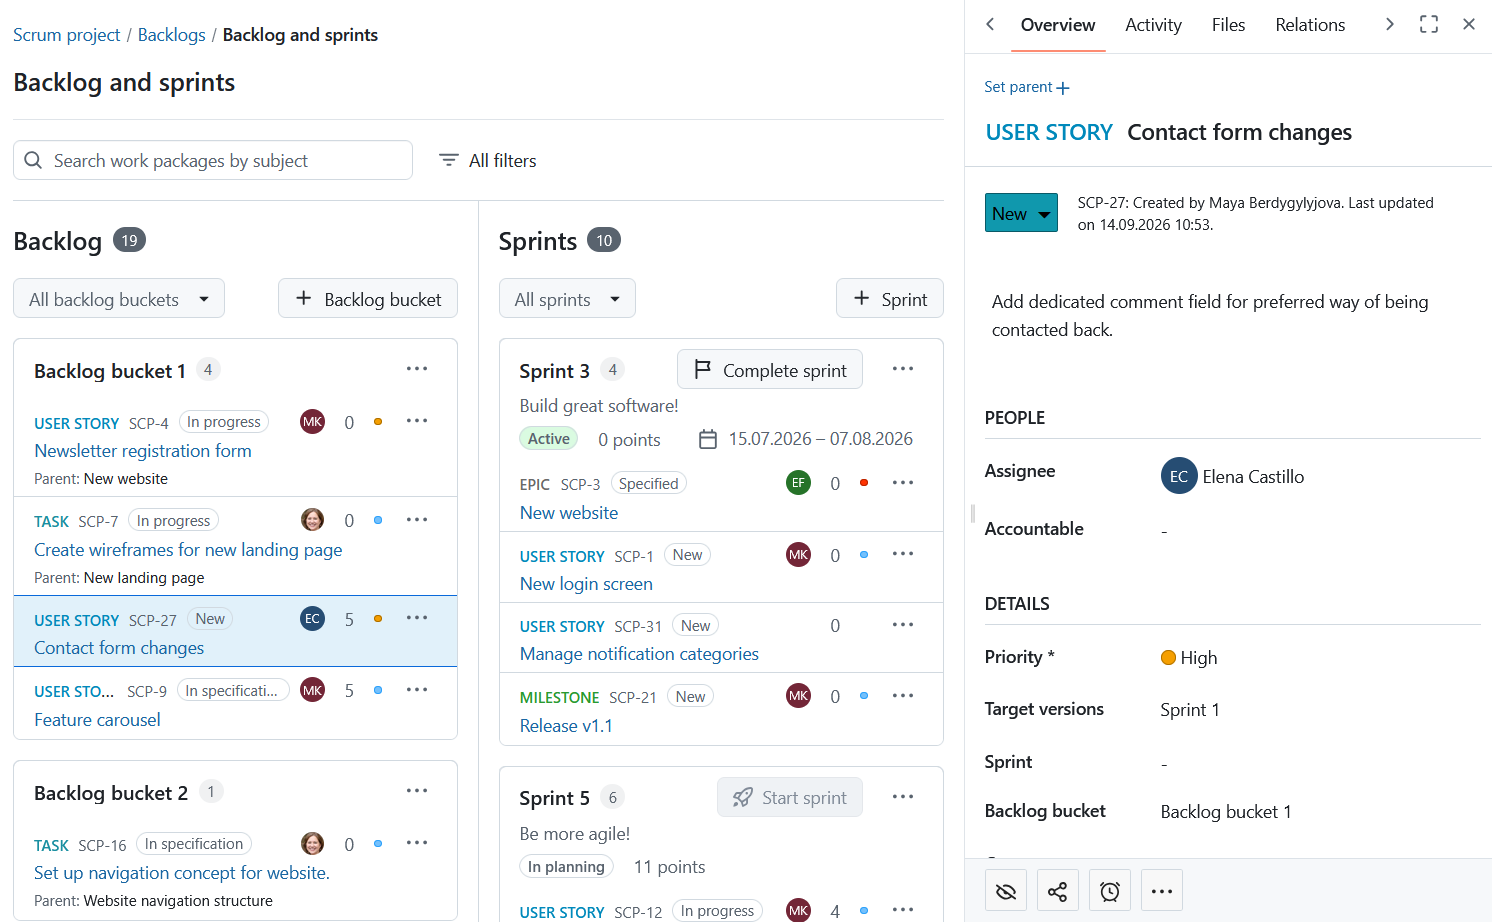
Die Detailansicht öffnet die Informationen zum Arbeitspaket auf der rechten Seite, genau wie im Benachrichtigungscenter. Sie können die Detailansicht mit einem einzigen Klick auf eine Arbeitspaketkarte öffnen.
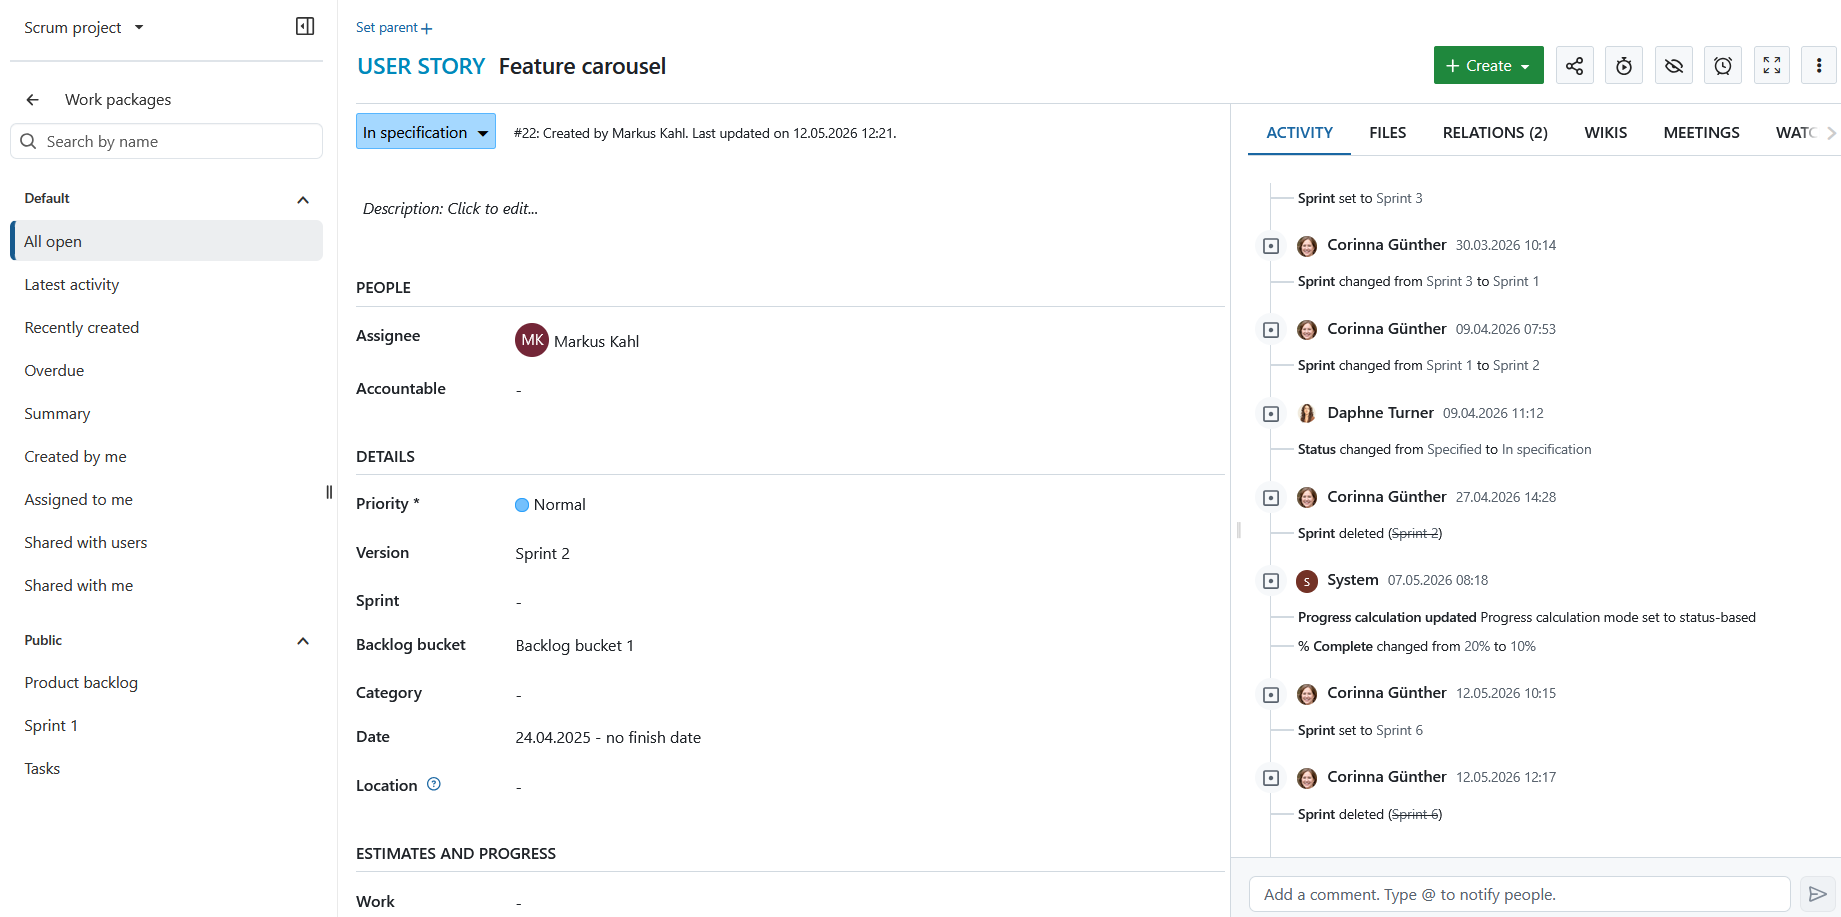
Wenn Sie die Vollbildansicht öffnen, wird das Arbeitspaket im Vollbildmodus geöffnet.
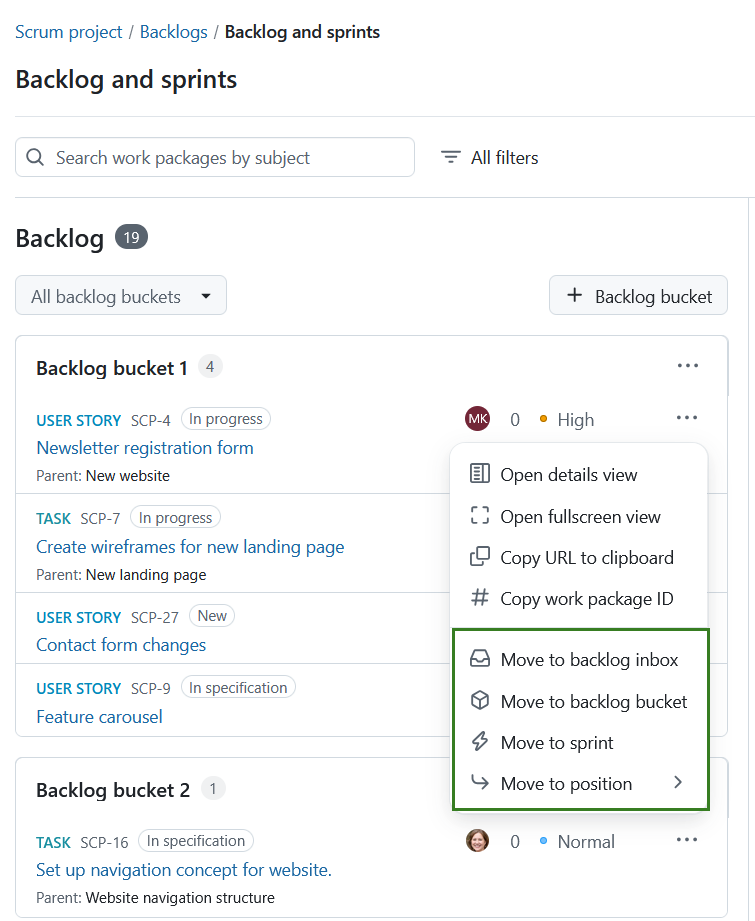
Sie können Arbeitspakete innerhalb des Backlogs des Posteingangs, eines Backlog Bucket oder eines Sprints priorisieren, indem Sie sie per Drag & Drop verschieben oder die im Menü Mehr verfügbaren Verschiebungsaktionen nutzen. Die gesamte Arbeitspaket-Karte kann als Drag-&-Drop-Bereich genutzt werden.
Je nach der aktuellen Position des Arbeitspakets können Sie es wie folgt verschieben:
- in den Posteingang.
- in ein anderes Backlog bucket,
- in einen anderen Sprint,
- innerhalb des aktuellen Backlog bucket oder Sprints
Sie können die Karte eines Arbeitspakets auch aus OpenProject herausziehen und in eine externe Anwendung ablegen, die Drag-and-Drop im Browser unterstützt. Je nach Zielanwendung passiert folgendes:
- Sie fügen die URL des Arbeitspakets als einfachen Text ein,
- Sie öffnen die URL des Arbeitspakets, wenn sie es in die Adressleiste oder die Registerkartenleiste eines anderen Browserfensters ziehen,
- Sie fügen einen Hyperlink ein, dessen Linktext dem Titel des Arbeitspakets entspricht, wenn Sie das Element in einen Rich-Text-Editor ziehen.
Die URL ist dieselbe URL, die Sie über „Mehr“ (drei Punkte) → „Kopieren“ aufrufen können.
Hinweis
Wie ein abgelegtes Arbeitspaket behandelt und angezeigt wird, hängt von der Zielanwendung, dem Browser und dem Betriebssystem ab. Möglicherweise unterstützen einige Anwendungen Drag & Drop nicht in allen Browsern.
Wenn Suchfunktionen oder Filter aktiv sind, berücksichtigen Sortier- und Verschiebungsaktionen nur die derzeit sichtbaren Arbeitspakete. Wenn Sie ein Arbeitspaket neu anordnen, während die Ansicht gefiltert ist, bleibt dessen neue Position auch nach dem Löschen der Suche oder der Filter erhalten.
Sollte nach dem Filtern in einem Sprint- oder Backlog-Bereich kein Arbeitspaket mehr sichtbar sein, wird ein in diesen Bereich gezogenes Arbeitspaket ganz oben platziert.
Ausgeschlossene Arbeitspakettypen und Status
Je nach Projektkonfiguration können bestimmte Arten von Arbeitspaketen und Status aus dem Backlog des Posteingangs und den Backlog Buckets ausgeschlossen werden. Dies kann unter Projekt-Backlog-Einstellungen konfiguriert werden.
Ausgeschlossene Arbeitspakete:
- erscheinen nicht im Posteingang.
- erscheinen nicht in den Backlog Buckets.
- erscheinen weiterhin in Sprints.
- erscheinen weiterhin auf den Sprint-Boards.
Wird ein Arbeitspaket in den „Inbox“-Backlog oder einen Backlog-Bereich verschoben und sind dessen Typ oder Status ausgeschlossen, wird die Verschiebung erfolgreich abgeschlossen. In einer Bestätigungsmeldung wird erläutert, dass das Arbeitspaket erfolgreich verschoben wurde, jedoch ausgeblendet ist, da sein Typ oder Status von den Backlog-Ansichten ausgeschlossen ist.
Sprints erstellen und verwalten
Wichtig
Ab der Version OpenProject 17.3 sind Sprints neue Objekte, die nicht mehr an Versionen gebunden sind (wie es bei früheren OpenProject-Versionen der Fall war).
Ein Sprint ist ein geplanter und zeitlich begrenzter Zeitraum, in dem ein Scrum-Team eine bestimmte Anzahl von Aufgaben erledigt. Es handelt sich um Container, in die Arbeitspakete per Drag & Drop oder über das Menü manuell aus dem Eingangs-Backlog oder aus Backlog buckets hinzugefügt oder daraus entfernt werden können.
Sprints erstellen
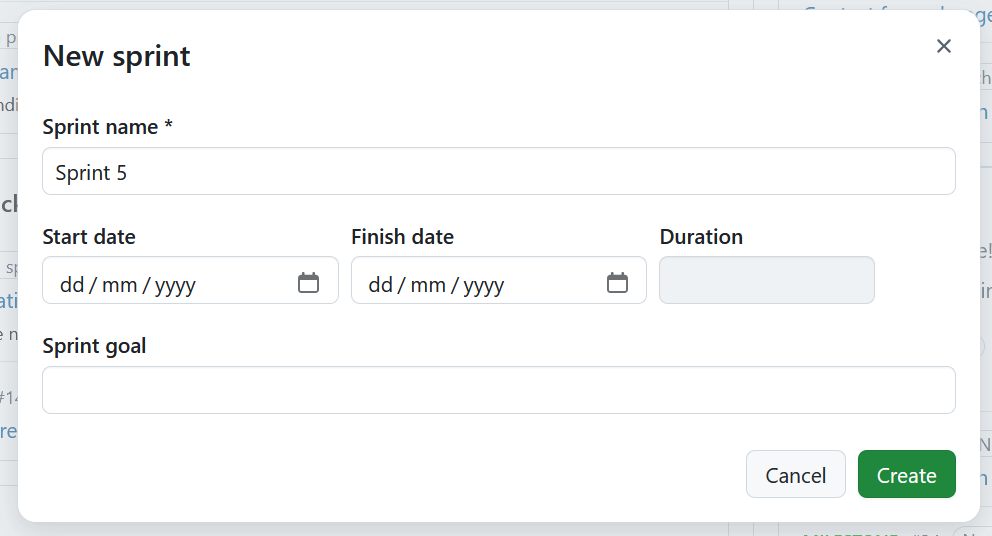
Um einen Sprint zu erstellen, klicken Sie auf die Schaltfläche + Sprint in der oberen rechten Ecke des Backlogs-Moduls. Dadurch wird ein Formular geöffnet, in das Sie den Namen des Sprints, das Startdatum, das Enddatum und – optional – ein Sprint-Ziel eingeben können. Das Sprint-Ziel ist ein kurzer Text, der das Hauptziel des Sprints beschreibt. Die Dauer wird automatisch berechnet. Klicken Sie auf die Schaltfläche Erstellen, um fortzufahren.
Die Benennung von Sprints erfolgt standardmäßig numerisch (z. B. Sprint 1, Sprint 2). Diese Namen können entsprechend dem Arbeitsrhythmus Ihres Teams angepasst werden.
Sprint-Ziele
Das Sprint-Ziel dient dazu, dem Team das Hauptziel des Sprints zu vermitteln. Dieser Wert kann beim Anlegen oder Bearbeiten eines Sprints eingegeben werden.
Bei gemeinsamen Sprints sind die Sprint-Ziele projektspezifisch. Das bedeutet, dass jedes Projekt, das den gemeinsamen Sprint nutzt, sein eigenes Ziel festlegen kann, ohne dass dies Auswirkungen auf andere Projekte hat.
Beim Bearbeiten eines gemeinsam genutzten Sprints zeigt OpenProject an, welche Felder projektübergreifend sind und welche projektspezifisch sind. Je nach Ihren Berechtigungen im Freigabeprojekt und im aktuellen Projekt sind einige Felder möglicherweise schreibgeschützt.
Einen Sprint starten oder abschließen
Ihr Sprint wird in Gang gesetzt, indem Sie auf die Schaltfläche Sprint starten in der Kopfzeile des Sprints klicken. Wenn Sie darauf klicken, wird das Sprint Board geöffnet.
Hinweis
Wenn Ihr Projekt nicht so konfiguriert ist, dass mehrere aktive Sprints (Enterprise Add-on) zulässig sind, können Sie keinen neuen Sprint starten, solange bereits ein anderer Sprint läuft. In diesem Fall ist die Schaltfläche „Sprint starten“ deaktiviert. Um mehrere aktive Sprints zuzulassen, lesen Sie die Einstellungen zum Projekt Backlog.
Sobald ein Sprint begonnen hat, gilt er als aktiv. Die Sprint-Kopfzeile zeigt den aktuellen Sprint-Status an und ermöglicht es Ihnen, den Sprint direkt von der Kopfzeile aus abzuschließen. Um einen Sprint abzuschließen, klicken Sie auf die Schaltfläche Sprint abschließen in der Kopfzeile des Sprints.
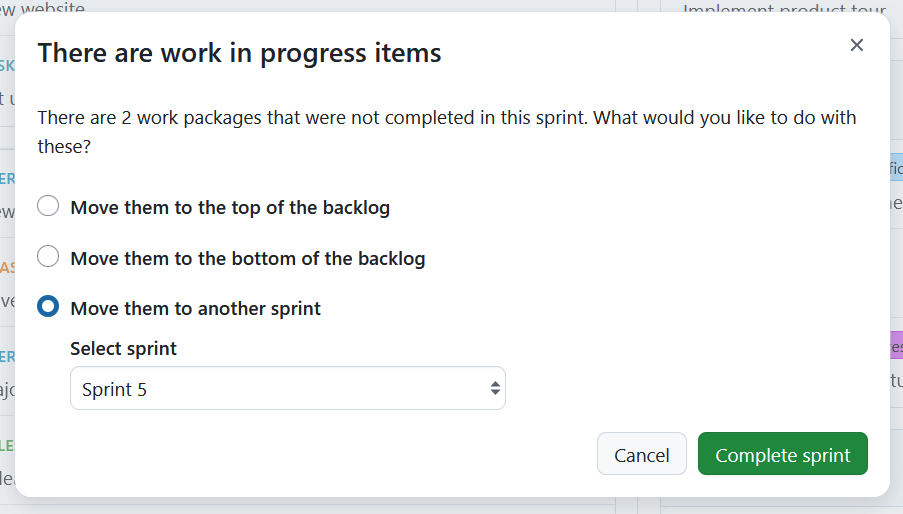
Falls sich noch unvollendete Arbeitspakete im Sprint befinden, öffnet sich ein Dialogfeld, in dem Sie entscheiden können, was mit ihnen geschehen soll. Sie haben folgende Möglichkeiten:
- Sie an den Anfang des Eingangs-Backlogs verschieben
- Sie an das Ende des Eingangs-Backlogs verschieben
- Sie in einen anderen Sprint verschieben
Arbeitspakete, deren Status unter Projekt-Backlog-Einstellungen als geschlossen konfiguriert ist, werden nicht verschoben, wenn ein Sprint abgeschlossen ist.
Wenn Sie sich dafür entscheiden, Arbeitspakete in einen anderen Sprint zu verschieben, müssen Sie den Zielsprint aus der Liste auswählen. Nachdem Sie Ihre Auswahl getroffen haben, klicken Sie auf die Schaltfläche Sprint abschließen, um den Sprint zu beenden. Der Sprint wird dann als abgeschlossen markiert, und andere Sprints können gestartet werden.
Hinweis
Arbeitspakete, die in den Posteingang verschoben wurden, werden möglicherweise nicht angezeigt, wenn ihr Typ oder Status von den Backlog-Ansichten ausgeschlossen ist.
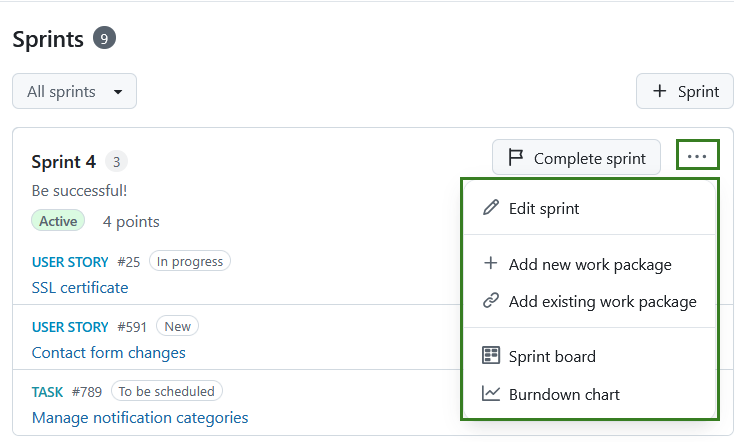
Über das Sprint-Menü stehen weitere Sprint-Aktionen zur Verfügung, darunter:
- Sprint bearbeiten
- Neues Arbeitspaket hinzufügen
- Vorhandenes Arbeitspaket hinzufügen
- Sprint-Board
- Burndown-Diagramm
Die Sprint-Details, einschließlich des Sprint-Ziels, können auch über das Dialogfeld Sprint bearbeiten bearbeitet werden.
Alle Sprints filtern
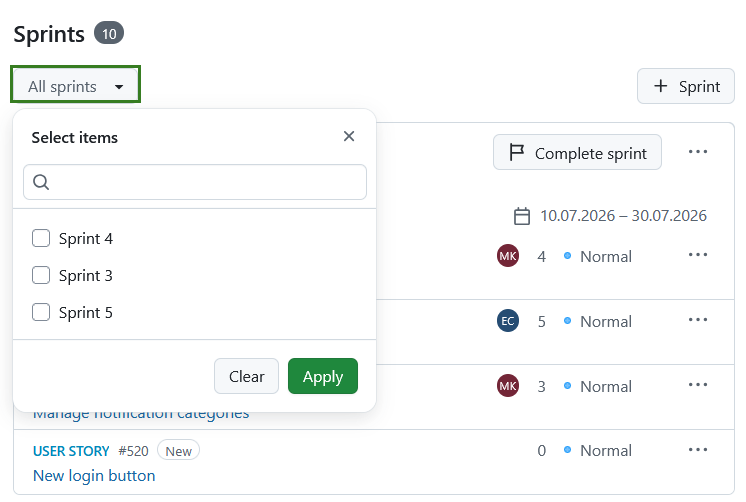
Die Schaltfläche „Alle Sprints“ ist ein Dropdown-Menü mit Mehrfachauswahl, über das Sie nach Sprints filtern können. Klicken Sie auf Alle Sprints. Wählen Sie die gewünschten Sprint Container aus, die angezeigt werden sollen, oder geben Sie einen Suchbegriff in das Suchfeld ein, um die Liste zu filtern. Klicken Sie auf Anwenden, um Ihre Änderungen zu speichern.
Ein neues Arbeitspaket hinzufügen
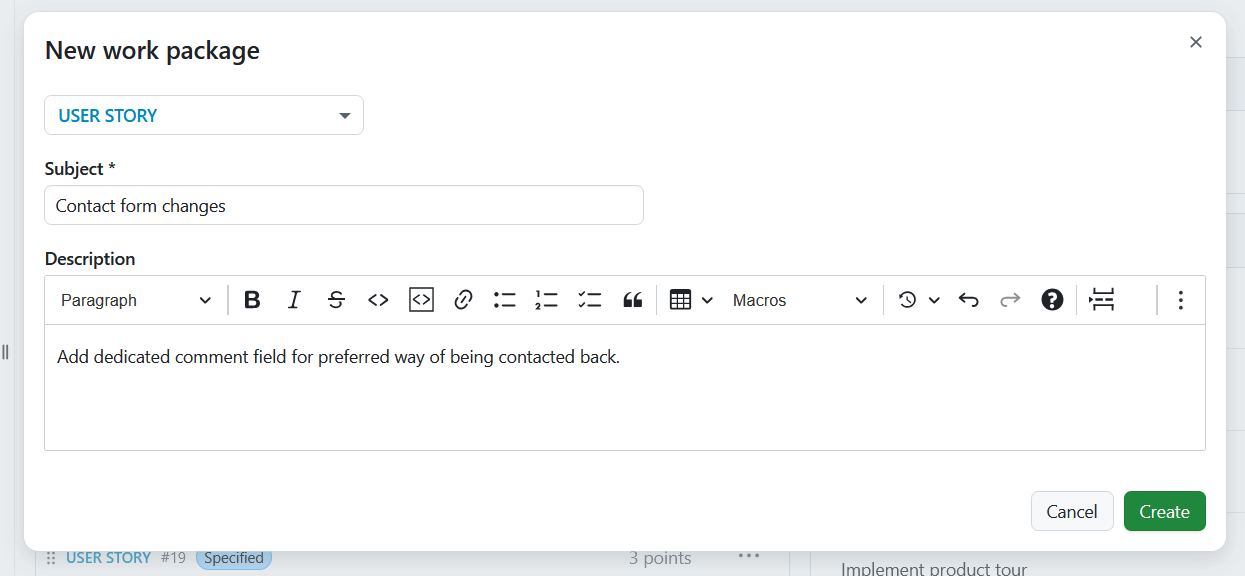
Um ein neues Arbeitspaket im Modul Backlogs zu erstellen, klicken Sie auf das Symbol Mehr (drei Punkte) in der oberen rechten Ecke eines Sprints und wählen Sie + Neues Arbeitspaket hinzufügen aus dem Dropdown-Menü. Es erscheint ein Formular-Dialog zum Erstellen eines neuen Arbeitspakets. Hier geben Sie direkt die Art des Arbeitspakets, den Betreff und die Beschreibung an. Klicken Sie auf Anlegen, um fortzufahren.
Dem Backlog wird ein neuer Eintrag hinzugefügt, um die neu erstellte Story anzuzeigen.
Vorhandenes Arbeitspaket hinzufügen
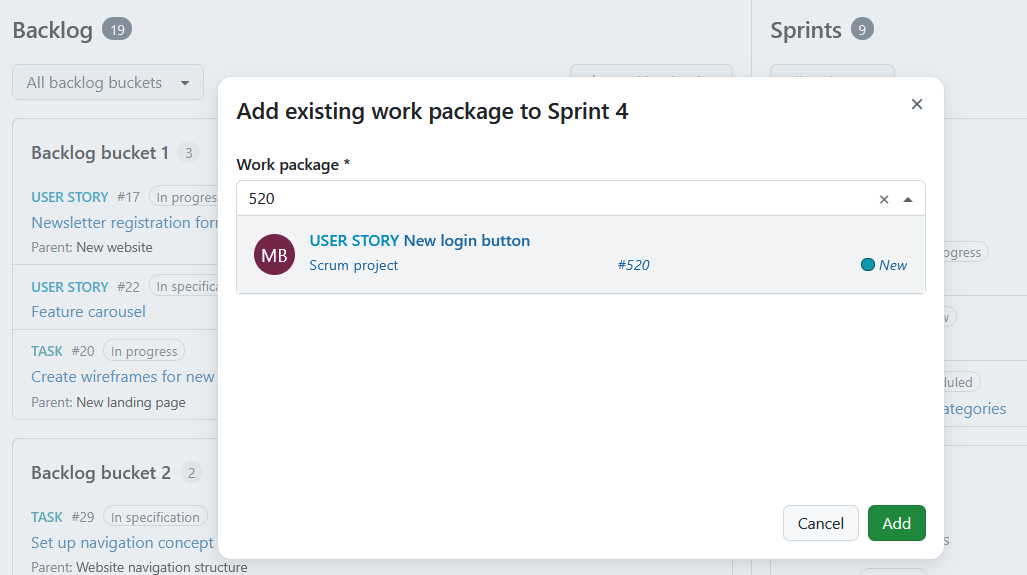
Um ein existierendes Arbeitspaket im Modul Backlogs hinzuzufügen, klicken Sie auf das Symbol Mehr (drei Punkte) in der oberen rechten Ecke eines Sprints und wählen Sie Vorhandenes Arbeitspaket hinzufügen aus dem Dropdown-Menü. Es erscheint ein Formulardialog, über den Sie bereits im Backlog vorhandene Arbeitspakete hinzufügen können.
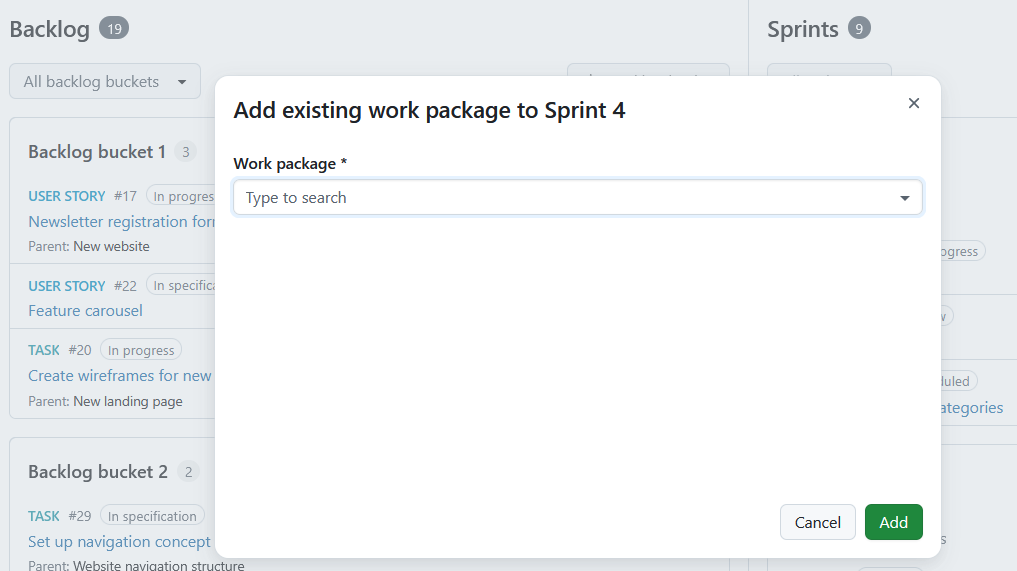
Geben Sie im Suchfeld den Typ des Arbeitspakets, den Titel oder die ID ein. Wählen Sie das angezeigte Arbeitspaket aus und klicken Sie auf Hinzufügen, um fortzufahren. Die Elemente im Sprint werden aktualisiert.
Stories priorisieren
Sie können verschiedene Arbeitspakete innerhalb des Backlogs des Posteingangs, eines Backlog-Buckets oder eines Sprints priorisieren, indem Sie diese per Drag & Drop verschieben oder die Option An Position verschieben aus dem Menü Mehr verwenden. Auf diese Weise können Sie Arbeitspakete einem bestimmten Sprint oder Backlog bucket zuweisen, sie in das Eingangs-Backlog zurückverschieben oder sie innerhalb eines Sprints oder Buckets neu anordnen.
Story-Punkte
In einem Sprint können Sie den notwendigen Aufwand direkt als Story Points dokumentieren.
Story Punkte sind Zahlen, die einem Arbeitspaket zugewiesen werden, um den (relativen) Umfang der Arbeit zu schätzen.
Die Sprint-Kopfzeile zeigt die Gesamtzahl der Story-Punkte an, die den Arbeitspaketen im Sprint zugewiesen sind.
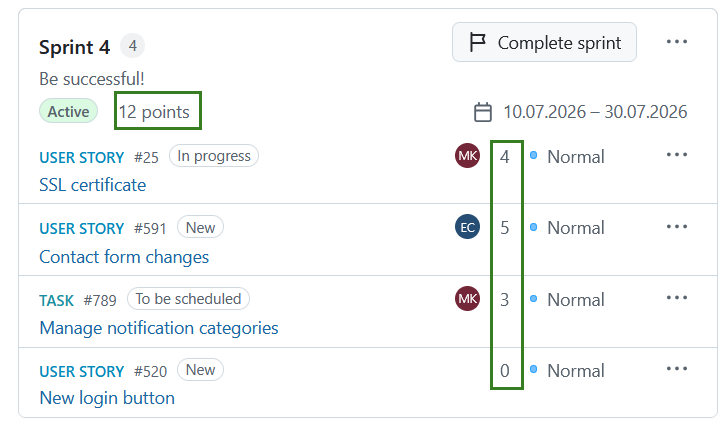
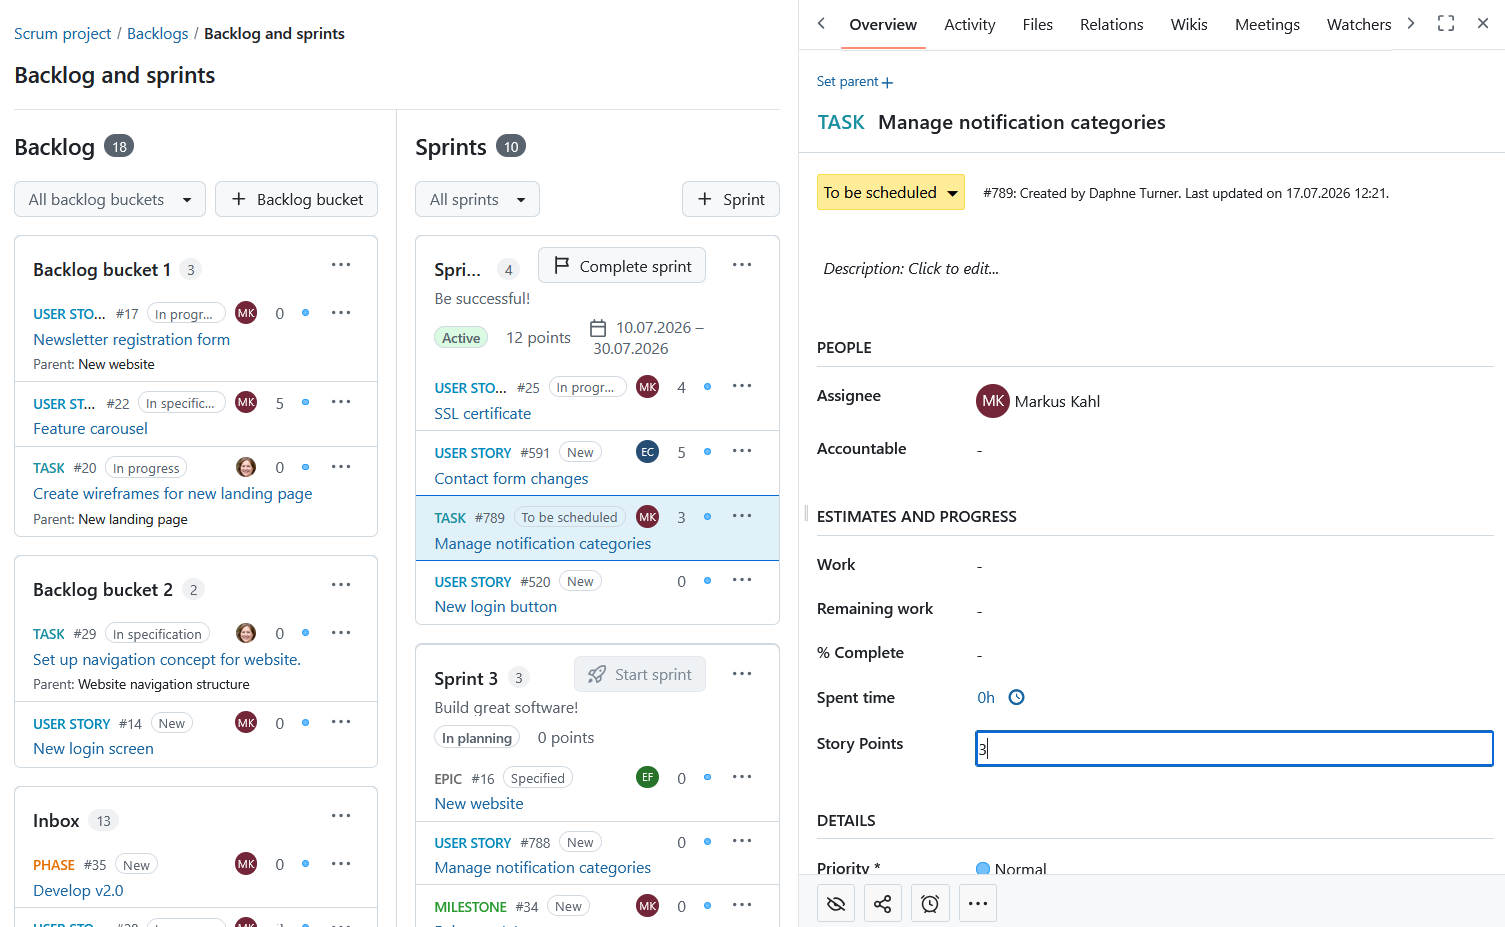
Sie können die Story-Punkte direkt in der Backlogs-Ansicht bearbeiten. Klicken Sie dazu einfach auf das Arbeitspaket, das Sie bearbeiten möchten, und nehmen Sie die gewünschten Änderungen in der Detailansicht des Arbeitspakets vor, die sich dann auf der rechten Seite öffnet.
Sprint-Boards
Sprint Boards sind für Teams besonders hilfreich, um den Fortschritt von Anfang an zu verfolgen und zu visualisieren.
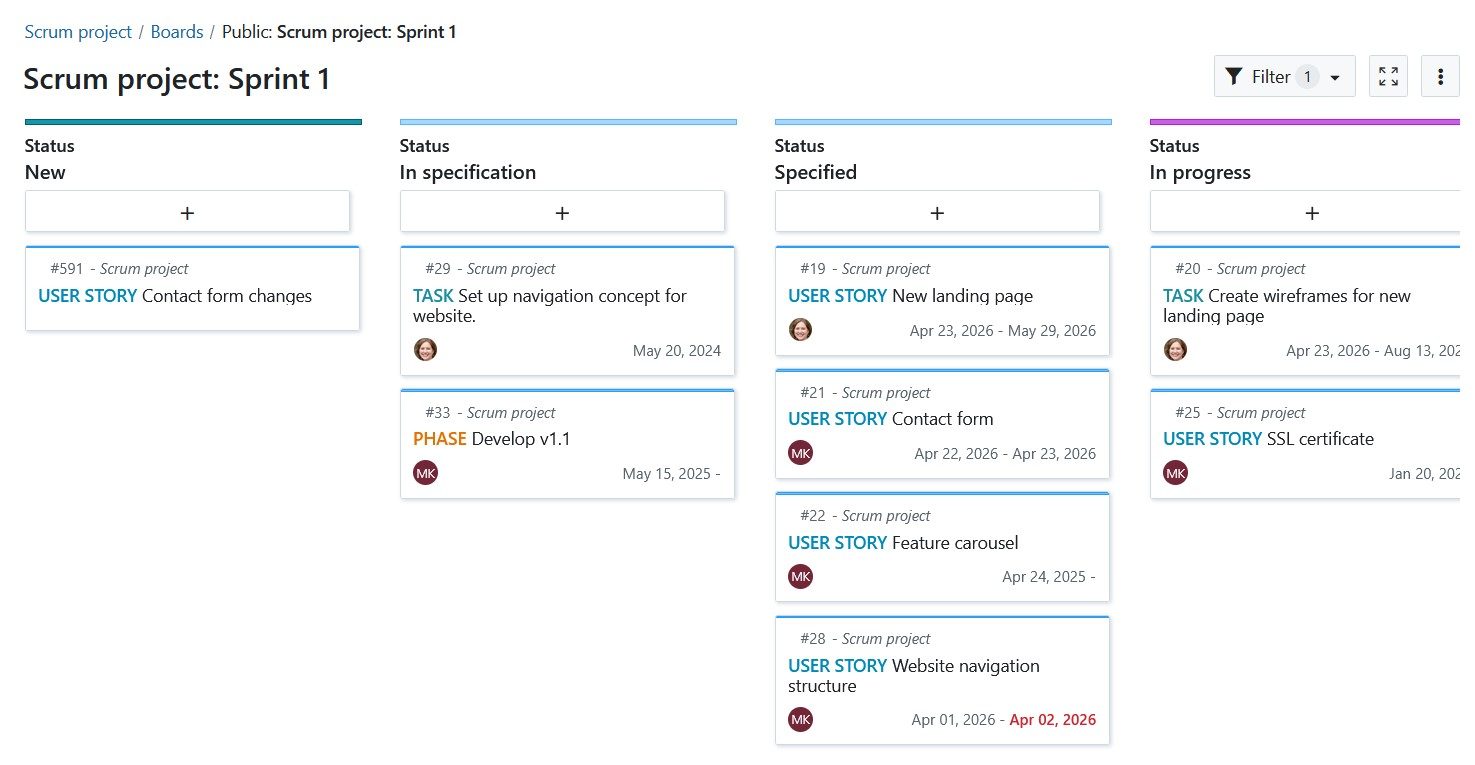
Wenn Sie in der Kopfzeile eines Sprints auf die Schaltfläche Sprint starten klicken, wird automatisch ein spezielles Sprint Board erstellt und Sie werden zum aktiven Sprint Board weitergeleitet. Boards werden nach folgendem Muster benannt: [Projektname: Sprintname]. Ein Beispiel: Scrum-Projekt: Sprint 1.
Das Sprint Board erbt automatisch die Projektberechtigungen, d.h. es ist standardmäßig für alle Projektmitglieder zugänglich.
Hinweis
Das Sprint Board und das Burndown-Diagramm sind nur im Menü sichtbar, wenn ein Sprint aktiv ist.
Sprint-Feld in Arbeitspaket-Tabellen
Die Sprint-Eigenschaft kann auch in Arbeitspaket-Tabellen verwendet werden. Sie können:
- die Sprint-Spalte anzeigen,
- nach Sprint sortieren,
- Arbeitspakete nach Sprint gruppieren.
Hinweis
Für die Anzeige von Sprint-Informationen in Arbeitspaket-Tabellen sind entsprechende Projektberechtigungen erforderlich.
Sie können die Zuordnung mehrerer Arbeitspakete zu einem Sprint oder Backlog auch gleichzeitig über Bulk Edit ändern.
Burndown-Diagramm
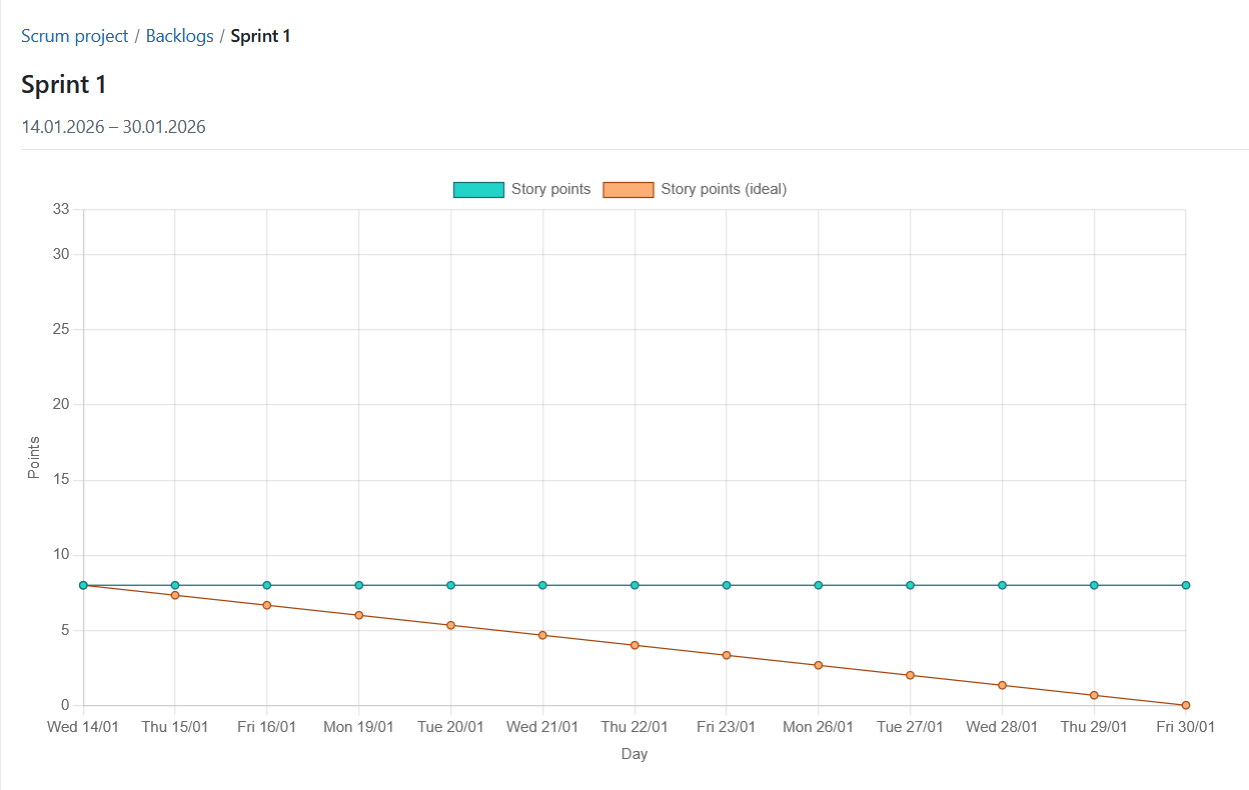
Burndown-Diagramme sind hilfreich, um den Fortschritt eines Sprints zu visualisieren. Mit OpenProject können Sie Sprint- und Task-Burndown-Charts automatisch generieren.
Tipp
Voraussetzung dafür ist, dass das Start- und Enddatum des Sprints definiert sind und die Informationen zu den Story Points gut gepflegt sind.
Der Sprint-Burndown wird aus der Summe der geschätzten Story-Punkte berechnet. Wenn eine User Story auf “geschlossen” gesetzt ist (oder einen anderen Status hat, der in den Projekt-Backlog-Einstellungen als geschlossen konfiguriert ist), zählt sie für den Burndown. Der Aufgaben-Burndown errechnet sich aus der geschätzten Anzahl der Stunden, die zur Erledigung einer Aufgabe notwendig sind. Wenn eine Aufgabe auf “geschlossen” gesetzt wird, wird der Burndown angepasst.
Die verbleibenden Story-Punkte pro Sprint werden im Diagramm angezeigt. Optional kann auch das ideale Burndown-Diagramm als Referenz angezeigt werden. Der ideale Burndown geht von einer linearen Abarbeitung der Story Points vom Anfang bis zum Ende eines Sprints aus.
Sprints teilen

Die gemeinsame Nutzung von Sprints ermöglicht es mehreren Projekten, dieselbe Sprintstruktur zu verwenden. Ein Sprint kann mit anderen Projekten, Unterprojekten oder gar nicht geteilt werden. Dies wird unter Projekteinstellungen konfiguriert.
Gemeinsame Sprints können Teams helfen, die Planung projektübergreifend zu koordinieren und unterstützen skalierte agile Frameworks wie SAFe.
Mehrere aktive Sprints
Sie können mehrere Sprints gleichzeitig aktiv haben. Diese Einstellung muss unter Projekteinstellungen aktiviert werden.
Alle Sprints
Die Alle Sprints Ansicht bietet eine einfache Übersicht über jeden Sprint im Projekt, einschließlich der Planung, der aktiven und abgeschlossenen Sprints.
Die Tabelle enthält den Namen des Sprints, den Status, das Startdatum, das Enddatum und die Anzahl der Arbeitspakete. Die Liste der Sprints ist nach Sprintdaten und anschließend nach Sprintnamen sortiert.
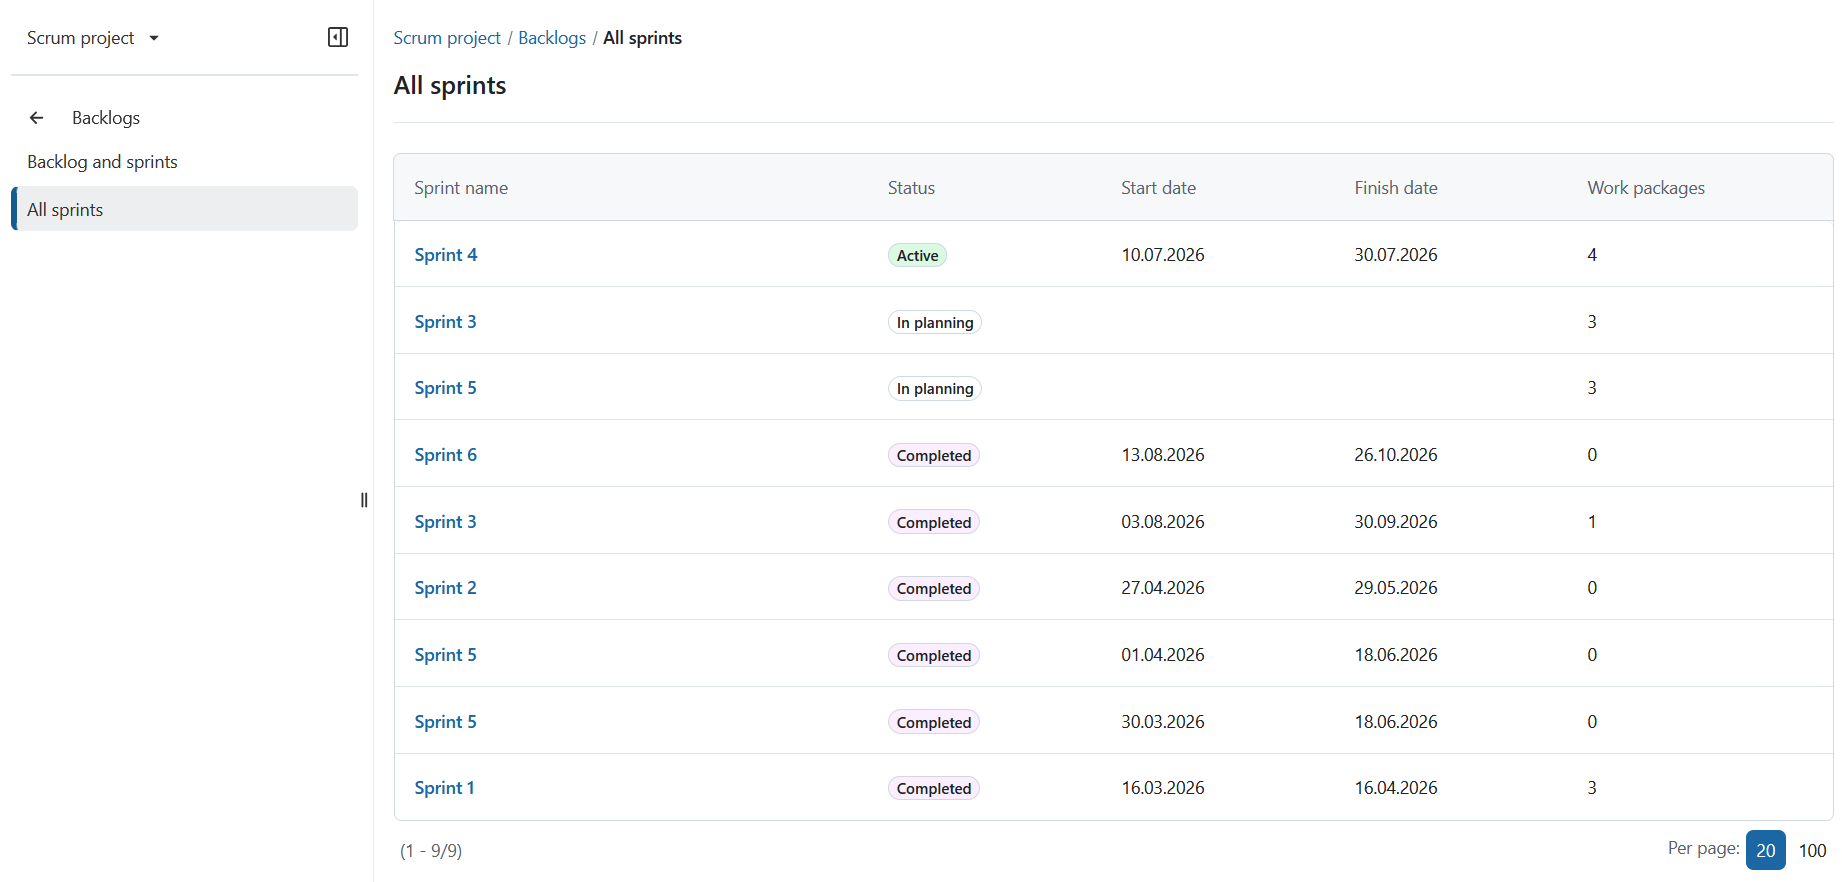
Wenn Sie einen Sprint auswählen, wird je nach dessen Status die entsprechende Zielseite geöffnet:
- Aktive Sprints öffnen das Sprint-Board.
- Sprints ** In Planung** öffnen die Sprintplanungsansicht.
- Abgeschlossene Sprints öffnen eine auf diesen Sprint gefilterte Arbeitspaket-Tabelle.