Backlog and sprints
Remarque
The Backlogs module is actively being improved. This documentation is updated regularly to reflect the latest changes.
Working in agile project teams is becoming increasingly important, and with OpenProject, it is easier than ever. OpenProject supports your work with the Agile and Scrum methodology by providing a variety of improved functionalities. Vous pouvez désormais créer et gérer des sprints, enregistrer et hiérarchiser les lots de travaux dans les sprints et le backlog, utiliser des tableaux de sprints automatisés ou des graphiques burndown, et bien plus encore. Pour plus d’informations, veuillez vous référer à la page OpenProject fonctionnalités Agile et Scrum.
Un Backlog est défini comme un module qui vous permet d’utiliser la fonctionnalité des backlogs dans OpenProject. In order to use backlogs in a project, the Backlogs module has to be activated in the project settings.
Please note that this user guide does not represent an introduction to Scrum methodology, but merely explains the Scrum-related functionalities and user instructions in OpenProject.
Manage the backlog
The Backlogs module is divided into two sides: on the left, you’ll find the Backlog, consisting of the Inbox backlog at the bottom and Backlog buckets above it (if created). On the right side, Sprints are displayed. If no backlog buckets have been created, only the Inbox backlog is shown on the left.
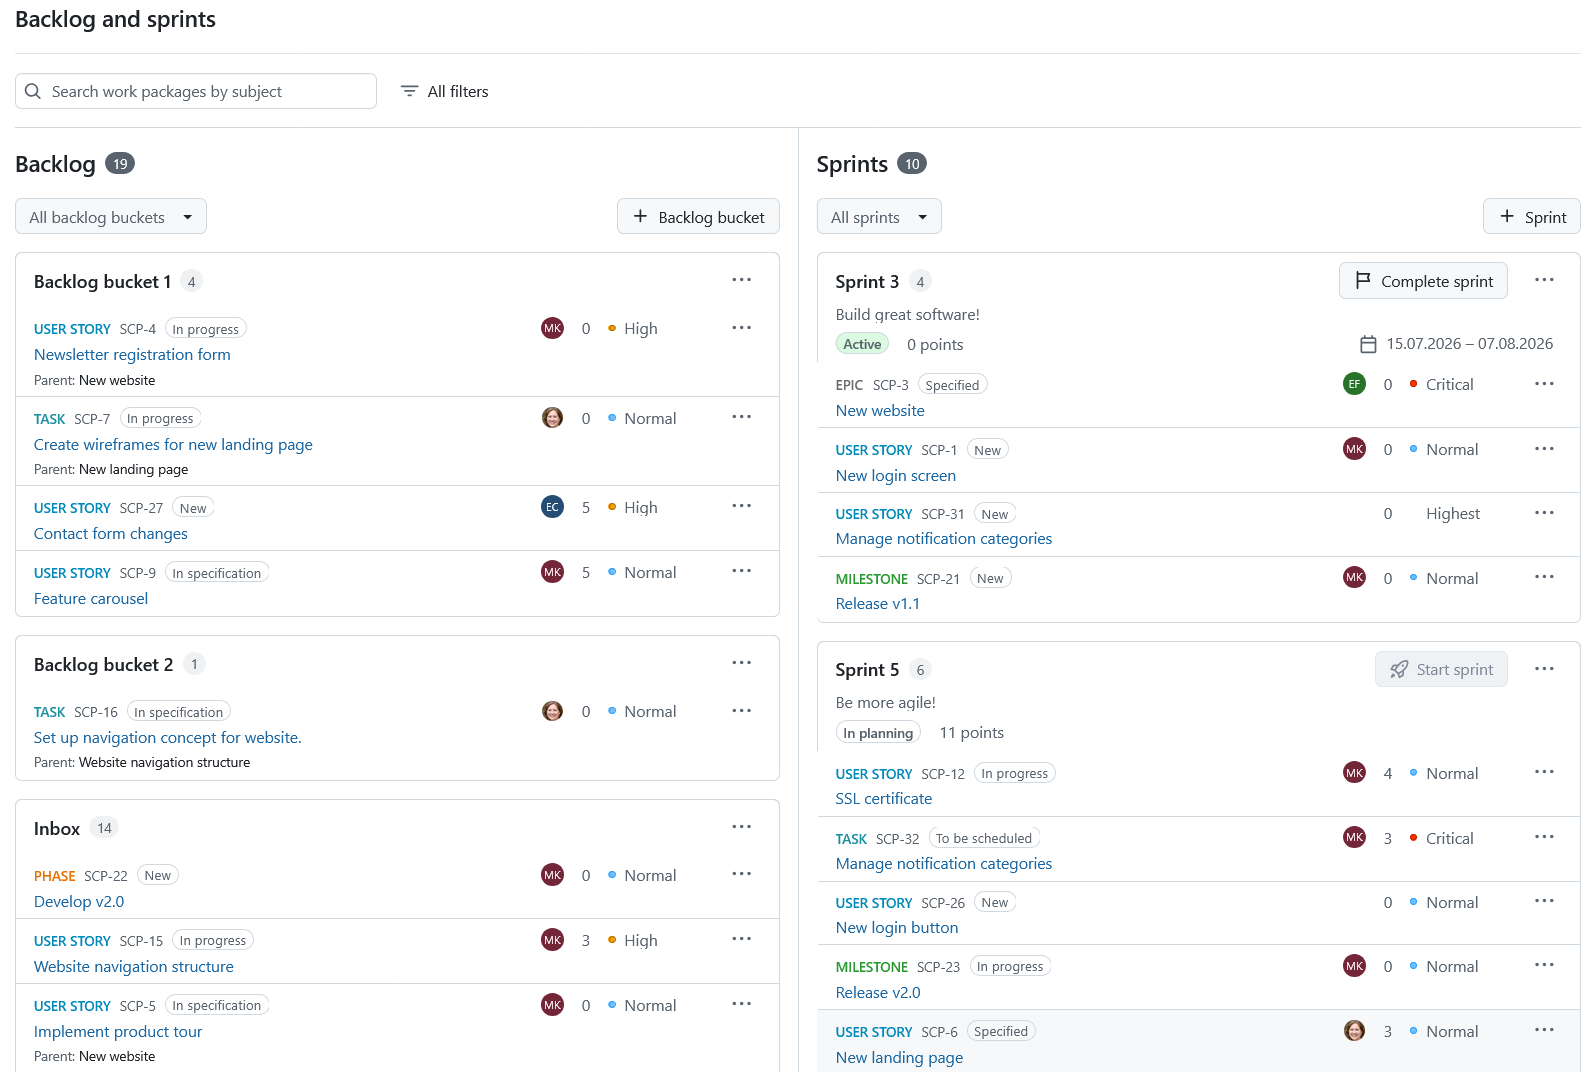
Backlog and sprint filters
At the top of the Backlog and sprints page, you can search and filter work packages to focus on specific items during backlog refinement or sprint planning.
Enter text in the Search by name field to show only work packages with a matching subject. The results are updated as you type across sprints, backlog buckets and the Inbox backlog.

Click the All filters button to further narrow down the displayed work packages.
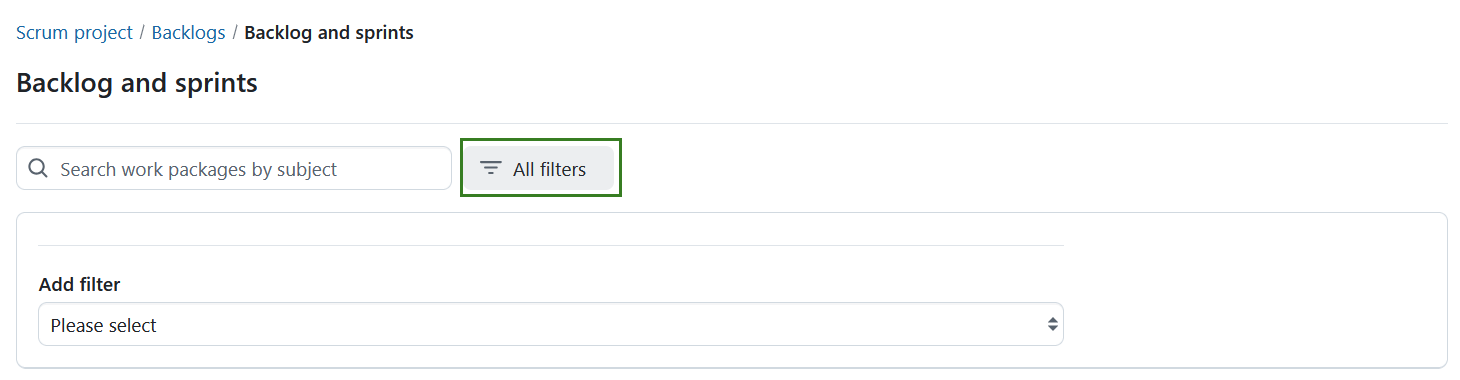
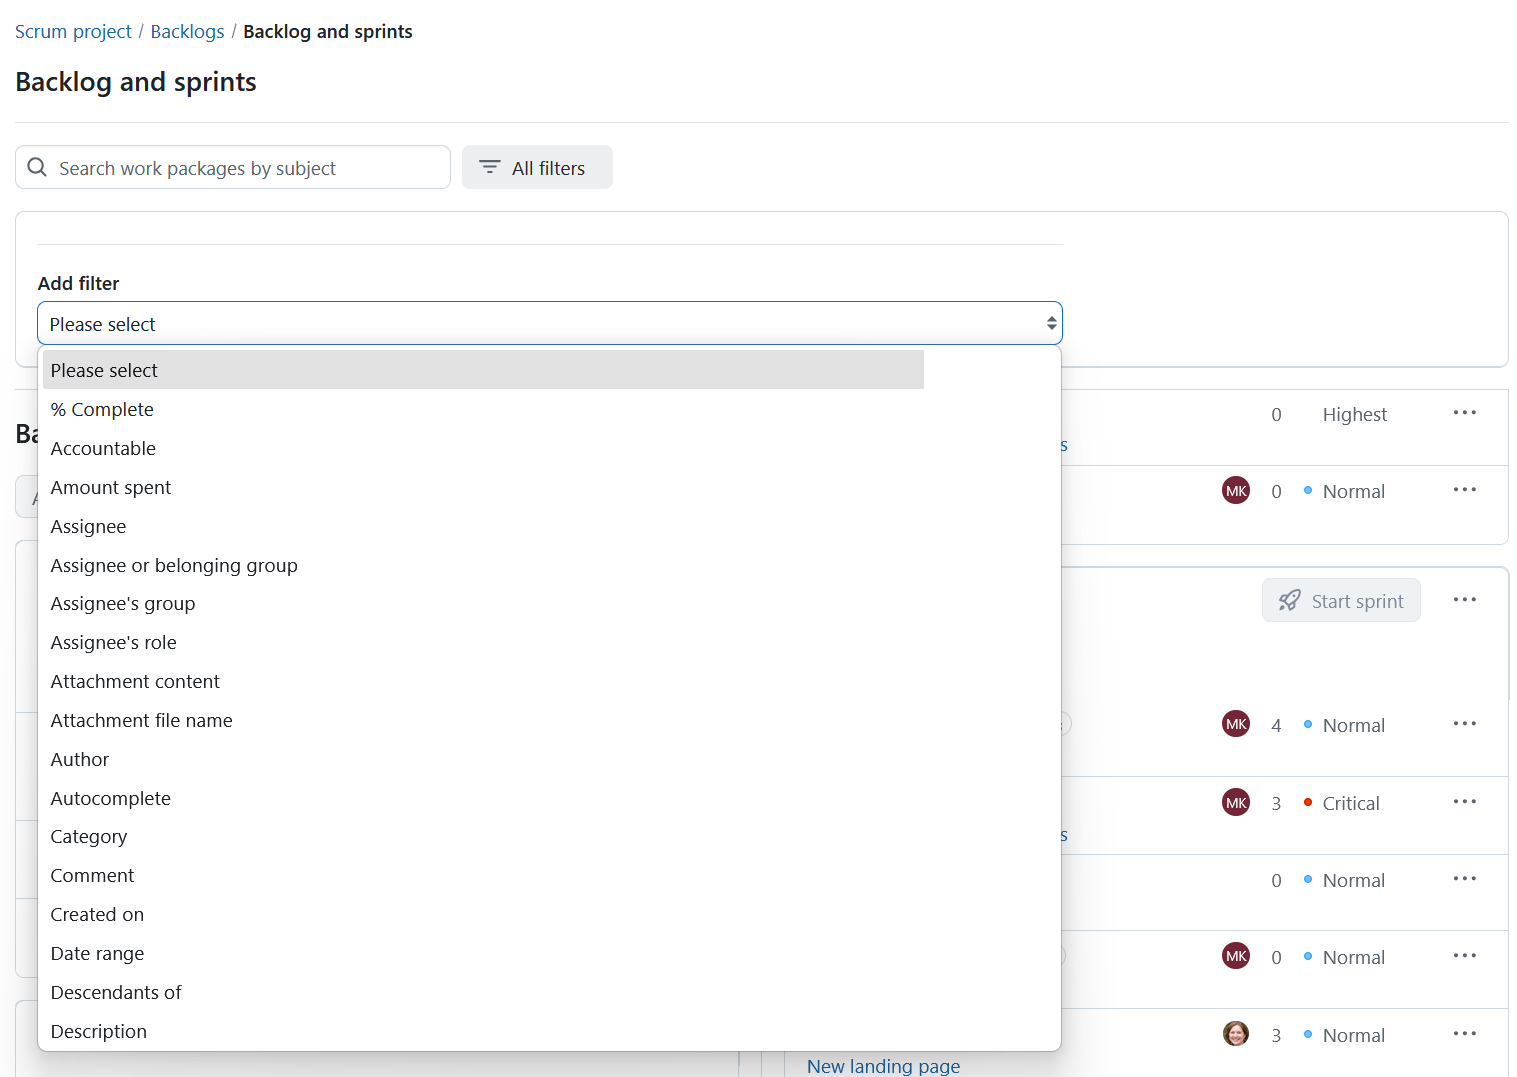
In the filter panel, you can add filters for type, subject, assignee, status, other available work package attributes and custom fields. Filtering work packages works the same way as throughout the application. The Backlog and sprints view is updated automatically when filters are applied.
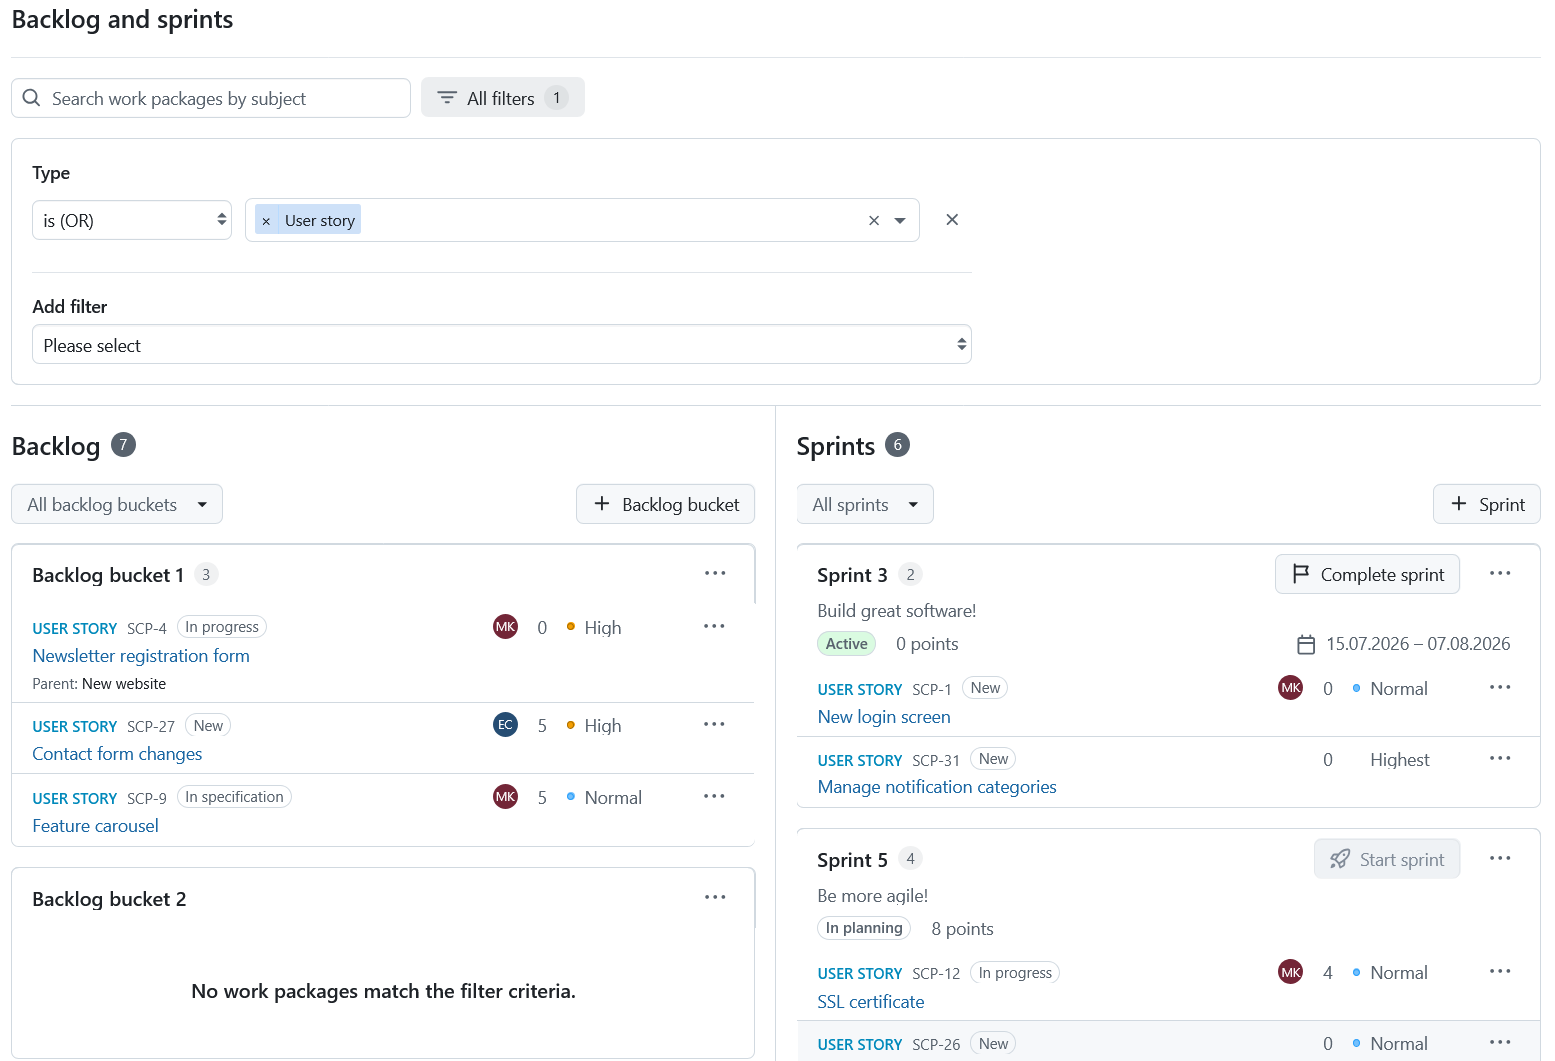
Search and filters apply to work packages in all containers: sprints, backlog buckets and the Inbox backlog. Work packages that do not match the current criteria are temporarily hidden.
The work package count and story points shown for each container are adjusted to reflect the currently visible work packages. If no work packages in a container match the current criteria, the container remains visible but indicates that there are no matching work packages.
Remarque
Searching and filtering only changes which work packages are displayed. It does not change their assignment to a sprint, backlog bucket or the Inbox backlog.
Click the All filters button again to close the filter panel.
Remarque
Filtered Backlogs views were introduced in OpenProject 17.9 and cannot yet be saved. In the meantime, you can bookmark the URL of a filtered view to return to it later or share the URL with others.
Sprint containers
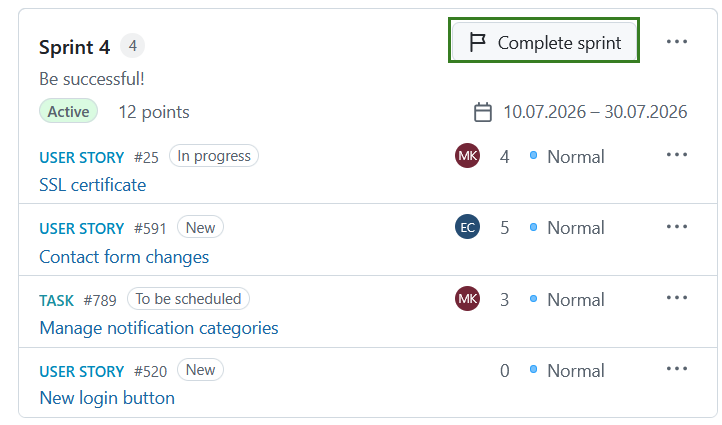
Each sprint is displayed in a dedicated container showing key planning information, including the sprint name, status, start and end dates, number of work packages, and total story points.
If defined, the Sprint goal is displayed in the sprint header below the sprint name.
Depending on the sprint status, either a Start sprint (for sprints in planning) or Complete sprint (for active sprints) button will be displayed.
Remarque
The Start sprint button is disabled by default if another sprint is already active or if no sprint dates have been defined. It might also not be available if you do not have the Start/complete sprints permission. By default, only one sprint can be active at a time. If your project is configured to allow multiple active sprints in the project backlog settings, the Start sprint button remains available for additional sprints.
Backlog buckets
Backlog buckets help you organize and prioritize work packages within the backlog. A backlog bucket is a named list of work packages that can be refined independently from the Inbox backlog. The Backlog and sprints view displays all backlog buckets within the current project, including the bucket name and the number of contained work packages.
Remarque
Backlog buckets are project-specific and are not shared across projects.
Work packages in backlogs
Work packages displayed in the Backlog and sprints view show the following information:
- Type
- ID
- Statut
- Assigné à
- Story points
- Priorité
- Sujet
- Lot de travaux parent
On smaller screens, assignee names and priority names may be hidden to preserve space while remaining available through tooltips.
Remarque
If a parent work package is not visible to a user due to permissions, Undisclosed is displayed instead.
A work package:
- can only belong to one backlog bucket at a time.
- cannot belong to a sprint and a backlog bucket at the same time.
- cannot belong to a backlog bucket and the Inbox backlog at the same time.
You can sort work packages within all containers (backlog bucket, inbox and sprints) via drag and drop or by using the Move option from the work package menu. You can also add new and existing work packages within all containers (backlog bucket, inbox and sprints) by using the More (three dots) menu.
Create a backlog bucket
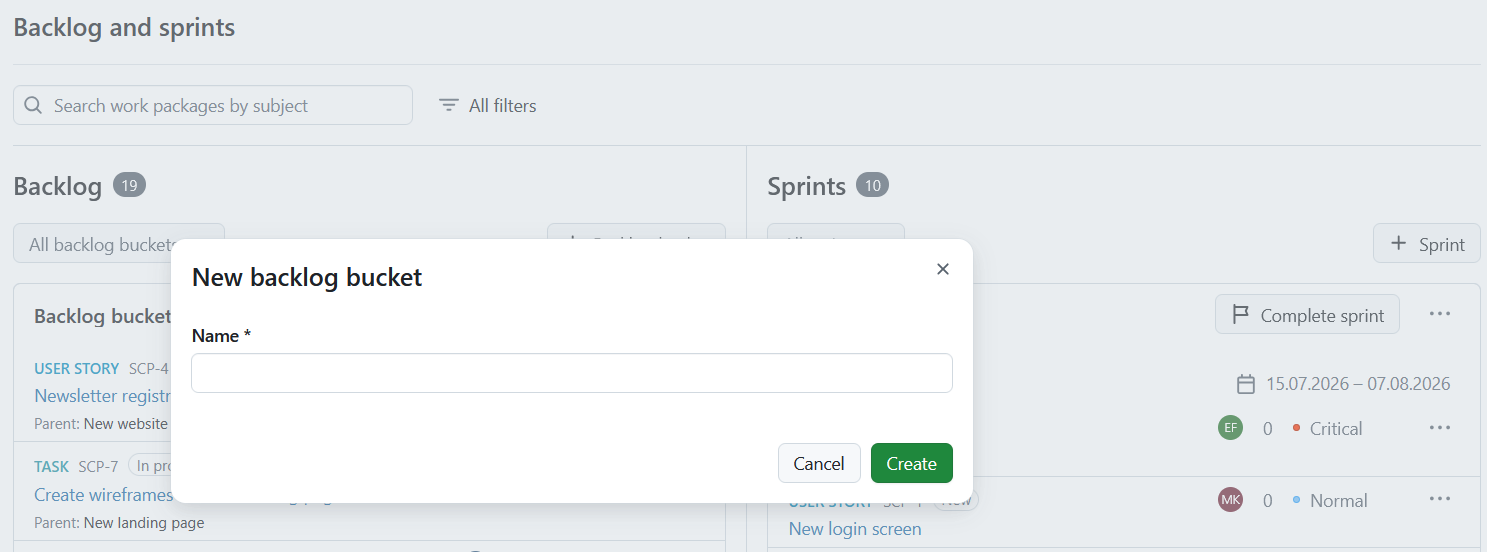
To create a backlog bucket, click the + Backlog bucket button in the Backlog and sprints view. This will open a dialog where you can enter the bucket name. Cliquez sur Créer pour continuer.
Remarque
Creating and deleting backlog buckets requires the appropriate project permissions.
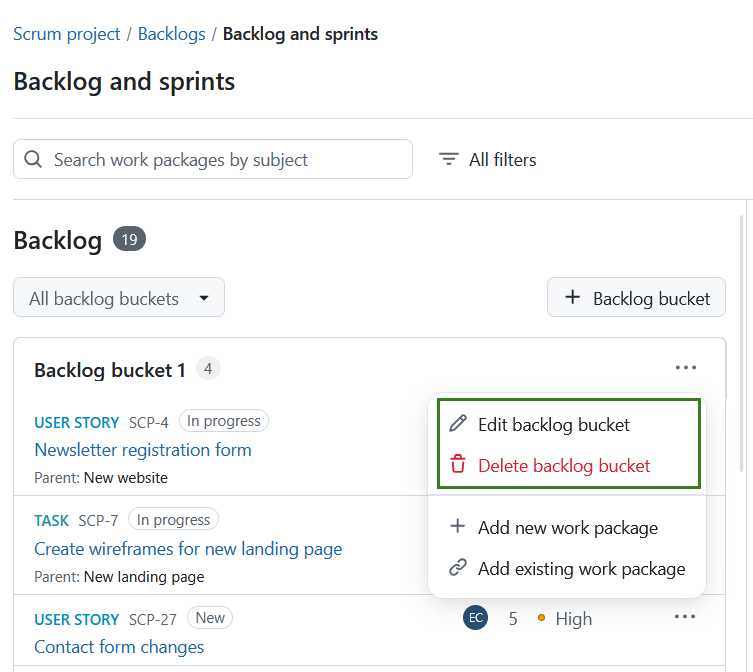
Edit or delete a backlog bucket
Open the More (three dots) menu of a backlog bucket to:
- Edit the backlog bucket
- Delete the backlog bucket
When deleting a backlog bucket, all contained work packages are automatically moved to the bottom of the Inbox backlog.
Work packages can also be moved directly into a backlog bucket from the work packages More menu. If multiple backlog buckets exist, OpenProject lets you choose the target bucket. The work package is placed at the bottom of the selected bucket.
Changes to a work package’s backlog bucket are recorded in the work package Activity tab. This allows you to see when a work package was moved into, out of or between backlog buckets.
Remarque
Backlog bucket changes are only visible in the Activity tab if you have the required permissions to view sprint and backlog information.
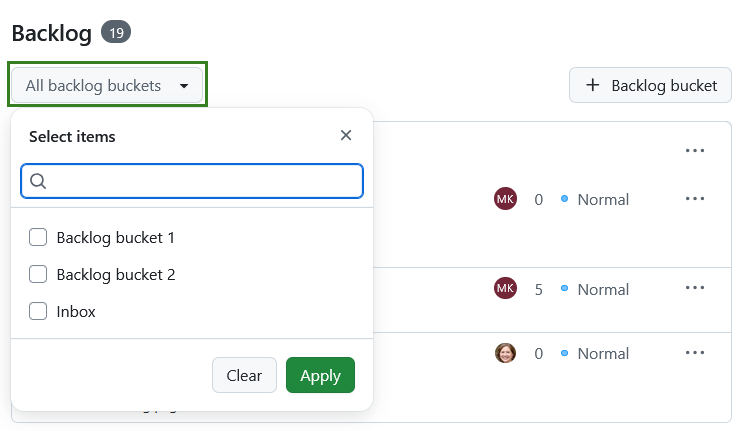
All backlog buckets
The all backlog buckets button is a multi-select dropdown that allows you to filter for buckets within your backlog. Click on All backlog buckets. Select the specific backlog bucket(s) you want displayed or type in the search box to filter the list. Click Apply to save your changes.
Inbox backlog
The Inbox backlog is automatically populated with all work packages in a project that are not assigned to a sprint or backlog bucket and are not excluded by the project’s backlog settings. When a work package is added to a sprint or bucket, or closed, it is removed from the Inbox.
Remarque
Closed work packages are removed from the Inbox backlog and backlog buckets, but continue to be visible in sprints.
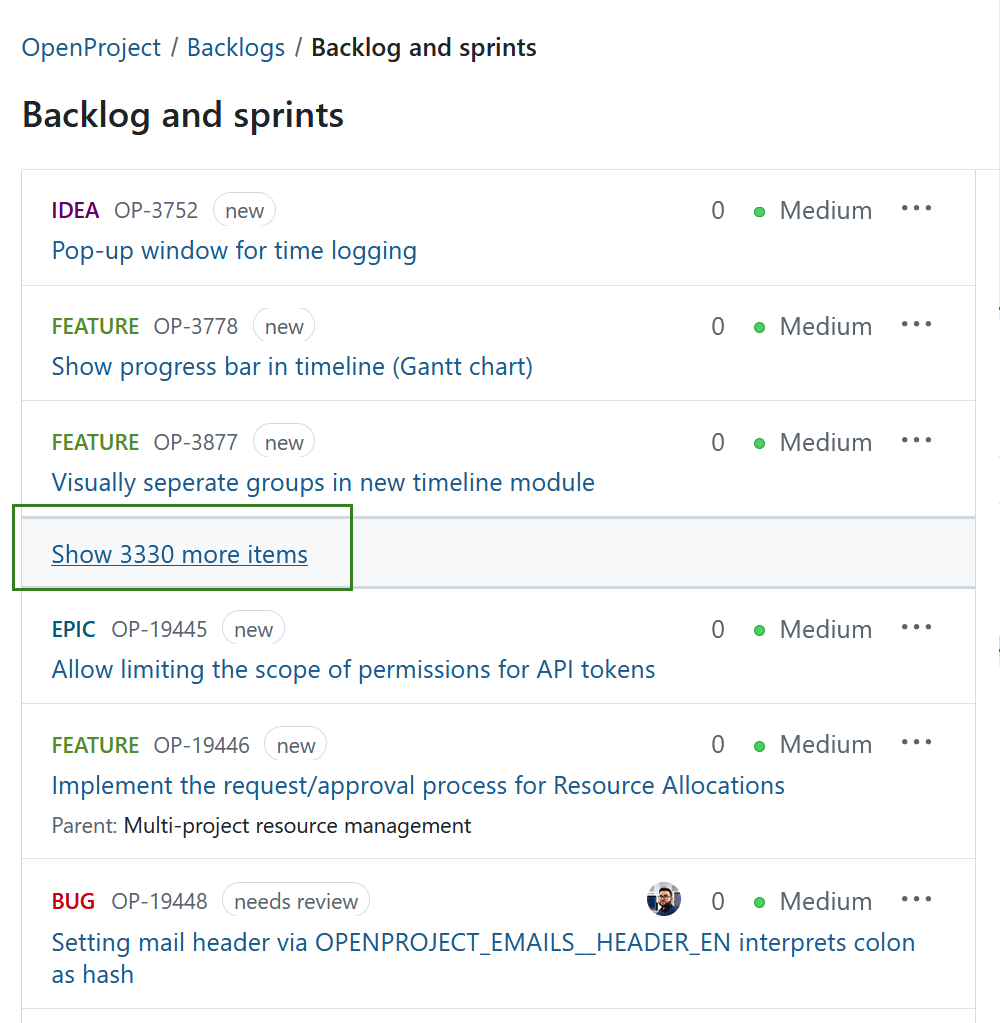
When there are too many items in the backlog, a Show more items link appears in the middle of the Inbox backlog. This collapses the middle section so that you always see the top and the bottom of the Inbox backlog.
If search or filters are active, the number of hidden work packages is adjusted accordingly. Clicking Show more items only displays work packages that match the current criteria.
Sort and move work packages
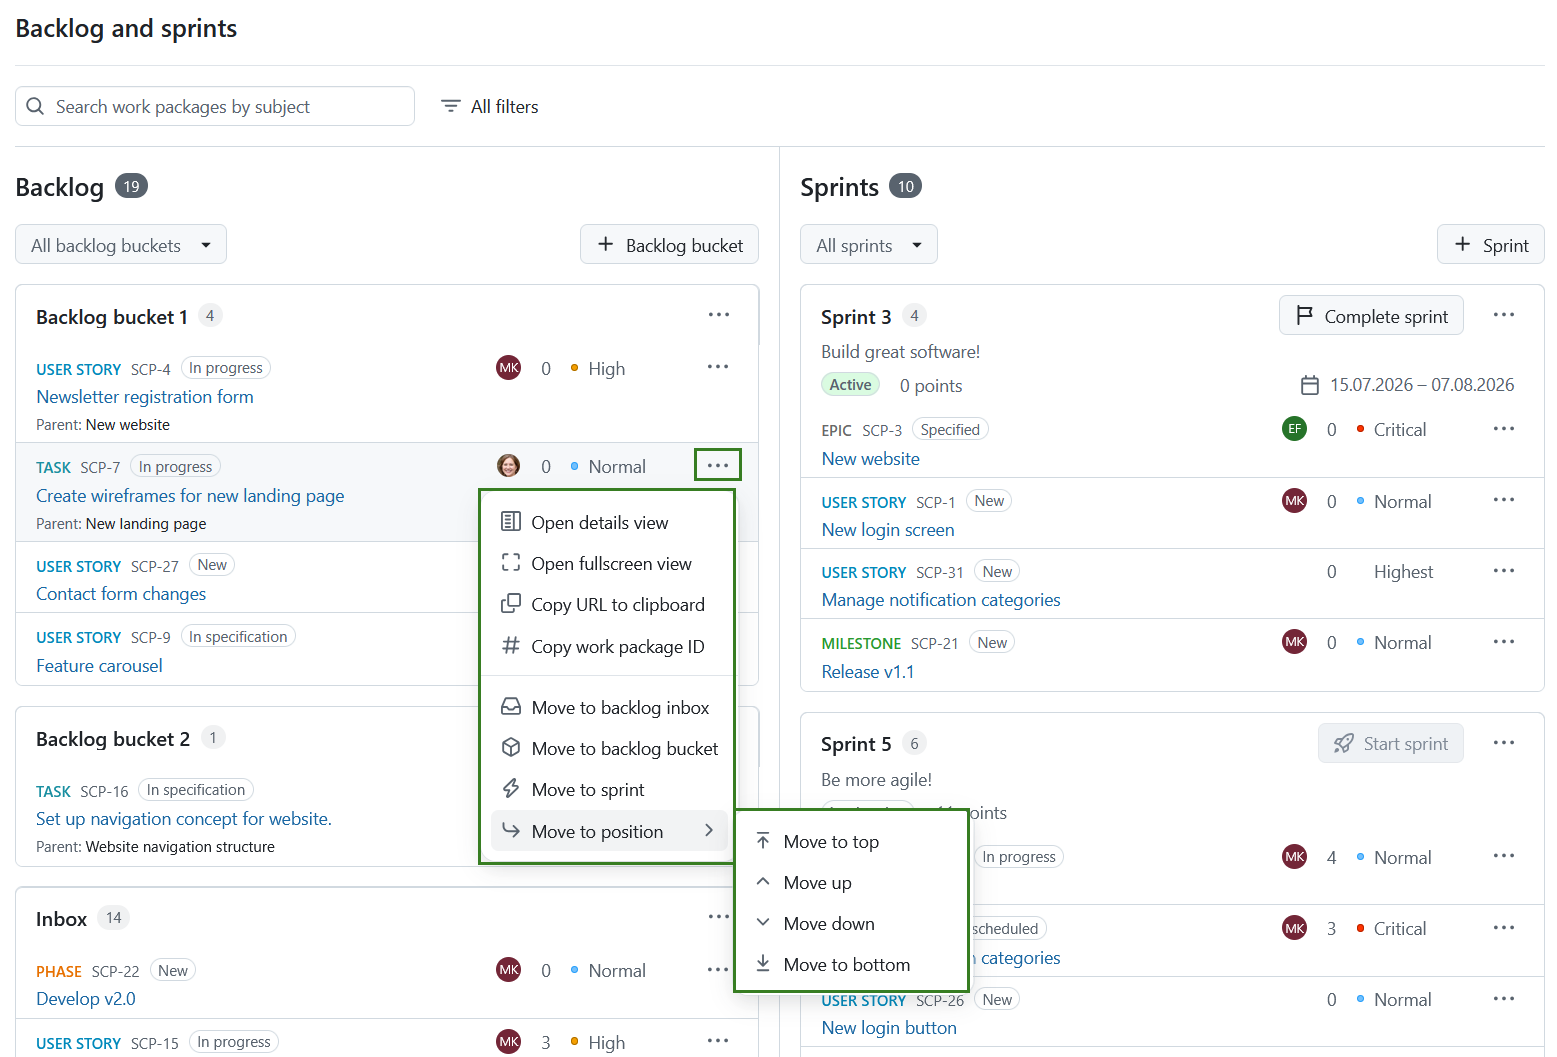
Next to every work package listed in the Inbox backlog, backlog bucket, or sprint, you can access the More (three dots) menu, including the following options:
- Open details view or fullscreen view of a work package. These options allow you to choose how much information (about the backlog item) you’d like to be displayed.
- Copy the work package URL or ID to the clipboard.
- Move to backlog inbox
- Move to backlog bucket
- Move to sprint
- Move to position. This option lets you change the ordering of a work package within its current container.
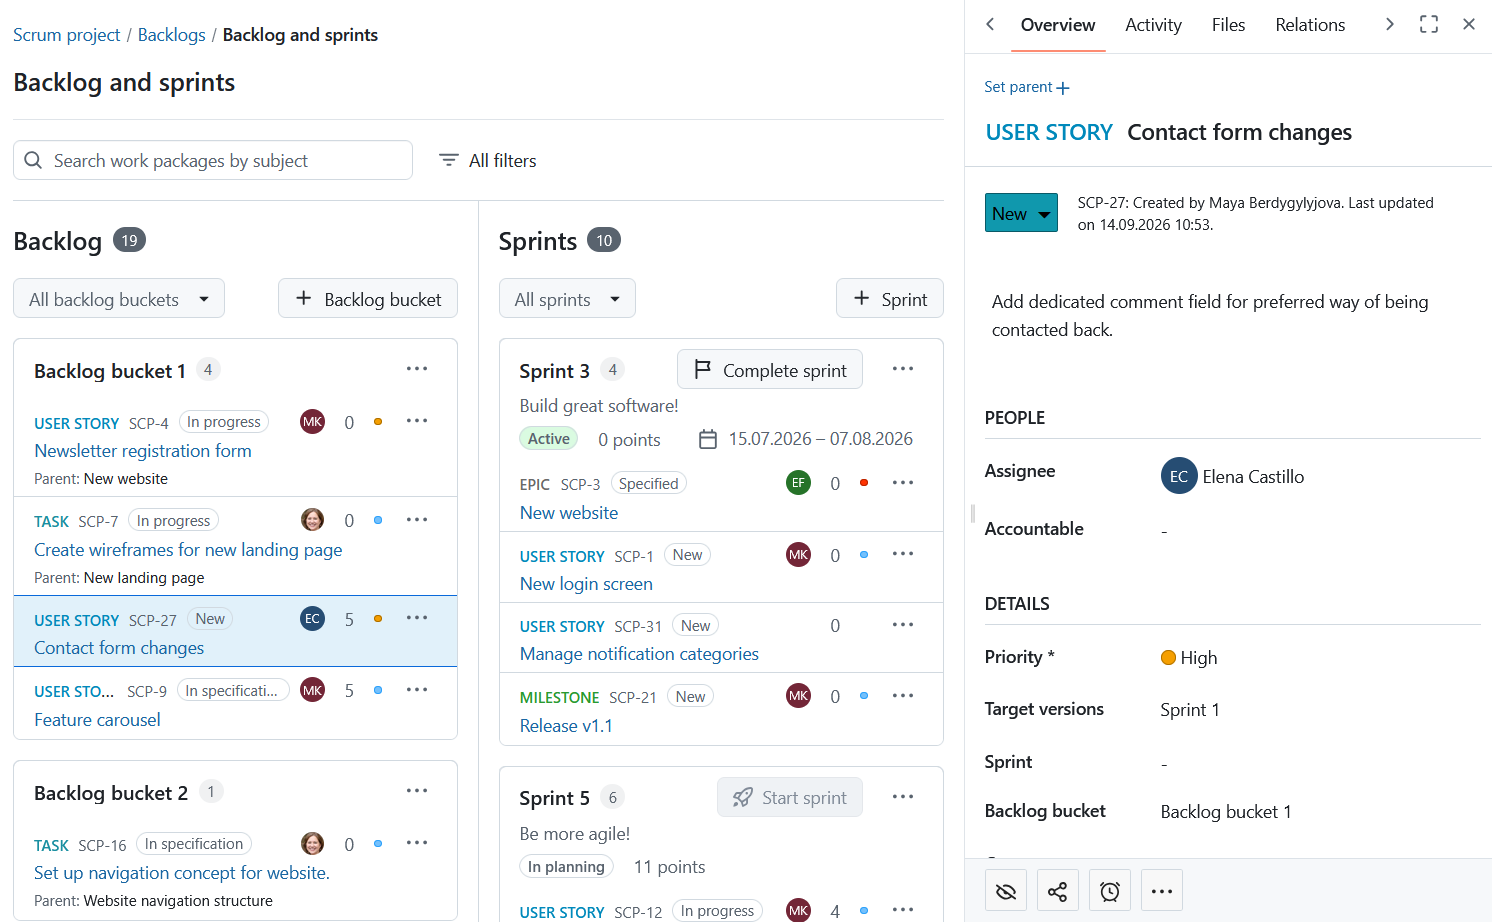
Details view opens the work package information on the right side, the same way as in the notifications center. You can open the details view with a single click on a work package card.
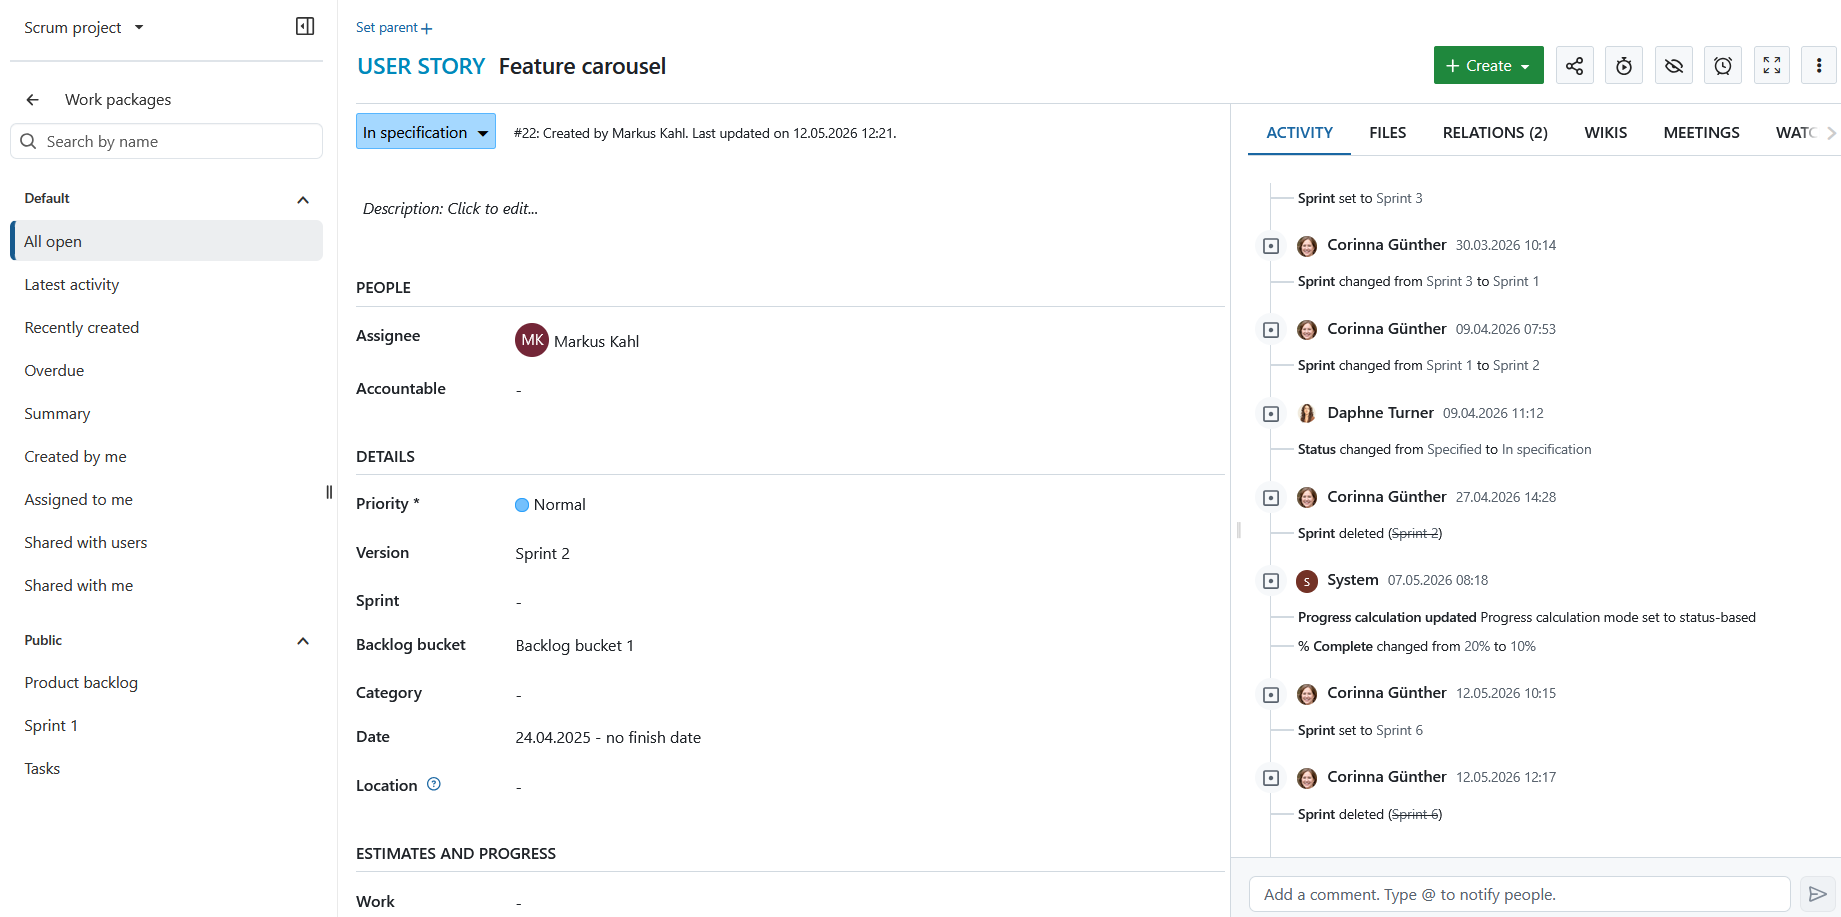
Opening the fullscreen view opens the work package in fullscreen.
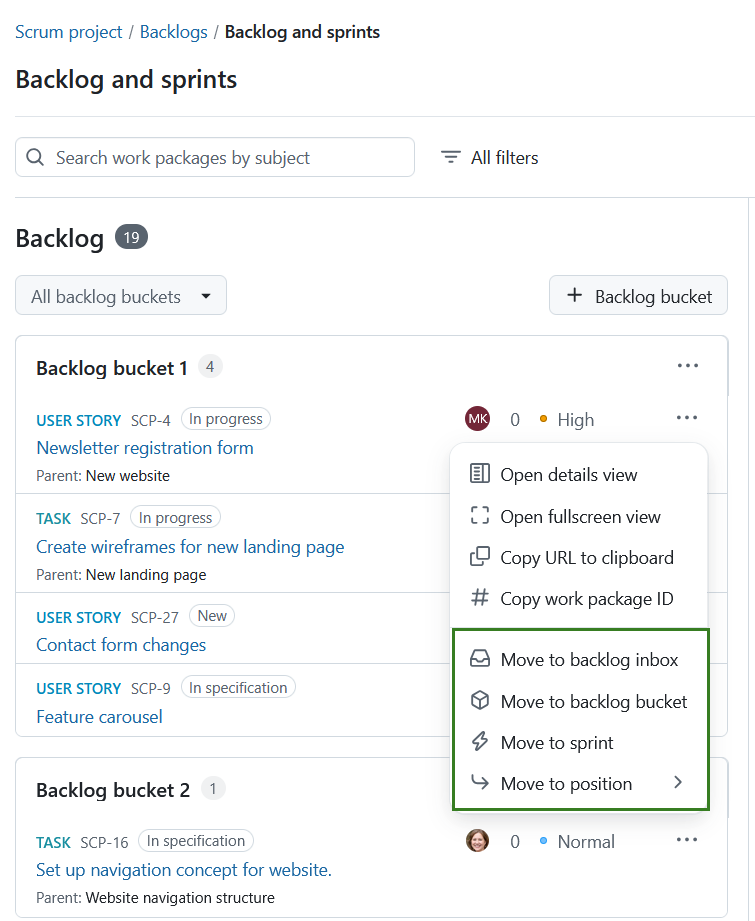
You can prioritize work packages within the Inbox backlog, a backlog bucket, or a sprint by dragging and dropping them or by using the move actions available from the More menu. The entire work package card can be used as a drag-and-drop area.
Depending on the current location of the work package, you can move it:
- into the Inbox backlog,
- into another backlog bucket,
- into another sprint,
- within the current backlog bucket or sprint
You can also drag a work package card out of OpenProject and drop it into an external application that supports browser drag and drop. Depending on the target application, this can:
- insert the work package URL as plain text,
- open the work package URL when dropped onto another browser window’s address bar or tab strip,
- insert a hyperlink with the work package subject as link text when dropped into a rich-text editor.
The URL is the same URL available through More (three dots) → Copy.
Remarque
How a dropped work package is handled and displayed depends on the target application, browser and operating system. Some applications may not accept drag and drop from all browsers.
When search or filters are active, sorting and move actions consider only the currently visible work packages. If you reorder a work package while the view is filtered, its new position is retained after clearing the search or filters.
If filtering leaves a sprint or backlog bucket with no visible work packages, a work package dragged into that container is placed at the top.
Excluded work package types and statuses
Depending on the project configuration, certain work package types and statuses can be excluded from the Inbox backlog and backlog buckets. This can be configured under project backlog settings.
Excluded work packages:
- do not appear in the Inbox backlog.
- do not appear in backlog buckets.
- continue to appear in sprints.
- continue to appear on sprint boards.
If a work package is moved to the Inbox backlog or a backlog bucket and its type or status is excluded, the move is completed successfully. A confirmation message explains that the work package was moved successfully but is hidden because its type or status is excluded from backlog views.
Create and manage sprints
Important
Starting with the OpenProject 17.3 release, Sprints are new objects no longer linked to versions (as was the case with previous OpenProject versions).
A Sprint is a planned and time-boxed period in which a Scrum team completes a defined set of tasks. They are containers where work packages can be manually added or removed from the Inbox backlog or backlog buckets via drag and drop or the menu.
Create a sprint
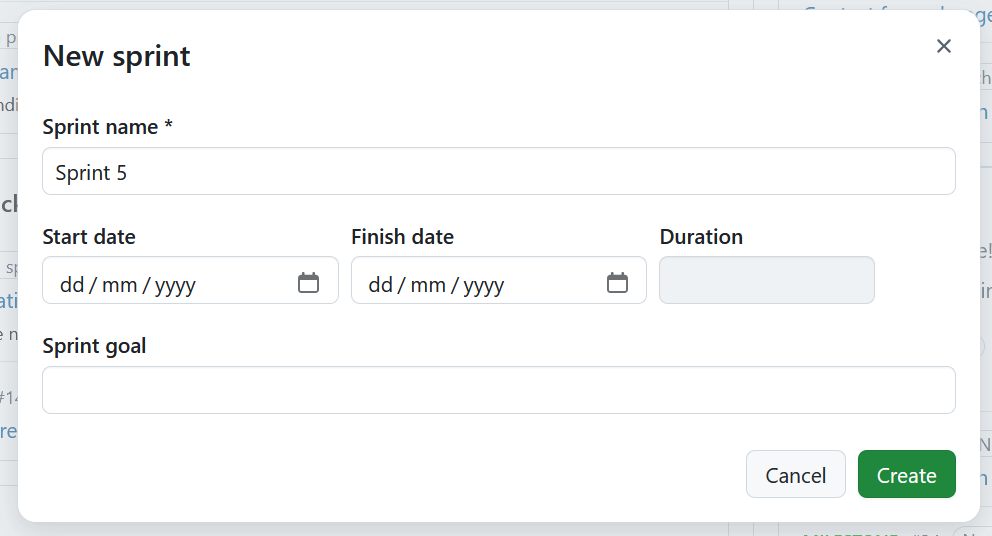
To create a sprint, click the + Sprint button in the top right corner of the Backlogs module. This opens up a form for you to fill in the sprint name, start date, finish date, and an optional sprint goal. The sprint goal is a short text describing the main objective of the sprint. The duration is automatically calculated. Click the Create button to proceed.
The naming of sprints is number-based by default (e.g. Sprint 1, Sprint 2). These names can be edited according to your team’s work rhythm.
Sprint goals
The sprint goal helps communicate the primary objective of the sprint to the team. It can be entered when creating or editing a sprint.
For shared sprints, sprint goals are project-specific. This means each project using the shared sprint can define its own goal without affecting other projects.
When editing a shared sprint, OpenProject indicates which fields are shared across projects and which are project-specific. Depending on your permissions in the sharing project and the current project, some fields may be read-only.
Start or complete a sprint
Your sprint is set in motion by clicking the Start sprint button in the sprint header. Clicking it will open the sprint board.
Remarque
If your project is not configured to allow multiple active sprints (Enterprise add-on), you cannot start a new sprint while another sprint is already in progress. In this case, the Start sprint button is disabled. Pour autoriser plusieurs sprints actifs, consultez les paramètres du backlog du projet.
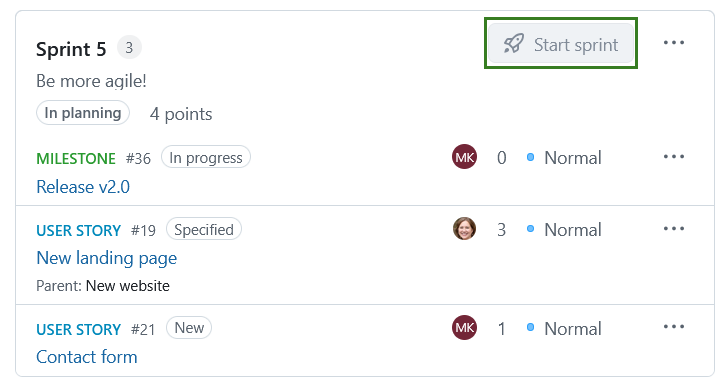
Once a sprint has started, it is considered active. The sprint header displays the current sprint status and allows you to complete the sprint directly from the header. To complete a sprint, click the Complete sprint button in the sprint header.
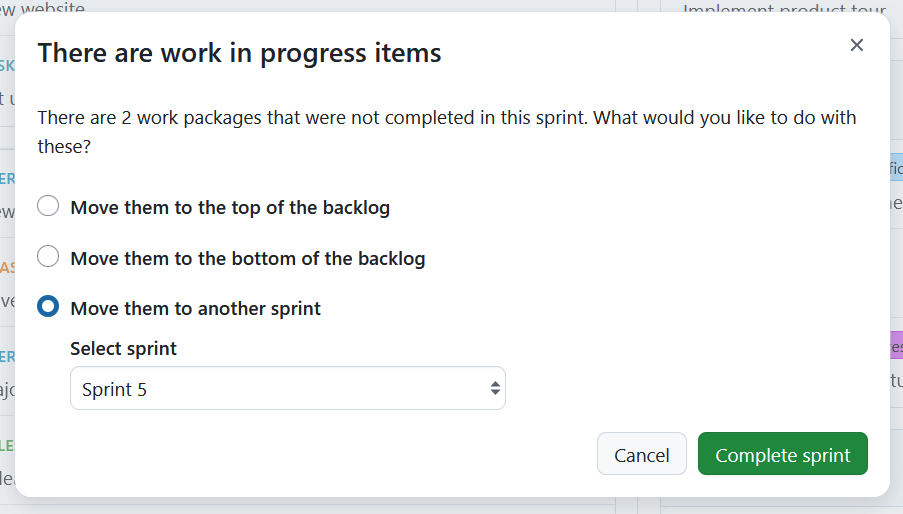
If there are still unfinished work packages in the sprint, a dialog will open prompting you to decide what should happen to them. You can choose to:
- Move them to the top of the Inbox backlog
- Move them to the bottom of the Inbox backlog
- Move them to another sprint
Work packages in statuses configured as closed under project backlog settings are not moved when a sprint is completed.
If you choose to move work packages to another sprint, you will need to select the target sprint from the list. After making your selection, click the Complete sprint button to finish the sprint. The sprint will then be marked as completed, and other sprints can be started.
Remarque
Work packages moved to the Inbox backlog may not be displayed if their type or status is excluded from backlog views.
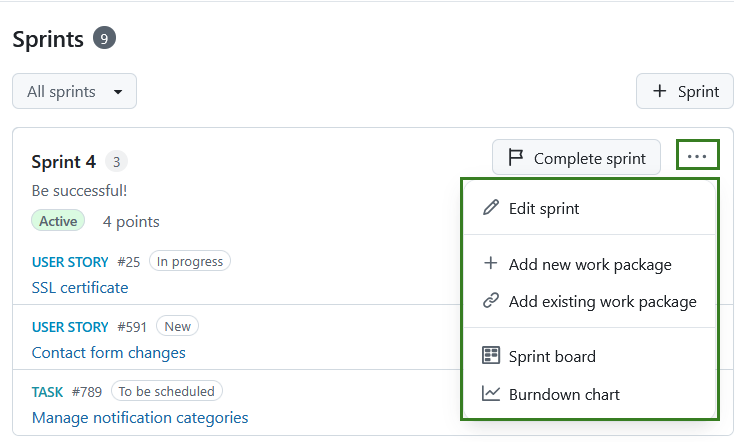
Additional sprint actions are available through the Sprint menu, including:
- Edit sprint
- Add new work package
- Add existing work package
- Sprint board
- Graphique burndown
Sprint details, including the sprint goal, can also be edited through the Edit sprint dialog.
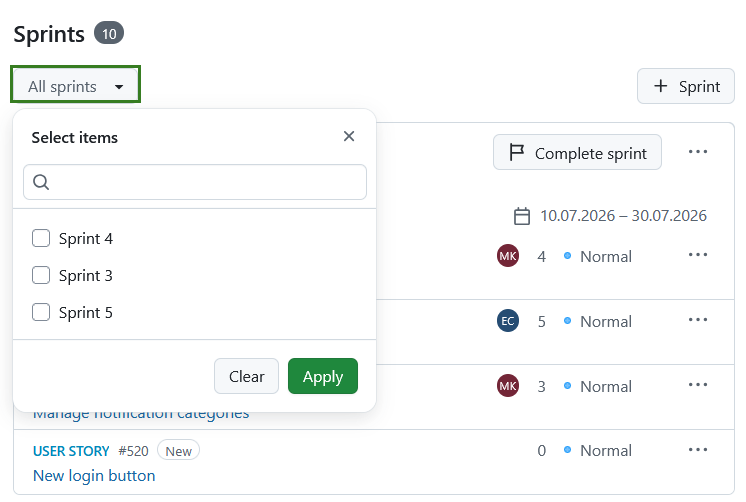
All sprints filter
The all sprints button is a multi-select dropdown that allows you to filter for sprints. Click on All sprints. Select the specific sprint container(s) you want displayed or type in the search box to filter the list. Click Apply to save your changes.
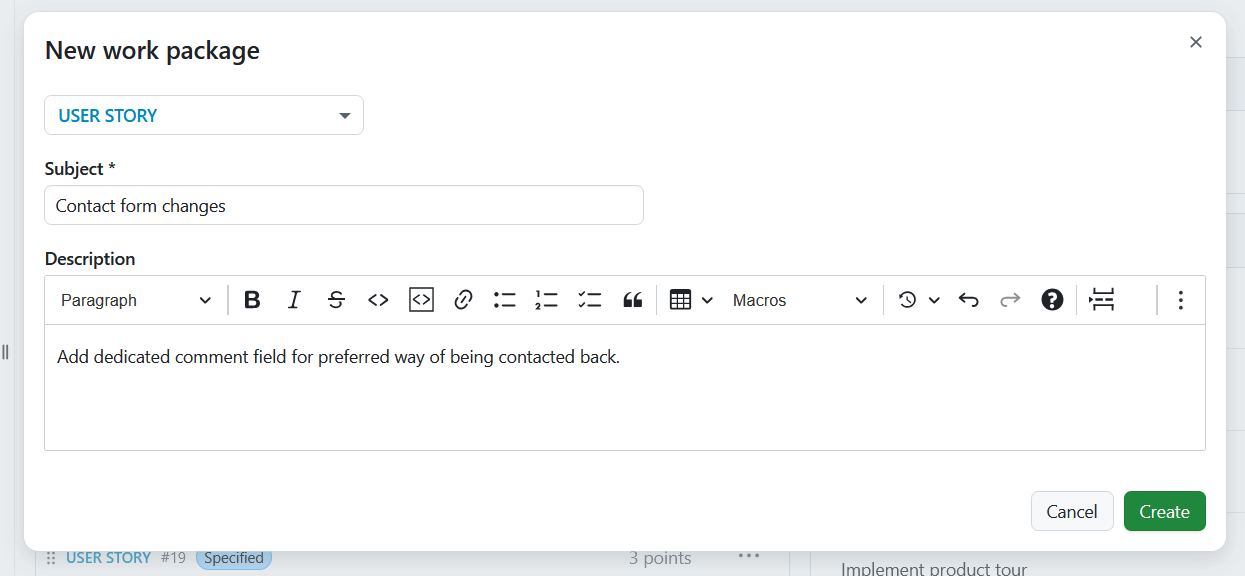
Add a new work package
In order to create a new work package in the Backlogs module, click on the More (three dots) icon in the top right corner of a Sprint, Backlog bucket or Inbox backlog and choose + Add new work package from the drop-down menu. Une boîte de dialogue apparaît pour créer un nouveau lot de travaux. Here, you directly specify the work package type, subject, and description. Cliquez sur Créer pour continuer.
Un nouvel élément sera ajouté au backlog pour afficher la nouvelle story créée.
Add existing work package
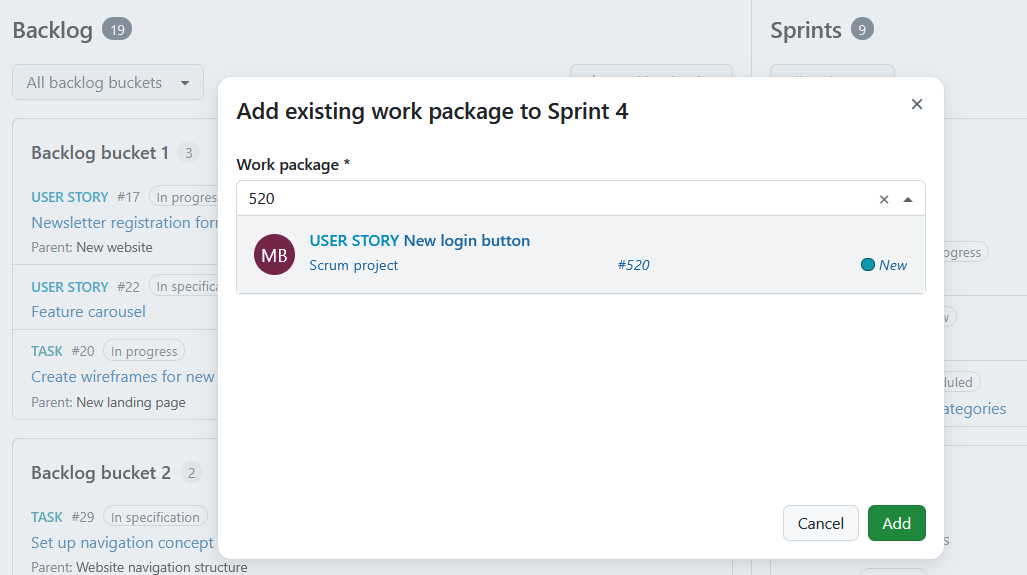
In order to add an existing work package in the Backlogs module, click on the More (three dots) icon in the top right corner of a Sprint, Backlog bucket or Inbox backlog and choose Add existing work package from the drop-down menu. A form dialog will appear to add work packages already in the backlog.
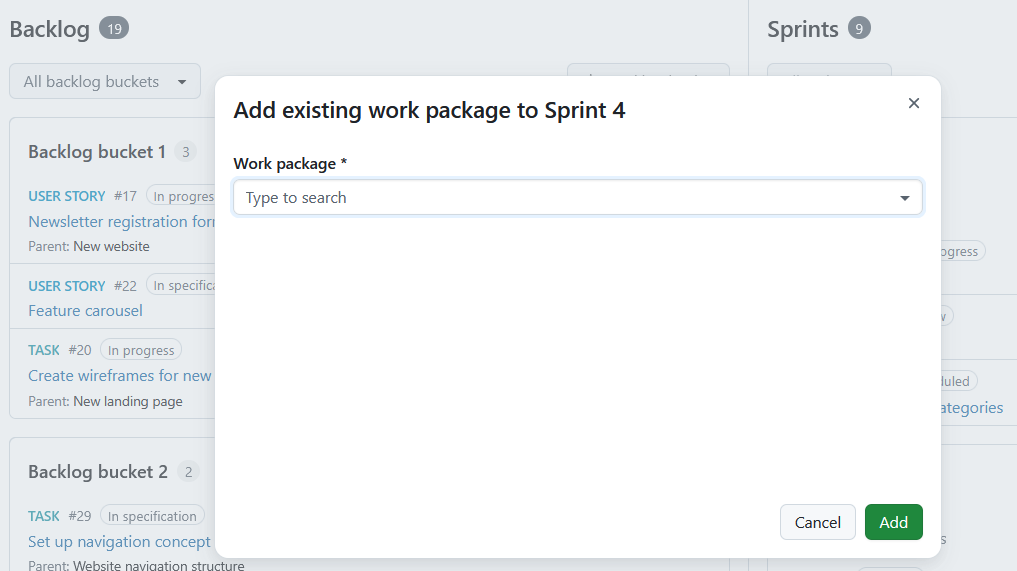
In the search panel, enter the work package type, subject or ID. Select the displayed work package and click Add to proceed. The items in the Sprint becomes updated.
Prioritize stories
You can prioritize different work packages within the Inbox backlog, a backlog bucket, or a sprint by dragging and dropping them or by using Move to position from the More menu. This allows you to assign work packages to a specific sprint or backlog bucket, return them to the Inbox backlog, or re-order them within a sprint or bucket.
Story points
Dans un sprint, vous pouvez documenter directement l’effort nécessaire en tant que story points.
Story points are defined as numbers assigned to a work package used to estimate (relatively) the size of the work.
The sprint header displays the total number of story points currently assigned to work packages in the sprint.
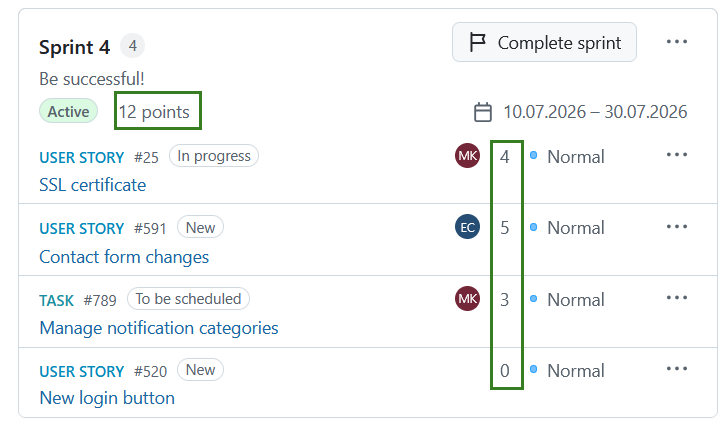
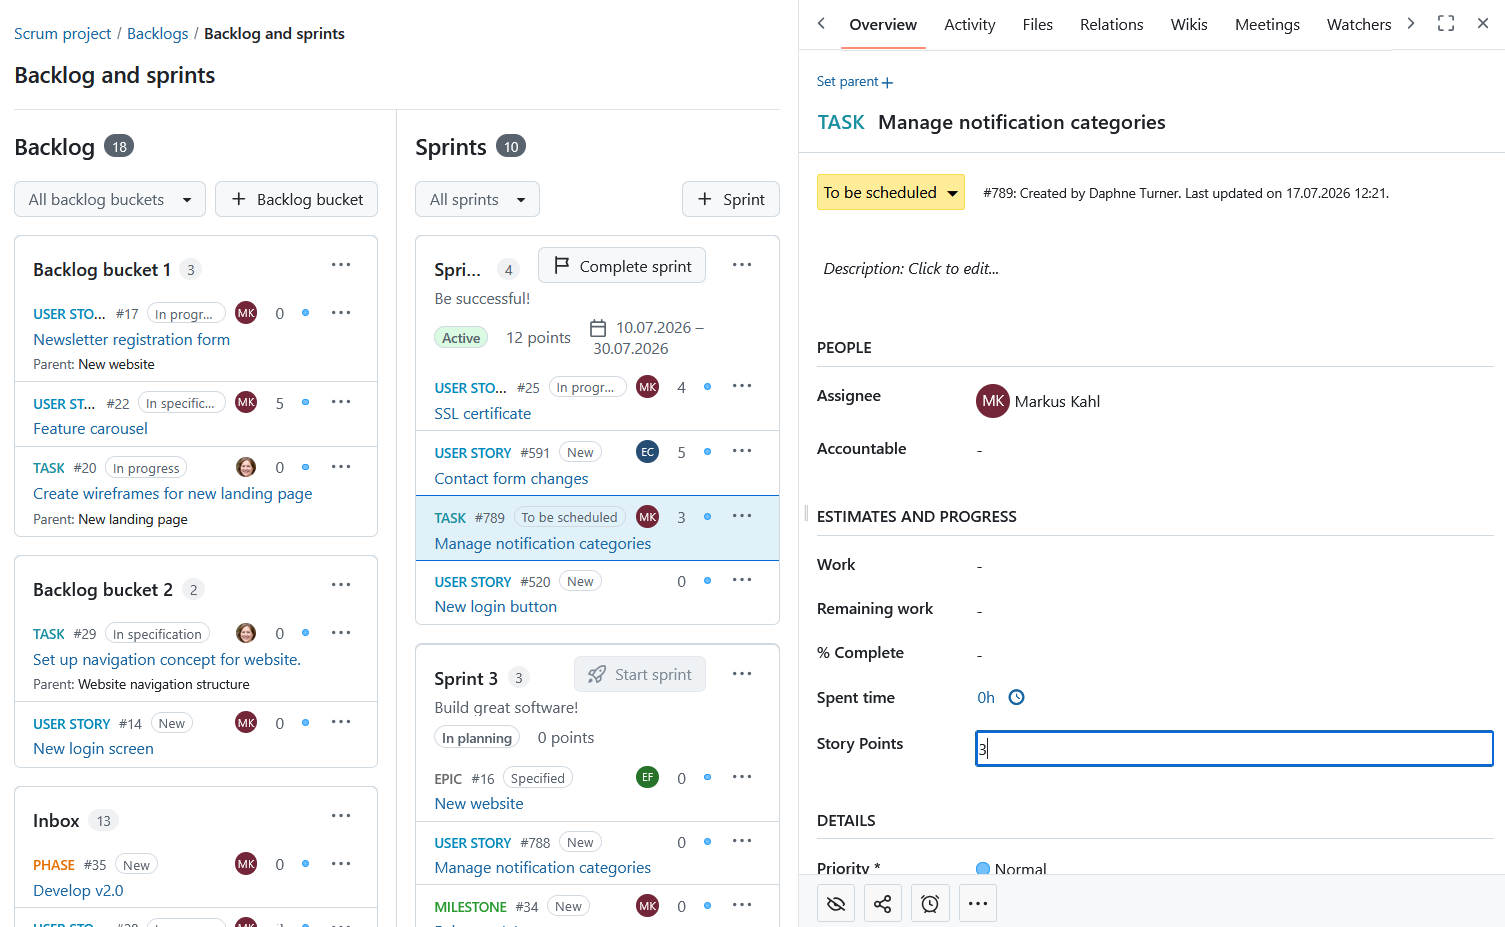
You can edit story points directly from the backlogs view. In order to do so, simply click the work package you want to edit and make the desired changes in the detailed view of the work package that will open on the right.
Sprint boards
Sprint boards are especially helpful for teams to track and visualize progress from the start.
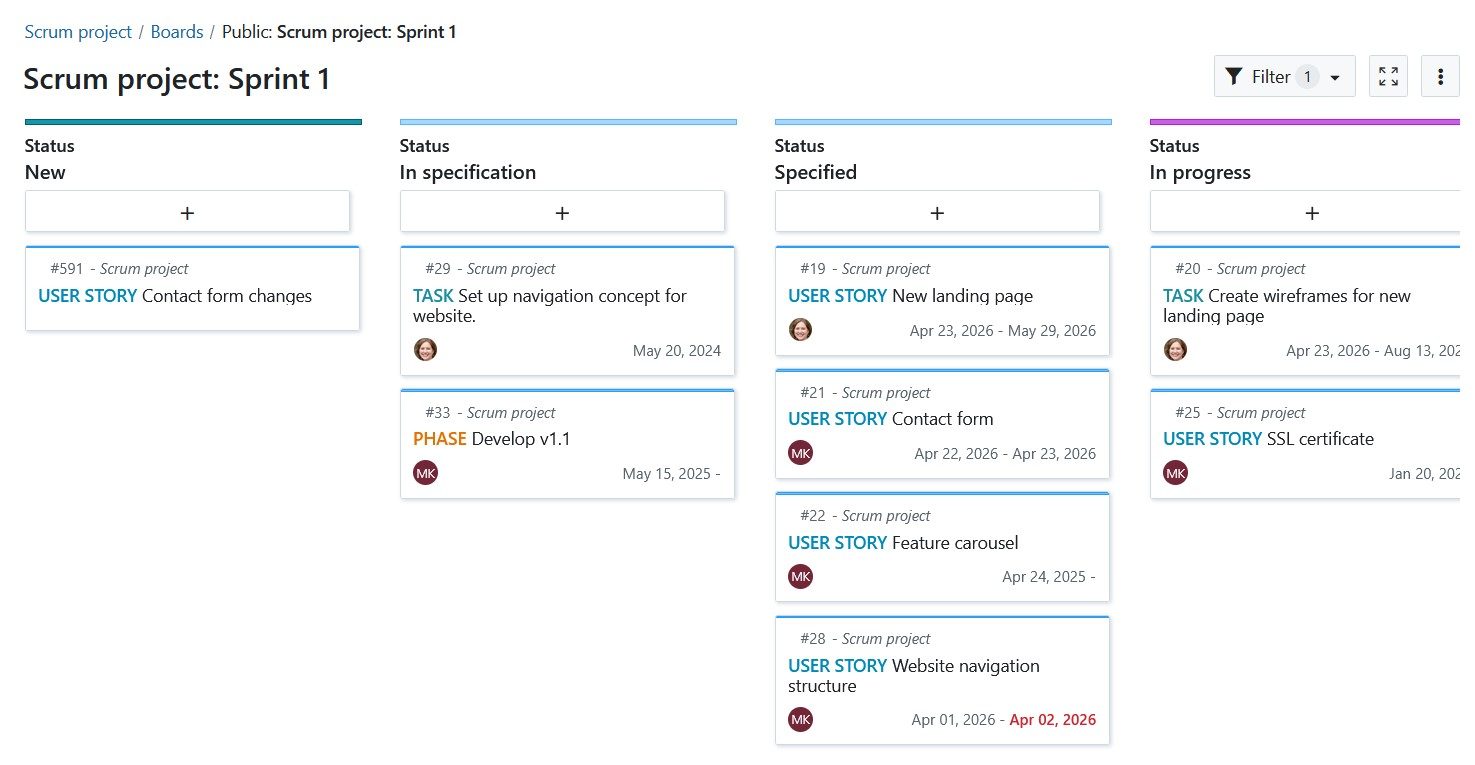
When you click the Start sprint button in a sprint header, a dedicated sprint board is automatically created and you are forwarded to the active sprint board. Boards are named using this pattern: [Project name: Sprint name]. As an example: Scrum project: Sprint 1.
The sprint board inherits project permissions automatically, which means it is accessible to all project members by default.
Remarque
The sprint board and burndown chart are only visible on the menu when a sprint is active.
Sprint field in work package tables
The Sprint property can also be used in work package tables. Vous pouvez :
- display the Sprint column,
- sort by Sprint,
- group work packages by Sprint.
Remarque
Viewing Sprint information in work package tables requires the appropriate project permissions.
You can also change the Sprint or Backlog assignment of multiple work packages at once using bulk edit.
Burndown charts
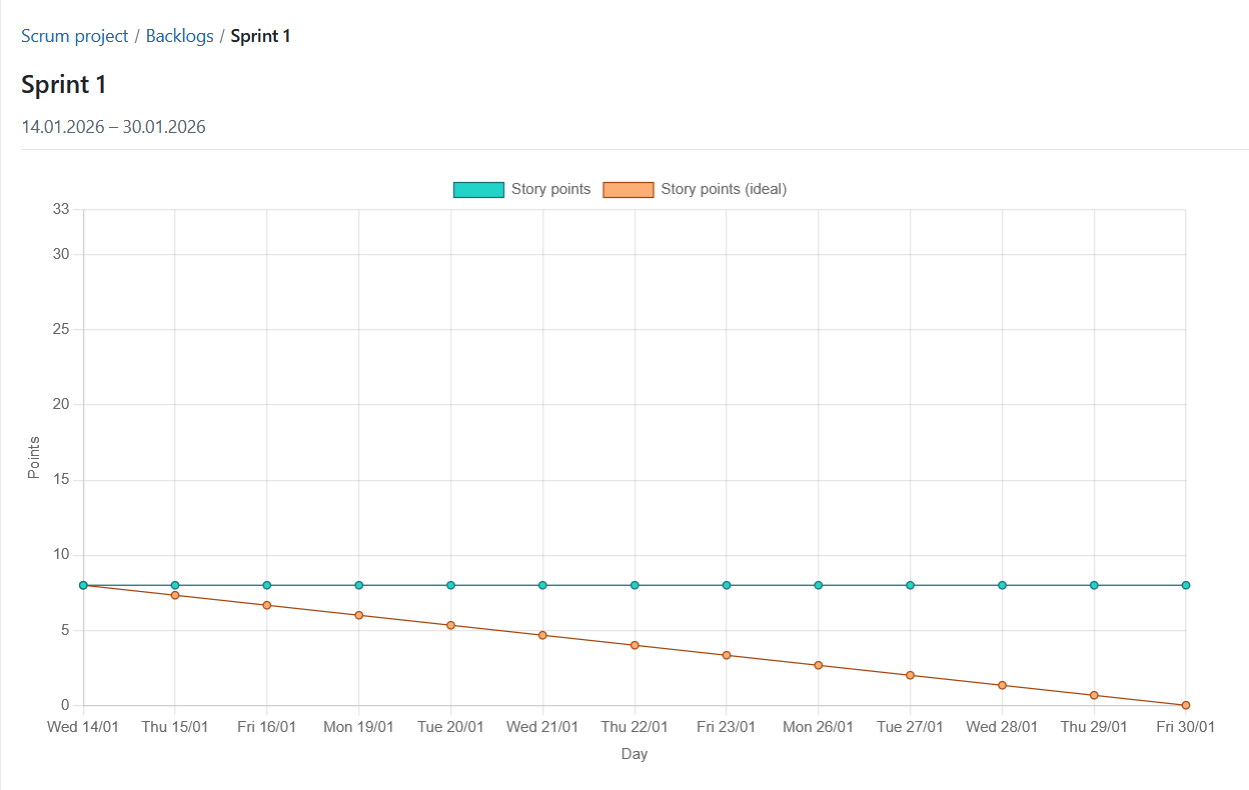
Burndown charts are a helpful tool to visualize a sprint’s progress. Avec OpenProject, vous pouvez générer automatiquement des graphiques burndown des sprints et des tâches.
Conseil
As a precondition, the sprint’s start and end date must be defined and the information on story points should be well maintained.
Le burndown d’un sprint est calculé à partir de la somme des story points estimés. If a user story is set to “closed” (or another status configured as closed in the project backlog settings), it counts towards the burndown. Le burndown d’une tâche est calculé à partir de l’estimation du nombre d’heures nécessaires à la réalisation de cette tâche. If a task is set to “closed”, the burndown is adjusted.
Les story points restants par sprint sont affichés dans le graphique. Facultativement, l’avancement idéal peut être affiché à titre de référence. Le burndown idéal suppose une réalisation linéaire des story points du début à la fin d’un sprint.
Sprint sharing

Sprint sharing allows multiple projects to use the same sprint structure. A sprint can be shared with other projects, subprojects, or not shared. This is configured under project settings.
Shared sprints can help teams coordinate planning across projects and support scaled agile frameworks such as SAFe.
Multiple active sprints
You can have more than one sprint active at the same time. This setting needs to be activated under project settings.
All sprints
The All sprints view provides a simple overview of every sprint in the project, including planning, active, and completed sprints.
The table displays the sprint name, status, start date, finish date, and number of work packages. The list of sprints is sorted by sprint dates and then by sprint name.
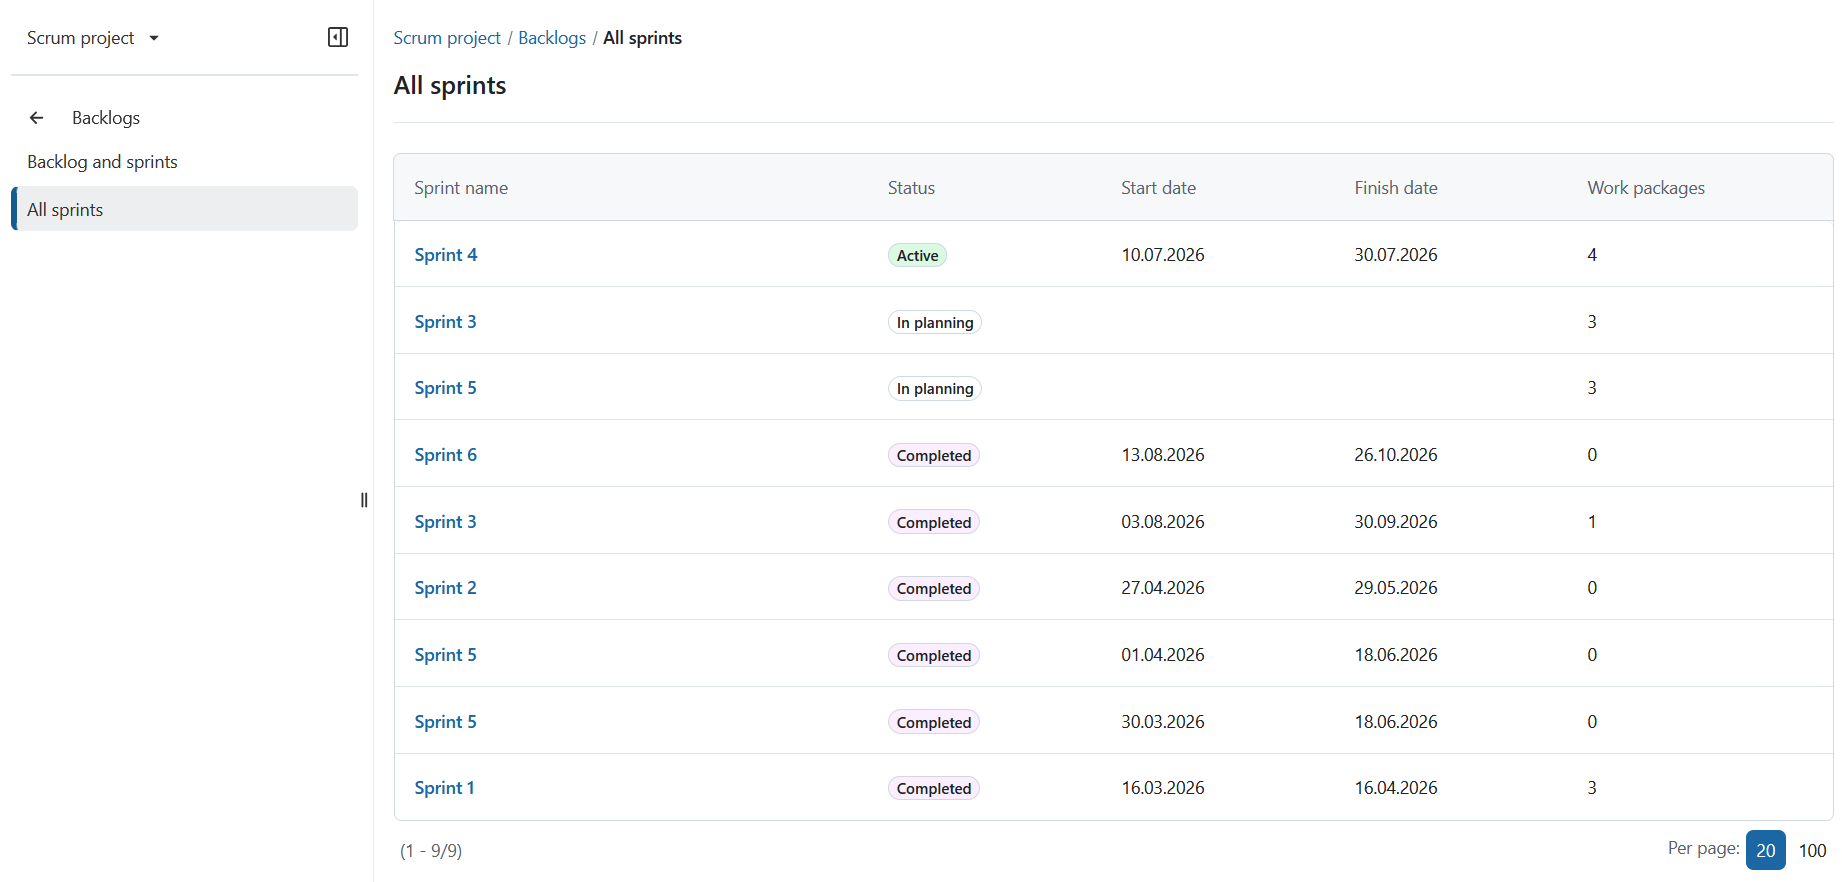
Selecting a sprint opens the appropriate destination depending on its status:
- Active sprints open the sprint board.
- Planning sprints open the sprint planning view.
- Completed sprints open a work package table filtered to that sprint.