Projektinformationen verwalten
Projektinformationen bearbeiten
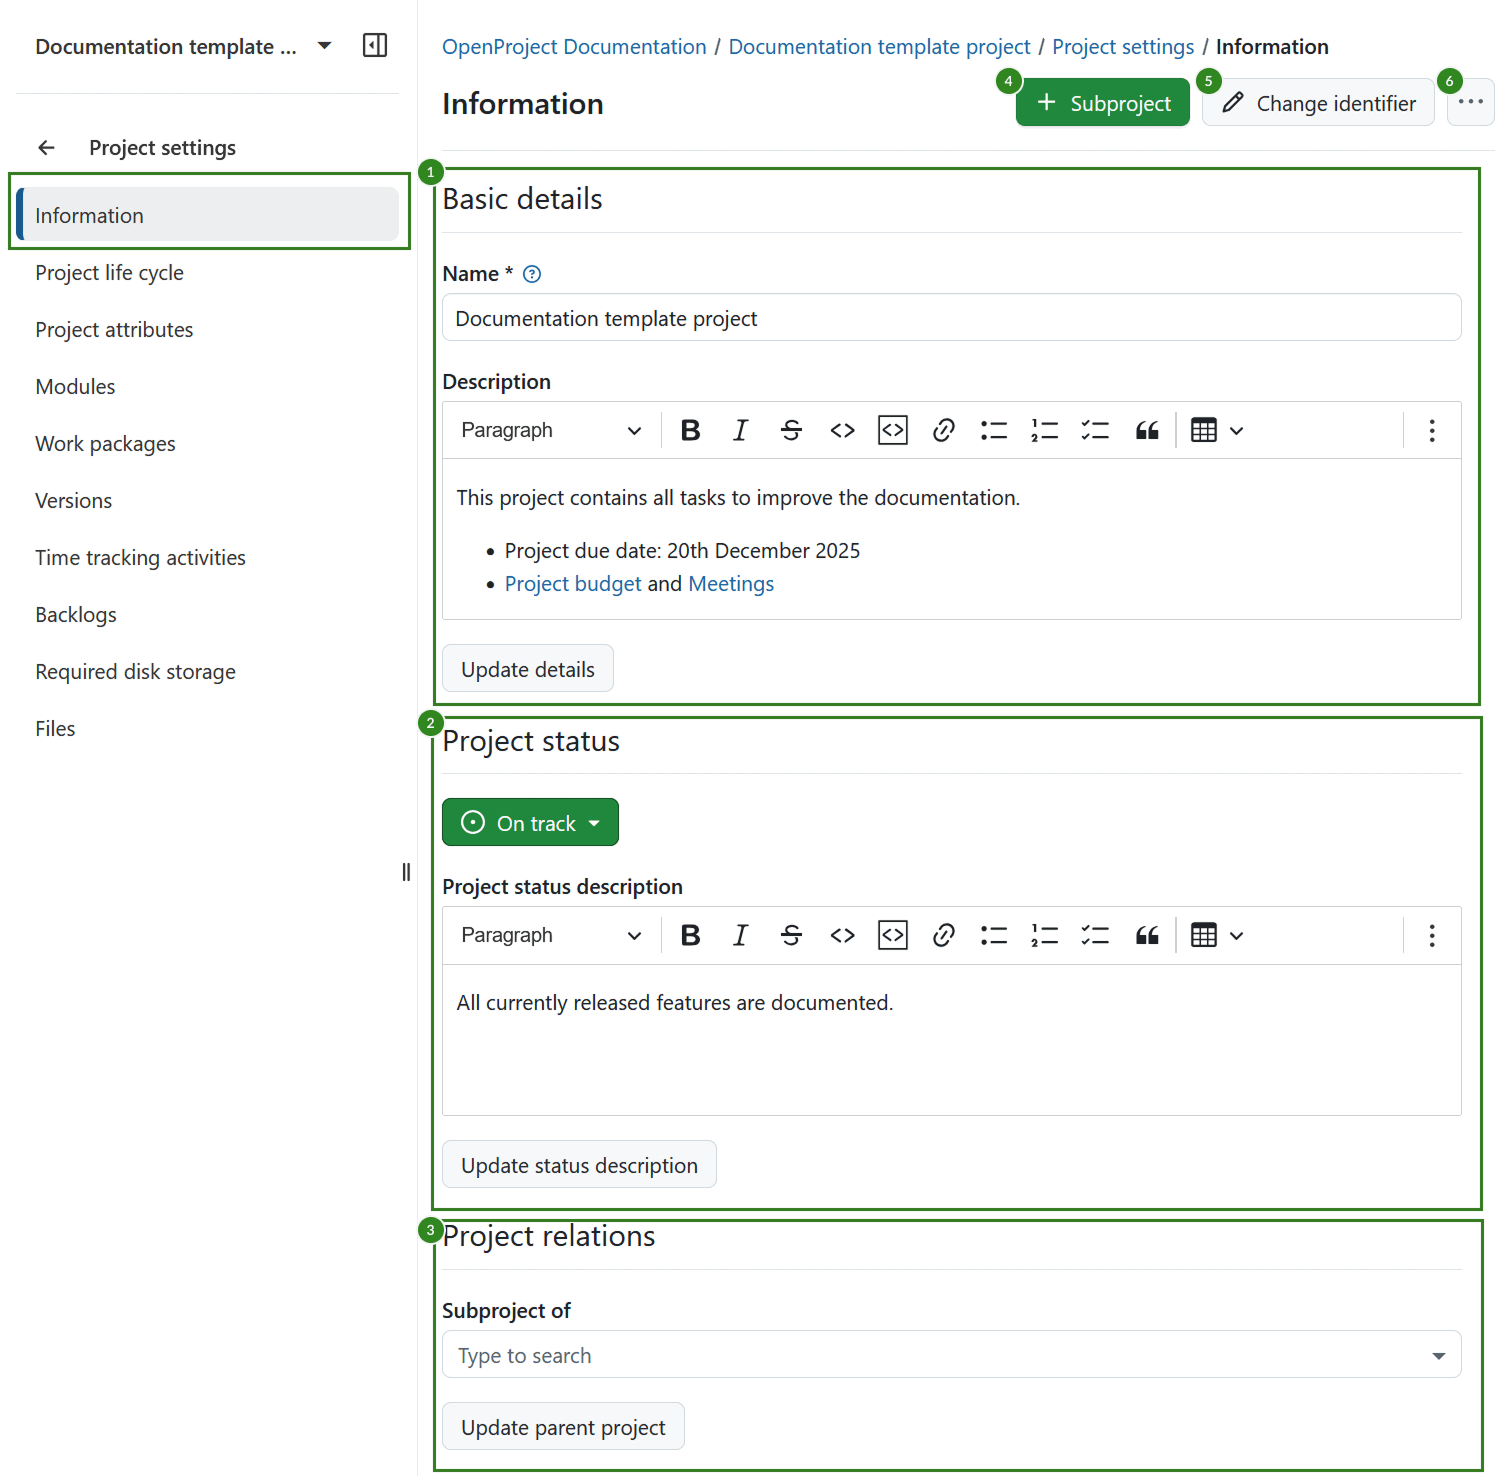
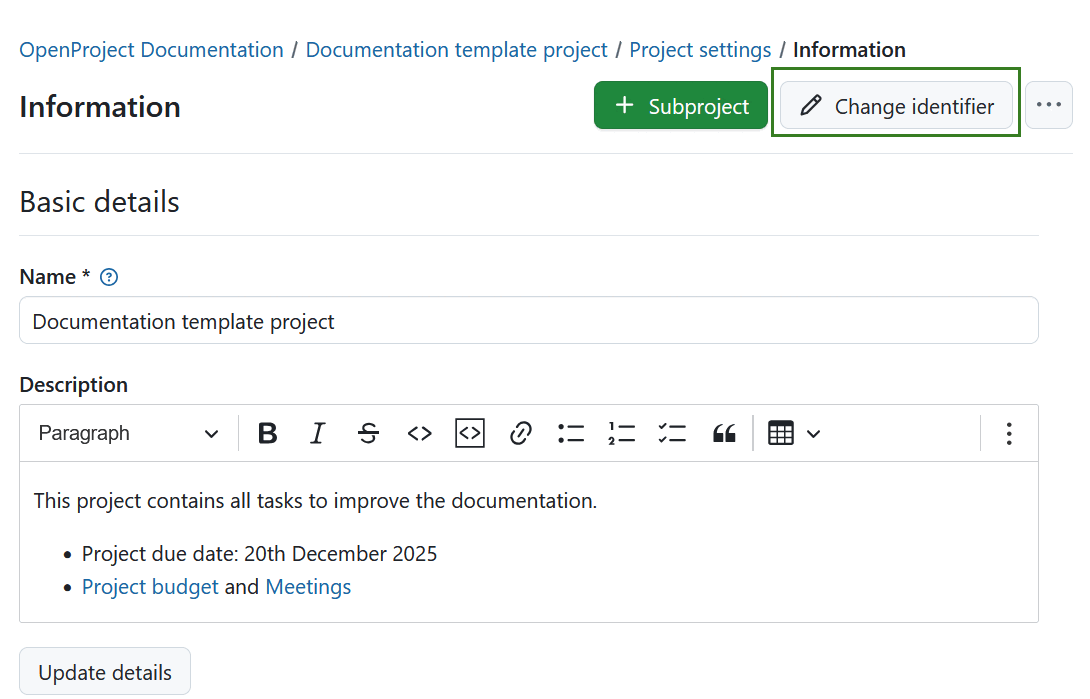
Um Ihre Projektinformationen in OpenProject zu bearbeiten, wählen Sie ein Projekt aus dem Dropdown-Menü Projekt auswählen. Navigieren Sie dann zu Projektkonfiguration → Information im Projektmenü links.
Projekteinstellungen sind in drei Bereiche gruppiert:
-
Allgemeine Informationen Hier können Sie Folgendes bearbeiten:
- Projektname. Dieser Name wird in der Projektliste angezeigt.
- Fügen Sie eine Projekt Beschreibung hinzu.
-
Projektstatus Hier können Sie:
- Projektstatus setzen. Der Projektstatus kann auf der Projekt-Startseite angezeigt werden. Wenn Sie zusätzliche oder andere Statusoptionen festlegen möchten, können Sie ein selbstdefiniertes Feld für Projekte erstellen und verwenden.
- Fügen Sie eine Projektstatusbeschreibung hinzu. Die Statusbeschreibung wird auf der Projekt-Startseite angezeigt.
-
Projektbeziehungen, wo Sie das Übergeordnete Projekt auswählen können.
Speichern Sie Ihre Änderungen, indem Sie auf die Schaltfläche Einstellungen aktualisieren am Ende des jeweiligen Abschnitts klicken.
Außerdem können Sie in der oberen rechten Ecke:
-
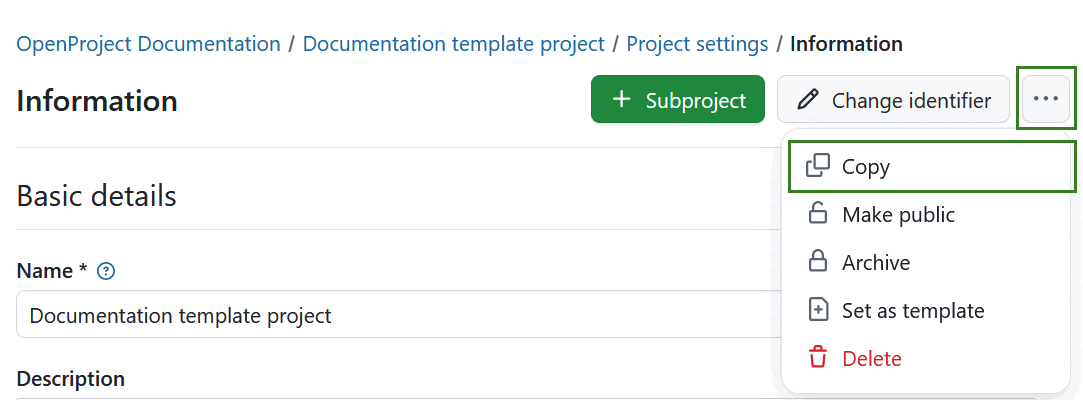
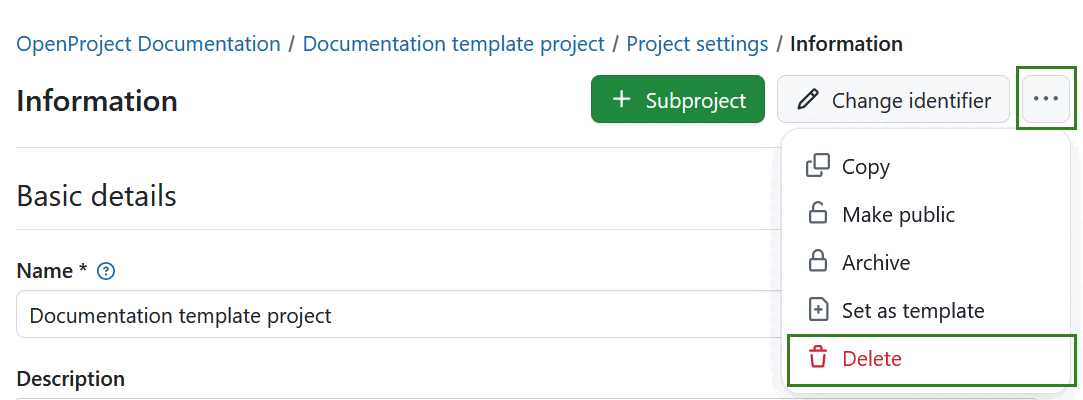
Klicken Sie auf das Mehr (drei Punkte) Symbol, welches ein Dropdown-Menü mit folgenden Optionen öffnet:
Hinweis
Nach der Version 16.0 können die Projektattribute direkt auf der Projektübersichtsseite bearbeitet werden.
Unterprojekte erstellen
Um ein Unterprojekt für ein bestehendes Projekt zu erstellen, navigieren Sie zu den Projekteinstellungen -> Informationen und klicken Sie auf den grünen Button + Unterprojekt.
Folgen Sie dann der Anleitung zur Erstellung eines neuen Projektes.

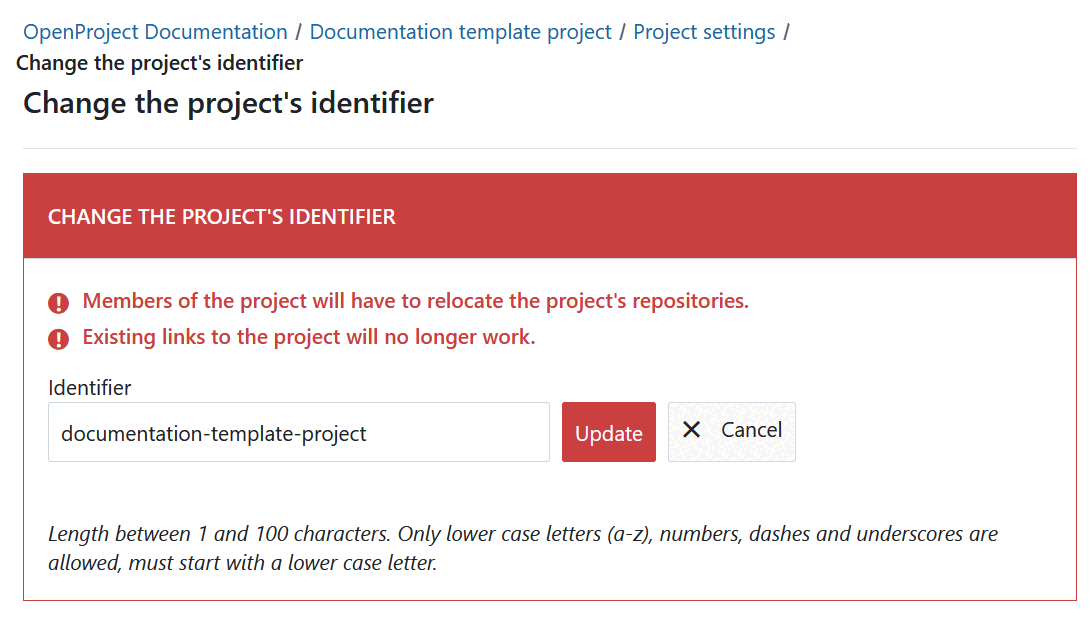
Projektkennung ändern
Eine Projektkennung ist der Teil des Projektnamens, der in der URL angezeigt wird, z. B. /demo-project. Um die Projektkennung zu ändern, navigieren Sie zu den Projekteinstellungen und klicken Sie oben rechts auf die Schaltfläche Kennung ändern.
Anschließend wird das Formular zum Ändern und Speichern der neuen Projektkennung angezeigt.
Warnung
Beachten Sie, dass nach dem Ändern einer Projektkennung die Mitglieder des Projekts die Repositorys des Projekts neu zuordnen müssen.
Bestehende Projektlinks funktionieren dann nicht mehr.
Projekt kopieren
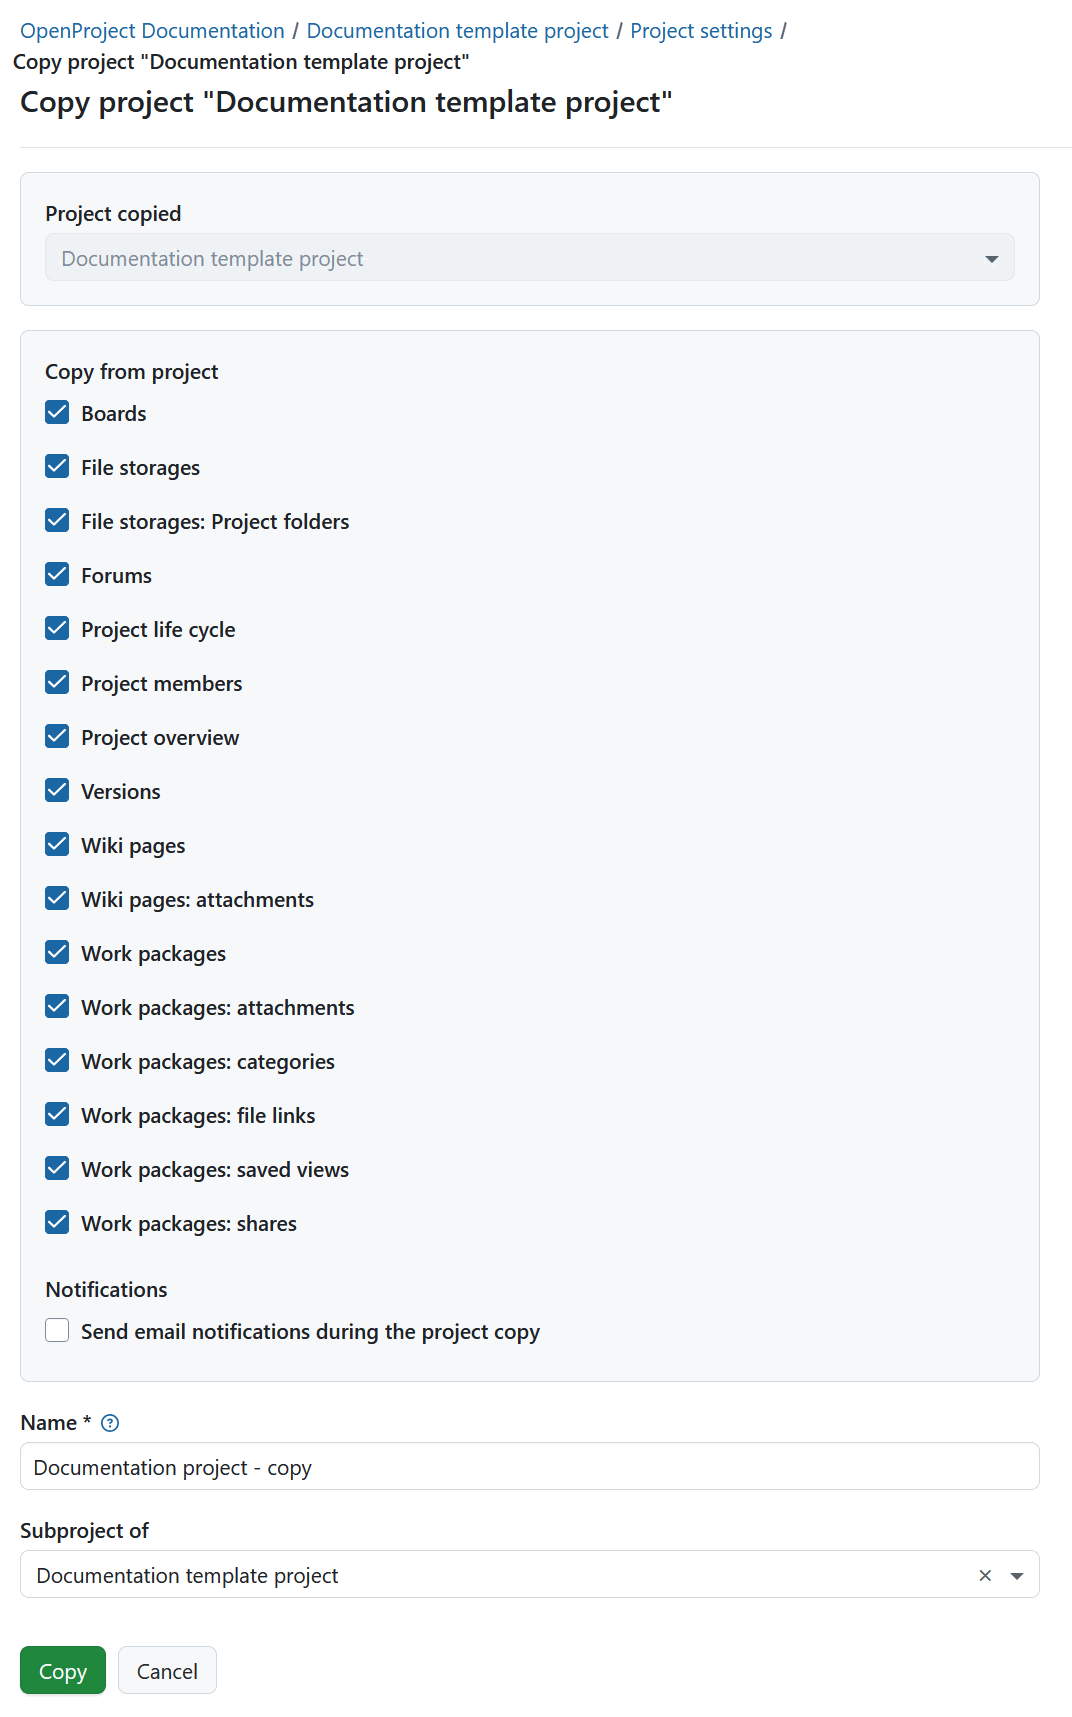
Sie können ein bestehendes Projekt kopieren, indem Sie zu den Projekteinstellungen -> Projektinformation navigieren. Klicken Sie auf das Mehr (drei Punkte) Symbol in der oberen rechten Ecke und Kopieren Sie Kopieren aus dem Dropdown-Menü.
Im Abschnitt Aus Projekt kopieren können Sie auswählen, welche zusätzlichen Projektdaten und Einstellungen, wie Versionen, Arbeitspaketkategorien, Anhänge, Projektlebenszyklus und Projektmitglieder, ebenfalls kopiert werden sollen. Sie können auch vorhandene boards(außer dem Unterprojekt-Board) und die Projekt-Startseite zusammen mit Ihrem Projekt kopieren.
Wählen Sie aus, welche Module und Einstellungen Sie kopieren möchten und ob Sie die Nutzer:innen während des Kopiervorgangs per E-Mail benachrichtigen möchten.
Wichtig
Budgets können nicht kopiert werden, daher müssen sie vorher aus der Arbeitspaket-Tabelle entfernt werden. Alternativ können Sie diese im Budget-Modul löschen und somit auch aus den Arbeitspaketen entfernen.
Hinweis
Die Optionen für die Dateispeicher gelten nur, wenn für das Vorlagenprojekt ein Dateispeicher mit automatisch verwalteten Ordnern aktiviert wurde.
Wenn Sie die Option Dateiablagen: Projektordner wählen, werden sowohl die Ablage als auch die Ablageordner in das neue Projekt kopiert, wenn für die ursprüngliche Dateiablage automatisch verwaltete Projektordner ausgewählt wurden. Bei Speichern mit manuell verwalteten Projektordnern verweist der kopierte Speicher auf denselben Ordner wie das Originalprojekt.
Wenn Sie die Option Dateiablagen: Projektordner deaktivieren, wird der Speicher kopiert, aber es wird kein spezieller Ordner eingerichtet.
Wenn Sie die Option Dateispeicher deaktivieren, werden keine Speicher in das neue Projekt kopiert.
Geben Sie dem neuen Projekt einen Namen und wählen Sie bei Bedarf ein übergeordnetes Projekt.
Klicken Sie auf Kopieren um fortzufahren.
Projekt öffentlich machen
Wenn Sie ein Projekt öffentlich machen möchten, navigieren Sie zu den Projekteinstellungen -> Projektinformationen. Klicken Sie auf das Mehr (drei Punkte) Symbol in der oberen rechten Ecke und wählen Sie Veröffentlichen.
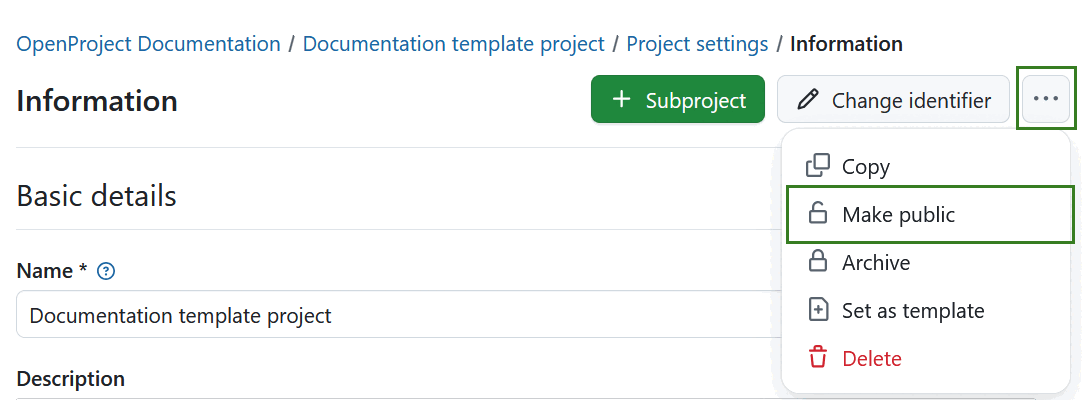
Wenn Sie ein Projekt öffentlich machen, wird es für alle Personen in Ihrer OpenProject Instanz zugänglich sein.
Wichtig
Wenn Ihre Instanz ohne Authentifizierung zugänglich ist wird diese Option das Projekt für die breite Öffentlichkeit außerhalb deiner Instanz sichtbar machen.
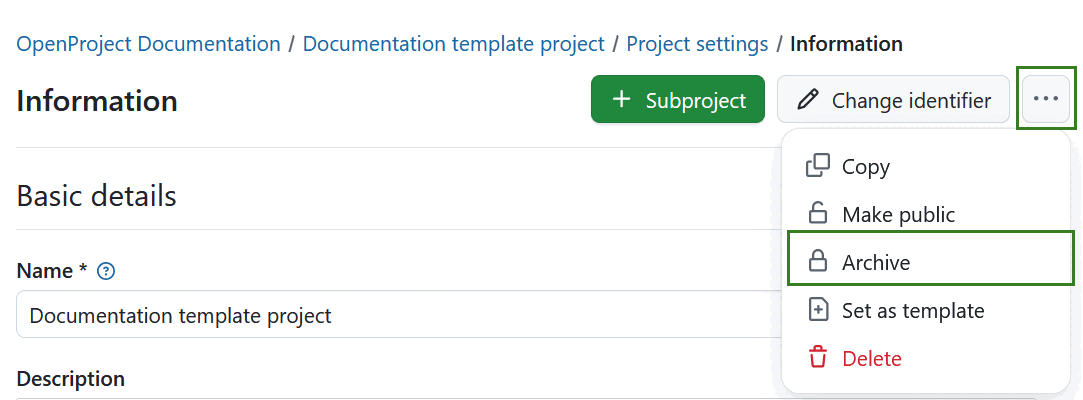
Projekt archivieren
Um ein Projekt zu archivieren, gehen Sie zu den Projekteinstellungen -> Projektinformation. Klicken Sie auf das Mehr (drei Punkte) Symbol in der oberen rechten Ecke und wählen Sie Archivieren.
Hinweis
Diese Option ist immer für Personen mit administrativen Rechten auf der Instanz- oder Projektebene verfügbar. Es kann auch für bestimmte Rollen aktiviert werden, indem die Berechtigung zur Projektarchivierung für diese Rolle über die Einstellungen für Rollen und Berechtigungen in den Administrations-Einstellungen aktiviert wird.
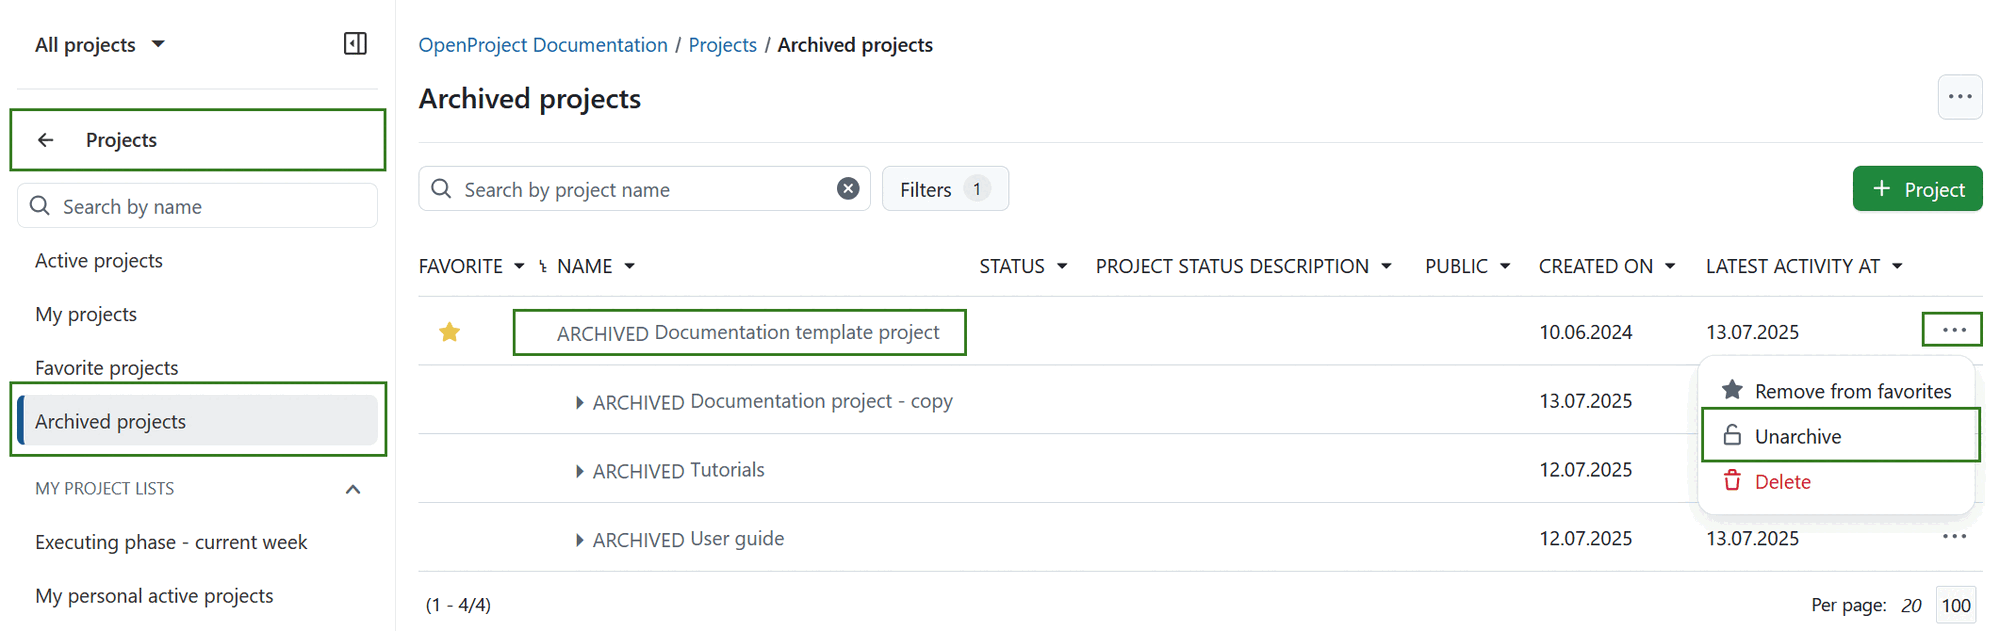
Nach der Archivierung kann ein Projekt nicht mehr aus der Projektliste ausgewählt werden, die über die Kopfzeilennavigation zugänglich ist Es ist weiterhin im Projektlisten- Dashboard sichtbar, wenn Sie den Filter „Aktiv” auf „Aus” setzen (Schieberegler nach links bewegen). Dort können Sie das Projekt auch wieder aus der Archivierung entfernen, indem Sie auf die drei Punkte am rechten Ende einer Zeile klicken und „Entarchivieren” wählen.
Sie können ein Projekt auch direkt auf der Projekt-Startseite archivieren.
Projekthierarchie ändern
Um die Hierarchie des Projekts zu ändern, gehen Sie zu den Projekteinstellungen -> Informationen und ändern Sie das Unterprojekt von im Abschnitt Projektbeziehungen .

Ein Projekt löschen
Wenn Sie ein Projekt löschen möchten, navigieren Sie zu den Projekteinstellungen. Klicken Sie auf die Schaltfläche Projekt löschen oben rechts auf der Seite.
Sie können ein Projekt auch über die Projektübersichtsliste löschen.
Hinweis
Das Löschen von Projekten ist nur für Systemadministratoren verfügbar.